For drilling the topplate I took Scotts setchassislayout.pdf modified it to the real size, printed out a 1:1 template and fixed it on the topplate for drilling and cutting.....very recommendable!!!!!
Only if your transformers have the same cutouts and size!!!!
Where exactly is this pdf posted? Besides Transformer sizes, is everything else standard and re-usable for other projects?
Thanks
I completed my amplifier kit by working on it a couple of hours at each sitting and it probably took about 14 – 16 hours total, which I didn’t think was bad given I couldn’t work on it for long periods each sitting. The instructions were easy to follow and I really didn’t get stuck at any point during the build (just some refreshing my memory on previous pages covered given the time between my build sittings). Voltage measurements all came in really close to Scott’s specifications.
I now have over 400 hours on the amplifier so far with no problems. Part of the 400 hours is because I’ve let it play during the night to break in the Cardas capacitors that a friend thought I would like, instead of the capacitors provided with the kit, given I run a pair of high sensitivity Klipschorn’s with mid-drivers that have beryllium mid-range diaphragms (very detailed and revealing).
My listening has really been only at low to moderate levels and the subjective reviews are not my specialty; however, as I’ve now done a lot of listening to this amplifier, it seems very detailed yet presents a nice level of smoothness. Another way to describe it would be tonally balanced with lots of resolution and great musicality (more modern sound and not the veiled and rolled-off sound of many of the vintage old tube amps).
It has been a great amp to roll the power tubes as I’ve used my Tung-sol solid plate 6550’s, GE 6550A’s, and new issue Genelex KT88s, in addition to the tubes provided in the kit. Given the simplicity of the circuit, I can hear the slightly different sound presentation of each type of tube. IMHO, the amplifier with the 6550’s have a slightly more “tubier” (for lack of a better word) sound with what seems to be slightly more mid-range sweetness, while the KT88’s seem to have more presence in the frequency extremes.
If bass notes in the mid 30 Hz range (Klipschorn’s reasonable low end) are present in the music, the amplifier reproduces the notes with clarity. Most listening has been with blues, rock (60’s, 70’s & 80’s and some modern), jazz and some classical. While the bass listening to Zeppelin, Pink Floyd & Kid Rock has been sufficient for my listening levels, I haven’t tried anything loud and I haven’t tried any of the harder rock electronic deep bass music. However, I suspect I would not 'feel' the bass as with a strong SS amp.
The sound stage and imaging seem fine. Also, the amplifier is extremely quiet and there is really no discernable “hum.”
Other equipment used has been the Klipschorn’s (tractrix flair mid horn/Beryllium mid-driver diaphragms) a Juicy Music Blueberry preamplifier, VPI scout turntable (Grado cartridge), and Rega Saturn CD player.
Attachments

Is this kit auto-biasing? Or is there a knob to adjust and tweak things? Can the be 6550 be a drop-in replacement?
The KT-88 amp I once heard sounded too smooth for my liking. I would be more interested in this kit if I could try rolling other tubes without having to open up the amp. I believe if voltages and bias is not tweaked, we can lose out on frequency extremes with different tubes (given their different requirements)? Is it possible to use beam tetrodes like 6L6 and Kt-66 with this amp after tweaking bias?
Lastly I am complete novice so pardon me if I have made any mistakes in my assumptions.
Thank you
Last edited:
IIs it possible to use beam tetrodes like 6L6 and Kt-66 with this amp after tweaking bias?
After some googling i think not ...
After some googling i think not ...
The circuit is cathode bias. You can use KT88, 6550, EL34, 6CA7 with no modifications necessary. The B+ for this amp is a little high for the 6L6, and not enough current for the KT120. It is a variation of a design by Mikael Abdellah with subsequent modifications by Alex Gendrano, and DIYAudio & AudioKarma.org members. You can see the schematic for this version here: http://www.diyaudio.com/forums/tubes-valves/175786-kt88-se-complete-kit-13.html at post #126.
progress update
Thought I'd send a progress update on my tube amp project. This is my first time at an amp, so I'm not setting any speed records.")
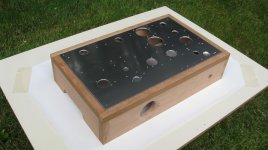
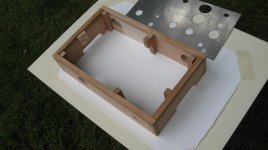
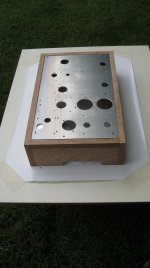
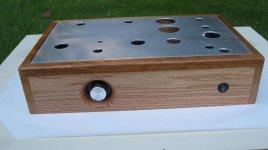
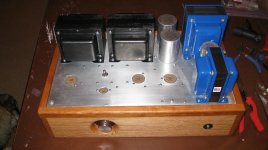
Here are a few shots of the chassis complete in its raw form. Still need to do the finishing work before mounting everything and doing the wiring.
Wooden base is oak and cherry construction to match my speakers. The top plate fits in the frame, with the supports set down 1/8", so that the plate is flush at the top.
Instead of mounting feet, I decided to cut a hand hold on each side. They are indeed centered -- near the center of gravity -- which is offset mainly by the transformers to be mounted along the back.
Going through all of the details (so far!) has been tedious and laborious, but now that it's all to this point, it's nice to step back, take a breath, and enjoy. Anxious to get it all together.
More pic's as progress is made.
Thought I'd send a progress update on my tube amp project. This is my first time at an amp, so I'm not setting any speed records.
Here are a few shots of the chassis complete in its raw form. Still need to do the finishing work before mounting everything and doing the wiring.
Wooden base is oak and cherry construction to match my speakers. The top plate fits in the frame, with the supports set down 1/8", so that the plate is flush at the top.
Instead of mounting feet, I decided to cut a hand hold on each side. They are indeed centered -- near the center of gravity -- which is offset mainly by the transformers to be mounted along the back.
Going through all of the details (so far!) has been tedious and laborious, but now that it's all to this point, it's nice to step back, take a breath, and enjoy. Anxious to get it all together.
More pic's as progress is made.
Attachments
More progress . . .
The wood base is finished, and the top plate is finished with a clear acrylic coat. The oak and cherry base was finished with (natural) Danish oil, and coated with a furniture wax for a low gloss.
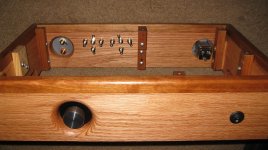
The volume control is mounted on a piece of sheet metal on the inside of the wooden frame. The through hole is cut with some clearance, and finished with a generous roundover for my fat fingers. Of course, the wood grain is more interesting around the flared opening as well.
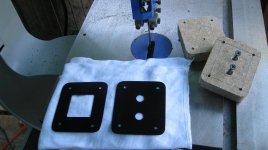
Figured out how to make the rear mounting plates with a nice finished look. One is for the electrical power jack, and the other is for the RCA-type (L&R) input jacks.
The sheet metal was clamped in place between the 3/4" particle board blocks. I cut the blocks out on the table saw, then ran the corners through a roundover bit on the router. This technique provided a good way to cut the sheet metal with the band saw, as well as final filing down to the wood edges. It also made for a nice drill block for the 4 corner screws.
After priming and painting, I thought the plates came out pretty good. The topcoat is satin black.
more later . . .
The wood base is finished, and the top plate is finished with a clear acrylic coat. The oak and cherry base was finished with (natural) Danish oil, and coated with a furniture wax for a low gloss.
The volume control is mounted on a piece of sheet metal on the inside of the wooden frame. The through hole is cut with some clearance, and finished with a generous roundover for my fat fingers.
Of course, the wood grain is more interesting around the flared opening as well. Figured out how to make the rear mounting plates with a nice finished look. One is for the electrical power jack, and the other is for the RCA-type (L&R) input jacks.
The sheet metal was clamped in place between the 3/4" particle board blocks. I cut the blocks out on the table saw, then ran the corners through a roundover bit on the router. This technique provided a good way to cut the sheet metal with the band saw, as well as final filing down to the wood edges. It also made for a nice drill block for the 4 corner screws.
After priming and painting, I thought the plates came out pretty good. The topcoat is satin black.
more later . . .
Attachments
just a clarification to post #50. (someone was confused, and thought others might be too)
Only the wood blocks were cut on the table saw and radiused corners on the router.
An over-sized piece of sheet metal was clamped between the finished blocks. The metal only was cut down on the band saw, and then filed down flush to the wood.
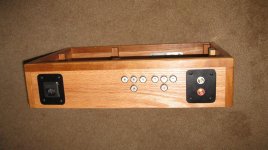
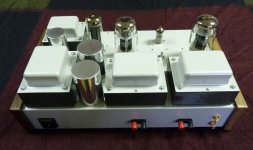
A couple shots with the input and output hardware on the back. I'm using different output transformers with 4,8,and 16 ohm taps (hence the "T" arrangement for the binding posts).
Now on with the wiring.
Only the wood blocks were cut on the table saw and radiused corners on the router.
An over-sized piece of sheet metal was clamped between the finished blocks. The metal only was cut down on the band saw, and then filed down flush to the wood.
A couple shots with the input and output hardware on the back. I'm using different output transformers with 4,8,and 16 ohm taps (hence the "T" arrangement for the binding posts).
Now on with the wiring.
Attachments
Last edited:
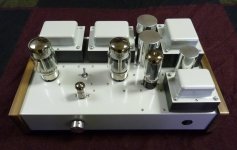
This amp is now available for purchase fully built and tested, on request, at the price listed and as shown in the photos. Other RAL colors are optionally available for the chassis and transformer covers at an additional charge.
If you are interested please send a PM. If you are in the NYC area you are welcome to audition the amp in person.
Specifications:
Output Power:
5 +/- Watt/Channel RMS Triode Mode (6 Ohm Load with KT88)
10 +/- Watt/Channel RMS Ultra-Linear Mode (6 Ohm Load with KT88)
Input Sensitivity: 1V RMS
Frequency Response: 30Hz ~ 20,000Hz -1dB, 20Hz ~ 22,000Hz -3dB
Hum & Noise: 1 mV RMS
Output Transformer: 5000 Ohm Primary, 6 Ohm Secondary
Recommended Speakers: 4 ~ 8 Ohms, > 89dB 1W/1m
Dimensions: 18"W X 11.5"D X 8.5"H
Weight: 32.5 lbs.
Price: $1,149.00
Estimated shipping cost: to Los Angeles $100, to Chicago $70.00
If you are interested please send a PM. If you are in the NYC area you are welcome to audition the amp in person.
- Triode or Ultra-Linear Operation - Switchable
- Supplied with Electro-Harmonix KT88 Output Tubes, NOS Russian 6N1P-EV Driver, & Electro-Harmonix 5U4GB Rectifier
- Output Tube Compatibilty: KT88, 6550, EL34, 6CA7 - no changes required
- Custom Transformers & Power Supply Choke - Made in USA
- Independent LC Plate Supply Filters for Each Channel of Driver Tube
- No Feedback
- No Semiconductors
- Hand-Wired, Fully Tested
- All Vishay-Dale Metal Film Resistors except Dale Wirewound for Output Tube Cathode Resistor & Chassis Ground Filter
- Metallized Polypropylene/Oil Power Supply Capacitors
- Elna Silmic II Output & Driver Tube Cathode Bypass Capacitors
- Erse Pulse X Metallized Polypropylene Coupling Capacitors
- Alps Blue Velvet Input Attenuator - 100K
- Pomona 5-Way Speaker Binding Posts
- High-Quality Belton Micalex Tube Sockets
- IEC EMI/RFI Filtered Power Entry Module w/Integral Fuse Holder
- Powder-Coated Chassis and Transformer Covers - Color: RAL9006
Specifications:
Output Power:
5 +/- Watt/Channel RMS Triode Mode (6 Ohm Load with KT88)
10 +/- Watt/Channel RMS Ultra-Linear Mode (6 Ohm Load with KT88)
Input Sensitivity: 1V RMS
Frequency Response: 30Hz ~ 20,000Hz -1dB, 20Hz ~ 22,000Hz -3dB
Hum & Noise: 1 mV RMS
Output Transformer: 5000 Ohm Primary, 6 Ohm Secondary
Recommended Speakers: 4 ~ 8 Ohms, > 89dB 1W/1m
Dimensions: 18"W X 11.5"D X 8.5"H
Weight: 32.5 lbs.
Price: $1,149.00
Estimated shipping cost: to Los Angeles $100, to Chicago $70.00
Attachments
If you have been on the fence as to which SE tube amplifier to build, as a kit, or to buy as a complete unit, this amplifier will more than provide complete auditory satisfaction. You will hear details in your favorite music that you have never heard before.
The careful attention to detail and superior components selected for this amp will provide a sensational listening experience.
The fully built amp is available in any color or finish that you desire.
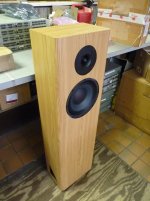
High-sensitivity loudspeakers that complement the outstanding sound quality of this amplifier are also available. The loudspeakers, designed specifically for SE amps, provide unparalleled live two-channel music reproduction and are of a contemporary tower design.
You are welcome to audition these components at your convenience.
Scott
The careful attention to detail and superior components selected for this amp will provide a sensational listening experience.
The fully built amp is available in any color or finish that you desire.
High-sensitivity loudspeakers that complement the outstanding sound quality of this amplifier are also available. The loudspeakers, designed specifically for SE amps, provide unparalleled live two-channel music reproduction and are of a contemporary tower design.
You are welcome to audition these components at your convenience.
Scott
Attachments
I purchased a fully built unit from Scott and couldn't be happier. The amp is beautifully finished (my girlfriend called in an objet d' art) with lots of gray powder coating and polished caps, but most importantly is sounds fabulous - clear as a bell in both triode and UL mode, with full extension at both extremes using medium-high efficiency Klipsch and Reference 3A bookshelf speakers. It sounds very close to my tube powered HiFi-Man phones (with HFM tube amp) and also close to my AN 300B amp - the best I have heard to date. (Not surprisingly, it wouldn't drive Martin-Logan ES speakers very well.) It beats any number of rebuilt vintage PP amps I have around, including the EICO HF-81.
I will try to do a longer post on this product, but for now I will just say that Scott is modest in his description of the sound of this solidly-built and modestly priced amp. The proof is in the pudding: I probably will buy another one for my bedroom system.
I will try to do a longer post on this product, but for now I will just say that Scott is modest in his description of the sound of this solidly-built and modestly priced amp. The proof is in the pudding: I probably will buy another one for my bedroom system.
Hope everyone's had a nice Christmas, time to enjoy family and friends . . . and maybe some time off!
Finally . . . got some of my own time during the Holiday break to finish this project!!! Things got busy by the end of the summer both at work and at home . . . so it goes.
Yesterday I pulled out the pieces and started in again. Thought I'd post a couple of pic's of where I left off today. Should be mostly done tomorrow and ready to crank it up soon.
Attachments
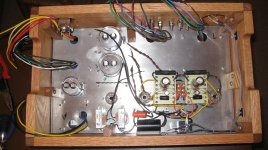
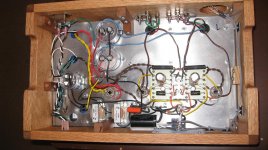
Wiring is done. Yippee!!!

Testing tomorrow, and hopefully some break-in tomorrow night.
I've built many speakers, but this was my first amp build. It took me a little longer than others have mentioned, but the kit instructions are very detailed and complete. I'd guess it took me around 25 or 30 hours total for the wiring. The quality of the parts and the packaging was top notch.
Update tomorrow after testing. Really anxious to hear my speakers with this amp pushing them.
Here's a picture of the completed wiring.
Attachments
Wiring is done. Yippee!!!
Testing tomorrow, and hopefully some break-in tomorrow night.
I've built many speakers, but this was my first amp build. It took me a little longer than others have mentioned, but the kit instructions are very detailed and complete. I'd guess it took me around 25 or 30 hours total for the wiring. The quality of the parts and the packaging was top notch.
Update tomorrow after testing. Really anxious to hear my speakers with this amp pushing them.
Here's a picture of the completed wiring.
Dave,
When's the party?
I bet that it will sound very nice and look forward to hearing it with your matching 2-way speakers.
Best Regards,
Terry
Dave,
When's the party?
Best Regards,
Terry
Come on up tomorrow. You're all invited. Take the second right turn just past the old gray mule scratching his rear end on the dead oak tree. Go a half mile past the second section line you see. If the gravel road turns to dirt, you've gone too far.
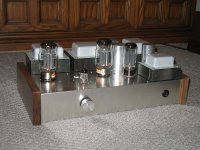
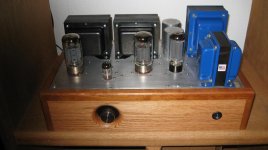
The amp tested out fine, and I've had them hooked up for a couple of hours this evening.
I hooked them up to a nice little bookshelf pair and noticed immediately how detailed the sound was. The upright bass sounded very detailed, and had a nice presence.
One other thing that I noticed was how impressively quiet this amp is. Very nice provisions in the design to accomplish that.
I need to check them out for a few days before I give a more detailed review, but for now, I am very pleased with what I hear. This amp is a very good choice, and well worth it, in my opinion.
Here's a picture of it up and running. Yes, they glow!
Attachments
Come on up tomorrow. You're all invited. Take the second right turn just past the old gray mule scratching his rear end on the dead oak tree. Go a half mile past the second section line you see. If the gravel road turns to dirt, you've gone too far.
Although it's awfully early, I'll try to be there around 1:00 (PM).
Here's a picture of it up and running. Yes, they glow!
Look Igor!........It's alive!
Best Regards,
Terry
- Status
- This old topic is closed. If you want to reopen this topic, contact a moderator using the "Report Post" button.
- Home
- Vendor's Bazaar
- KT88 SE Basic or Master Kit