OK - that's reassuring! It is easier to use register 10 than both 22 and 23!in botic6 with enabled i2c control of es9018 within kernel driver the dac will be muted (by using mute flag in that register) everytime
I have to figure out how to integrate control of multiple DACs into ALSA control system.
Me too! When I want to use headphones I only need 2 channels with 1 DAC. So what I have been doing is using a script to a) cp a 2 channel version of the Alsa configuration file to asound.conf, then b) execute aplay -L, then c) kill and restart squeezelite. I do the same procedure using an 8 channel Alsa crossover configuration to change back to speaker output. I think there must be a better way!
Thanks for your dedication!
Frank
but I have to figure out how to integrate control of multiple DACs into ALSA control system.
...silly of me - it was too late at night...
I confirmed today that all of the relevant plugins can live in the same asound.conf file, as long as they have separate names/pathways from input to output. So in my easy case with all Buffalo DACs, I send squeezelite output to 'default' for 6 channels and I send it to the 'phones' plugin for 2 channels. That way, the control script to go between speaker vs. headphone configurations only needs to kill squeezelite and restart it with a different '-o' parameter.
")
Though I imagine you (Miero) are contemplating a far broader range of compatibility issues... If there is any way I can help, please let me know.
Code:
root@botic:/etc# aplay -L
null
    Discard all samples (playback) or generate zero samples (capture)
pulse
    PulseAudio Sound Server
filter1
delay
speaker
t-table8
default
phones
t-table2
sysdefault:CARD=Botic
    Botic,
    Default Audio Device
dmix:CARD=Botic,DEV=0
    Botic,
    Direct sample mixing device
dsnoop:CARD=Botic,DEV=0
    Botic,
    Direct sample snooping device
hw:CARD=Botic,DEV=0
    Botic,
    Direct hardware device without any conversions
plughw:CARD=Botic,DEV=0
    Botic,
    Hardware device with all software conversions
root@botic:/etc# squeezelite -z -o phones -a 8192:2048::0Good performance using NetIO for BBB control
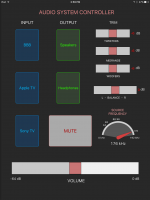
I have been pounding away with Python and now have a very decent remote system controller running on my iPad. In terms of the BBB, it uses a combination of GPIO controls/interrupts, I2C from both shell and python scripts, and the NetIO system using a python TCP server on the BBB. There are a couple of inputs (spdif sources) that must await Botic 6, but with luck they will incorporate easily. I hope to run them through the BBB rather than directly to one BuffaloIIIse because the BBB is also running a 3-way non-resampling LADSPA crossover. This explains the ability to trim each stereo Buffalo to shape the driver responses. While i was at it - making an old-school preamp at 48 bits - I threw in a left/right balance control.
Several posts back are photos of the DACs and unfinished BBB case. I'm updating just to show the finished (2.5"X11") BBB faceplate with momentary buttons for 'manual' control (via GPIO). The buttons launch the same scripts as the input/output buttons in the tablet controller. My favorite little gizmo? the sample rate "speedometer"! At 176kHz it was playing vintage Brubeck.
The code to integrate the system all works but is a bit rough because I am not a programmer! I would like to have it reviewed by somebody knowledgable in Python. Best to optimize it, because it is now using subprocess calls with shell=True. I will post when that process is complete. If others will use the code, better to adhere to 'best practices' as much as possible. It is my intention to make all of this freely available because, when you start digging, the NetIO documentation is pretty sketchy.
This effort only builds peripherally on the fundamental expertise and, I would say, passion of Miero, Russ, and Brian. I have said before that I think these headless clock-switching systems have a good bit of room for development remaining. I look very much forward to seeing what is in store in Botic 6. "Recording", hopefully!!!
Best,
Frank
I have been pounding away with Python and now have a very decent remote system controller running on my iPad. In terms of the BBB, it uses a combination of GPIO controls/interrupts, I2C from both shell and python scripts, and the NetIO system using a python TCP server on the BBB. There are a couple of inputs (spdif sources) that must await Botic 6, but with luck they will incorporate easily. I hope to run them through the BBB rather than directly to one BuffaloIIIse because the BBB is also running a 3-way non-resampling LADSPA crossover. This explains the ability to trim each stereo Buffalo to shape the driver responses. While i was at it - making an old-school preamp at 48 bits - I threw in a left/right balance control.
Several posts back are photos of the DACs and unfinished BBB case. I'm updating just to show the finished (2.5"X11") BBB faceplate with momentary buttons for 'manual' control (via GPIO). The buttons launch the same scripts as the input/output buttons in the tablet controller. My favorite little gizmo? the sample rate "speedometer"!
At 176kHz it was playing vintage Brubeck.The code to integrate the system all works but is a bit rough because I am not a programmer! I would like to have it reviewed by somebody knowledgable in Python. Best to optimize it, because it is now using subprocess calls with shell=True. I will post when that process is complete. If others will use the code, better to adhere to 'best practices' as much as possible. It is my intention to make all of this freely available because, when you start digging, the NetIO documentation is pretty sketchy.
This effort only builds peripherally on the fundamental expertise and, I would say, passion of Miero, Russ, and Brian. I have said before that I think these headless clock-switching systems have a good bit of room for development remaining. I look very much forward to seeing what is in store in Botic 6. "Recording", hopefully!!!
Best,
Frank
Attachments
Thanks @Kaskade. There is plenty of room for expanding these methods and making them suit others' individual systems. One thing that occurs to me is expanding the server to listen on more than one TCP port. For example, Squeezelite can be controlled from several sources at once. It would be nice if each could have volume control via TCP. ...but first I will work on cleaning up the existing Python code for sharing...
Here is a fantastic tip for BBB tinkerers:
Unbrick BeagleBone Black without erasing eMMC | Hipstercircuits
As written, it mounts the eMMC after booting from the uSD card. If you want to go the other way, change 'mmcblk0p2' to 'mmcblk1p2'. I used it to undo a flub and it saved me many hours.
Unbrick BeagleBone Black without erasing eMMC | Hipstercircuits
As written, it mounts the eMMC after booting from the uSD card. If you want to go the other way, change 'mmcblk0p2' to 'mmcblk1p2'. I used it to undo a flub and it saved me many hours.
I showed the python controller script to a friend with significant Python saavy. He felt the code was good to share with the caveat that the TCP ports it opens are not very secure. I use wired internet for my BBB, so i have no qualms considering my other firewalls. I doubt that the "keys to the palace" can be found loaded into our Audio BBBs, but I would think about network security if I used this script via wifi in a crowded digital environment!
I have moved to GitHub to distribute code: https://github.com/francolargo/BBB-audio/tree/master
The server that runs on the BBB is 'netio_server.py' and the controller file to upload to a Netio account is 'BBB_iPad'. I am not done tinkering and learning so I will keep the GitHub code up to date, with descriptions and comments here. I'd like an iPhone version that can run concurrently but its priority is low right now.
Cheers,
Frank
One frustration I have faced with the netio_server.py script is that I can only launch it from the command line in Botic. On the command line several of the usual syntaxes work well. However, none of them work if included in /etc/rc.local (even though a different python script does launch reliably from rc.local). Also, I have tried creating an init.d script and none of the 'stock' formats will launch this TCP server. I don't know what I need to learn. Any suggestions from anybody?
Thanks Miero, I will look into it tonight.
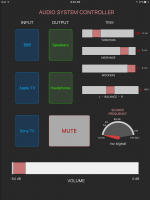
For now, things fell into place and I have two TCP ports working simultaneously in netio_server.py. Thus, I can control BBB from both iPad and iPhone simultaneously. Here is a screenshot of the current iPhone control panel. iPhone 6S is a little tricky compared to iPad because the finger pressure has to be correct.
For now, things fell into place and I have two TCP ports working simultaneously in netio_server.py. Thus, I can control BBB from both iPad and iPhone simultaneously. Here is a screenshot of the current iPhone control panel. iPhone 6S is a little tricky compared to iPad because the finger pressure has to be correct.
Attachments
probably some console dependency ... standard input or output
try to execute it following way: nohup /path/to/script/netio_server.py
this should redirect output to file nohup.out ... check its content if it started correctly
Thanks Meiro! Nohup was a definite help! I was hoping to start two python scripts from within etc/rc.local. The first script manages the front panel inputs to my BBB and would always start no problem. I finally discovered that if I commented that out, then with nohup I could instead start the TCP server script from rc.local. No matter what I tried, I could not make rc.local start BOTH python scripts. So to solve the dilemma, I simply call the server script from within the button input script, and both run fine without an SSH shell open on the BBB.
Now I am satisfied with how the system is working, though I know the code could be improved. I need to do some high WAF cabinetry to hold everything. [At least in that I know what I'm doing!
] Then when Botic 6 is ready, I can finalize the management of SPDIF inputs to BBB. Most of the current code is at GitHub: https://github.com/francolargo/BBB-audio/tree/masterAll the best!
Frank
Thanks Miero,
I was hoping to use 'recording' for I2S input to the BBB. That way, the LADSPA crossover filters it runs can be available to other sources in addition to what comes internally from BBB itself. I will use it for video, and understand that recording will probably not adapt sample rates to the incoming signal. I don't mind that. I have a WM8804 to convert spdif->I2S and it could run as master or slave. My hope was to use control scripts to switch BBB configurations to anything that would work to filter external I2S. I would probably use Ecasound to get started.
If that goal seems impossible after some time, then 'plan B' is to switch SPDIF directly into a Buffalo and bypass the BBB. But that likely means 2 channels only, so no woofers (nor LFE) for video.
I am not in a rush. For now, the 'high WAF' cabinetry I have planned includes a rack console and 4 new speaker enclosures. If recording is working, I'd be happy to try it any time. But I really must make progress in the wood shop as well. ...and now Holiday distractions are upon us!
Very best holiday cheer,
Frank
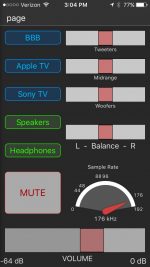
I have been testing and tweaking my 'preamp' functions in the Netio remote control for BBB/Botic. I find that the individual level adjustments for tweeters, midrange, and woofers are very convenient! I frequently make small adjustments to please the ear. Thus, on the remote control screen I made those trim sliders larger for easier access (example photo below). In addition I improved their function. Previously, each trim slider attenuated via an individual DAC master volume register, using absolute volume units of .5 dB. Things got messy at low overall volume settings where negative numbers sent to the es9018 are treated as positive.
Now the trim functions work as a fixed percentage of attenuation from the master volume setting for each of the DACs, so a master volume value of 0 (-64 dB) has no trim applied. This is now in the python script that is available on GitHub: https://github.com/francolargo/BBB-audio/blob/master/netio_server.py
...just a reminder: this remains a 'work in progress'...
Attachments
I have been testing and tweaking my 'preamp' functions in the Netio remote control for BBB/Botic. I find that the individual level adjustments for tweeters, midrange, and woofers are very convenient! I frequently make small adjustments to please the ear. Thus, on the remote control screen I made those trim sliders larger for easier access (example photo below). In addition I improved their function. Previously, each trim slider attenuated via an individual DAC master volume register, using absolute volume units of .5 dB. Things got messy at low overall volume settings where negative numbers sent to the es9018 are treated as positive.
Now the trim functions work as a fixed percentage of attenuation from the master volume setting for each of the DACs, so a master volume value of 0 (-64 dB) has no trim applied. This is now in the python script that is available on GitHub: https://github.com/francolargo/BBB-audio/blob/master/netio_server.py
...just a reminder: this remains a 'work in progress'...
Sweet, Great work
Cool work!
Are you able to share some details on how you power up the bbb and reset it? Do you have power and reset buttons in place?
I'm also curious to learn which tactile switches with button caps you use? Or do you not use any because you are remotely controlling the device?
My bbb is still in my dac in dev mode, so the WAF factor isn't very high but i'm contemplating how i can integrate the bbb nicely in my chassis whilst still allowing to see the status of the device.
My thinking is that i would need:
- bbb pwr led
- bbb pw button
- bbb reset button
- hermes enable led
Looking forward to your thoughts!
Cool work!
Are you able to share some details on how you power up the bbb and reset it? Do you have power and reset buttons in place?
I'm also curious to learn which tactile switches with button caps you use? Or do you not use any because you are remotely controlling the device?
My bbb is still in my dac in dev mode, so the WAF factor isn't very high but i'm contemplating how i can integrate the bbb nicely in my chassis whilst still allowing to see the status of the device.
My thinking is that i would need:
- bbb pwr led
- bbb pw button
- bbb reset button
- hermes enable led
Looking forward to your thoughts!
Greetings, and I'm glad to offer whatever experience might help.
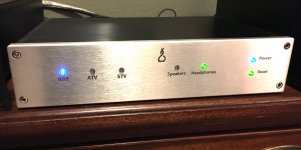
A quick overview - my build involves 3 DACs so it was most practical to separate the BBB/Hermes/Cronus from the DACs using the Teleporter modules. I also hoped to incorporate inputs from optical SPDIF appliances - that objective is waiting for further advances in the Botic system. In this context, I chose to include 'manual' controls on the chassis in addition to the software-based controls. If you look at the small chassis pictured in post #23, each of the momentary buttons is also an LED. [source] The LED function is independent of the switch function.
Each of the 4 functions you indicated are easy to implement. The power and reset momentary buttons are simply wired into the appropriate .1" headers on Hermes (they are labeled J_P_SW and J_RST respectively). The LED indicators are fed by the EN and "1" LED driver connections. This setup requires no special software - Russ, Brian and Miero did the work for us!
As for power, I do have separate switches on the AC inputs to the built-in power 2A switched and 5v linear supplies for the BBB and Cronus. Sometimes I like to power the BBB even when the DACs are not in use - convenient for development work etc. The NetIO remote control is not capable of powering up the BBB, so the 'manual' power button is useful.
Convenient though the lit momentary switches are to use, they are a bit of a pain to wire up because their contacts don't easily fit 0.1" perf board spacing. If you look farther back in this thread you will see the mounting boards I etched in order to make the front panel switches work cleanly. I'm sure that simpler options exist. The 10mm-thick front panel required to be milled in order for the switches to protrude an optimal amount. BTW, the front panel lettering was laser etched at a trophy shop.
Feel free to ask more questions, try out ideas, etc. ...and post pictures!
Best,
Frank
Hi Frank,
Thanks for your elaboration!
My current DAC is running on a microcontroller based firmware controller (with OLED display, IR receiver and rotary encoder). The front panel was milled specifically for that setup.
This means I'll probably make a new front panel once the BBB is integrated decently.
Just a few more questions to get more clarification on your build:
I need to create a schematic and then prepare a breadboard for testing on my end. My ES9016 dac contains a relay to control SPDIF and Mute that need to be set-up correctly in order for the whole thing to work.
Once i've made progress I'll definitely post pictures.
One other 'big' thing that I'm currently still researching on to what extent it will be possible to use my HD44780 OLED display to also display information while the BBB is booting. Ideally it would display a status text like "booting" but also for allow an IP address to be set.
Thanks for your elaboration!
My current DAC is running on a microcontroller based firmware controller (with OLED display, IR receiver and rotary encoder). The front panel was milled specifically for that setup.
This means I'll probably make a new front panel once the BBB is integrated decently.
Just a few more questions to get more clarification on your build:
- You mention "The LED indicators are fed by the EN and "1" LED driver connections": do you mean that you've soldered these leds to those places where normally the row of four green leds go on the Hermes? Or have you found separate header locations for these?
- You also mention that you have separate AC switches for both the BBB and Cronus. This makes sense, but I assume these only serve to bluntly cut AC power away from the power supplies? Once AC power is being fed to the power supplies I assume you can use your 'normal' power button connected to Hermes to power up the BBB?
I need to create a schematic and then prepare a breadboard for testing on my end. My ES9016 dac contains a relay to control SPDIF and Mute that need to be set-up correctly in order for the whole thing to work.
Once i've made progress I'll definitely post pictures.
One other 'big' thing that I'm currently still researching on to what extent it will be possible to use my HD44780 OLED display to also display information while the BBB is booting. Ideally it would display a status text like "booting" but also for allow an IP address to be set.
Just a few more questions to get more clarification on your build:
- You mention "The LED indicators are fed by the EN and "1" LED driver connections": do you mean that you've soldered these leds to those places where normally the row of four green leds go on the Hermes? Or have you found separate header locations for these?
On Hermes I simply desoldered the two on-board LEDs and installed pin headers. Then ran the wire out to the front panel. The advantage of using the Hermes on-board connections is that most LEDs will draw too much current if connected directly to the BBB header, which is controlling when they are lit. But the EN and 1-3 sources are obviously safe. [My experience running LEDs via other BBB pins generated posts 2-5 in this thread.]
- You also mention that you have separate AC switches for both the BBB and Cronus. This makes sense, but I assume these only serve to bluntly cut AC power away from the power supplies? Once AC power is being fed to the power supplies I assume you can use your 'normal' power button connected to Hermes to power up the BBB?
Correct. When all is off, energizing the 5v power supply to the BBB also starts the boot cycle. Occasionally, when testing new settings, I find that a simple reset doesn't fully recycle the system and a cold restart is needed. So having both reset and power buttons has helped me.
One other 'big' thing that I'm currently still researching on to what extent it will be possible to use my HD44780 OLED display to also display information while the BBB is booting. Ideally it would display a status text like "booting" but also for allow an IP address to be set.
I imagine that it is very doable if the 'firmware' that runs the DAC micro controller is open source, or if the OLED display has unused controls that could interface to the BBB. Like brightness, background color, etc... Perhaps there are non-text ways to indicate 'BBB ready'? In my setup, that is indicated by the lighting of the front panel 'source' and 'output' LEDs.
Frank, this is just marvelous. I am understanding only 10% of how you did it, but got to learn this as a complete digital chain incl. crossover would be my dream as well. I have now first to bet my normal setup working and than will follow your example. THX for the effort to share.
- Status
- This old topic is closed. If you want to reopen this topic, contact a moderator using the "Report Post" button.
- Home
- More Vendors...
- Twisted Pear
- Control of BBB-based audio appliances