For the last nearly 20 years I have dreamed about building an SET tube amp. It started in highschool, where I drooled over kits that I could buy and simply just build from detailed instructions since I had no electrical/electronics experience. I did build a Forepay pre right out of highschool, which I enjoyed building and listening to for years. I looked forward to building a 2A3 SET amp to mate it with. Of course relationships got in the way of funding, then marriage, kids, etc, etc...
Anyhow, I said “now or never. It is time to build something!” After searching around I came across Hagerman’s write up and thought this is excellent! there is a schematic, a parts list with part numbers, general information, I can do this. I ordered the small parts like sockets, plug, fuse holder, binding posts, inputs, etc., to lay it all out on the chassis. I liked how the amp was designed from parts that were accessible from one single supplier, however this meant being locked into those prices. Like many others, I’m sure, I am on a “budget” there is no cap per say, but I can’t set the wife alert off... I decided to go ahead and order the transformers through Edcor regardless of the bizarre 8 week build time.
The Hagerman Clarion Article
Fast forward to now: I received my Edcor high and low voltage and output transformer on Saturday. I am pleased I went that route, these helped my “budget” and will also look good. FYI their site says 8 weeks, but I received them in about 3.
As of today the chassis is mostly machined, I am drilling/machining it as the actual parts come in to ensure proper fitment. I will find a way to post up some photos soon. The only things left to machine are the power switch, volume pots, the necessary lamps, and mounting the chokes inside the chassis. That all is the easy part for me. The hard part, for me, is yet to come.
I started inquiring on the post Hagtech Clarion 2A3 SET I felt it would be better suited for me to start a thread of my own, for my own build. Where I can ask around for advice on my particular build instead of a 11 year old treat that has been silent since 2015
That is my back story, I hope some of you are willing and able to help me out along the way to complete this project of mine.
Just wondering, which Edcor transformer model did you choose to replace the EBT-3? What speakers do you plan to drive the amp with?
Power transformer: xpwr179
Output transformer: gxse10-35k
Low voltage: lvp25-3
For the time being I will be powering my Fostex FE167E’s. Once this project is complete, I plan to build myself a set of backloaded horns. Suggestions welcome!
Last edited:
Good to know about edcor. I need to rush a few projects along lol.
I was pleasantly surprised to see them arrive that early! Mentally I had prepared myself for 4 to 6 weeks.
I was not aware of the board, thanks for the heads up! I will have to check it out.
I’ll try sharing just a couple photos of the amp in its current state:
#1 my Google photos - the Apple-Fire
#2 my Google photos - the Apple-Fire
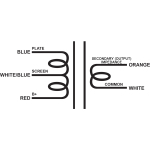
I have a question with the Edcor GSXE10-8-3.5K output transformer. It has a white/blue wire labeled as “screen”. You can see the printed label is visible in one of the above photos. I do not have any idea where this would be utilized. From some of the reading/research that I did I THINK what I understood is that it is not used in a SE Triode setup like the clarion design. Can anyone confirm this or explain its purpose/use.
Quick funny story... the other night I am mounting the two 2.5v transformers on the underside of the chassis and my 4 year old daughter walks over and asks “Daddy, what are you doing? What is this?” As she points to the amplifier. So I reply “it is a amplifier that daddy is building.” She immediately runs off to tell her older brother (6yo) “daddy is building an apple-fire!” It was the cutest thing ever. Needless to say I think I need to have a custom made emblem made up for it saying “The Apple-Fire”. Anyone know where to have custom emblems made up?")
I’ll try sharing just a couple photos of the amp in its current state:
#1 my Google photos - the Apple-Fire
#2 my Google photos - the Apple-Fire
I have a question with the Edcor GSXE10-8-3.5K output transformer. It has a white/blue wire labeled as “screen”. You can see the printed label is visible in one of the above photos. I do not have any idea where this would be utilized. From some of the reading/research that I did I THINK what I understood is that it is not used in a SE Triode setup like the clarion design. Can anyone confirm this or explain its purpose/use.
Quick funny story... the other night I am mounting the two 2.5v transformers on the underside of the chassis and my 4 year old daughter walks over and asks “Daddy, what are you doing? What is this?” As she points to the amplifier. So I reply “it is a amplifier that daddy is building.” She immediately runs off to tell her older brother (6yo) “daddy is building an apple-fire!” It was the cutest thing ever. Needless to say I think I need to have a custom made emblem made up for it saying “The Apple-Fire”. Anyone know where to have custom emblems made up?
Last edited:
> Anyone know where to have custom emblems made up?
Google "Sign Shop near me".
Nobody really advertises custom emblems. But the machines don't care what you call it; they put ink on plastic or metal, or cut vinyl shapes. Here we use Kustom Visual Kreations: "We are an automotive customizing shop. We ..do ...Vehicle Graphics, Business Cards, Magnetic Signs, Boat Lettering, ...and more...."
Also Google "Apple fire images".
Attachments

An externally hosted image should be here but it was not working when we last tested it.
Does anyone have any input on that “screen” leg of the output transformer? I think what I am understanding is that it is not used in SE triode setups. The link above is the schematic provided by Edcore with the transformer. On Haggermans schematic it shows a middle leg that goes nowhere but to a greyed square box with no tag or ID.
Thanks guys & gals!
> The link above is the schematic
Well, no, it links to "4 bedroom Georgetown Colonial in the highly desirable Fleetwood Park section".
The screen leg is to work pentodes in ultralinear. If working as triode, just tape-off that lead so it doesn't short-out and release smoke.
Well, no, it links to "4 bedroom Georgetown Colonial in the highly desirable Fleetwood Park section".
The screen leg is to work pentodes in ultralinear. If working as triode, just tape-off that lead so it doesn't short-out and release smoke.
Attachments
Oops!! Haha We are currently house hunting as well... that one did not make the list.
Thanks for confirming my suspicion!!
I have another question regarding the primary power. The article mentions using the CT to “balance the supply at 0v”. What exactly does this mean? Looking at the schematic I see the two legs of the 6.3vct applied to terminals 4 & 3 and I believe the “center” so to speak that is grounded?
There are many things I’ve never done before, and anything with a center tapped power source, is one...
I have one small order remaining for the larger caps and then of course the tubes. Speaking of which, I wanted to ask for everyone’s opinions on which 2A3 tube you’d recommend? And the EC99? Is it right that the E182CC and the 6N6P are drop in replacements? Any recommendations there?
EC99? No, JJ ECC99. That is in the Clarion.
Use an ECC99.
Build everything to spec, get the amp working properly.
Then do your research about tube rolling.
do Not consider an E182CC or 6N6P to be equivalent to an ECC99 unless you
compare all the specifications on each tubes data sheet.
If your 6.3V filament winding does not have a center tap, then make a Pseudo Center tap:
Connect two 100 Ohm resistors in series. Ground the common connection. Then connect the ends of the 100 Ohm resistors, one to one end of the filament winding, the other resistor end to the other end of the filament winding.
Last edited:
Current status:
The “Apple-Fire”
I’m asking about the other tubes more for brand than “interchangeable” tubes for tube rolling. As I’ve said I’m not well experienced but would like to learn. My intention for asking was to verify if the ECC99 is exclusively made by JJ or are there other brands out there that make the equivalent of the ECC99 worth trying. If the ECC99 is only produced by JJ then, JJ it is!
For the same reason I ask about the 2A3 tubes, I know there are many brands out there that I would like to hear opinions on. I suppose it may be best for me to just go and search reviews of folks opinions online, but I’m also curious to hear what everyone here has to say. I’m sure asking for opinions on a forum like this is like opening Pandora’s box, but hey, I’m always up for a good debate! ��
I really would love to learn more about electronics and how to understand how these circuits work, understand better how to read schematics and such. Where would you all suggest I started? Local colleges electrical engineering classes or similar? YouTube is great but also very limited and not very interactive....
I’ve just gone through and labeled all the baggies of the resistors with the corresponding values making it easier to identify the resistors when I start soldering, hopefully Wednesday evening, when I noticed that Antique Electric Supply sent me a .57 ohm resistor instead of a .47 ohm.
I am curious to know, what sort of difference would that difference in ohms make? Not that I intend use it, I am writing them an email to get the correct resistors shipped. I am curious what that .10ohms changes? Can .57 be used in place of R6 & R8?
I am curious to know, what sort of difference would that difference in ohms make? Not that I intend use it, I am writing them an email to get the correct resistors shipped. I am curious what that .10ohms changes? Can .57 be used in place of R6 & R8?
TheReelMuhcoy,
It is hard for me to work on two similar Hagtech Clarion Threads at once.
I am getting too old to keep track.
But here is an answer to your R6 and R8 question, and a little bit more important info on the filament wiring too:
Check your power transformer specifications:
Is the filament winding 6.3V?
. . . Or, less likely is it 12.6V?
If it is 6.3V, the Hagtech Clarion schematic at the other Hagtech Clarion Thread, post #1 is wrong.
The ECC99 wired properly for 6.3V requires you to tie pins 4 and 5 together.
Then apply one end of 6.3 volts to pin 9 and the other end of 6.3V to the tied pins 4&5.
The proper way to wire the ECC99 filament for 12.6V is to apply one end of 12.6V to pin 4, and the other end of the 12.6V to pin 5.
Now, as to those resistors you got:
ECC99 wired for 6.3V filament draws 0.8Amps
0.8 Amps through 0.47 Ohm = 0.376 Volt drop per resistor, 0.752V total.
0.8 Amps through 0.57 Ohm = 0.456 Volt drop per resistor, 0.912V total.
ECC99 wired for 12.6V filament draws 0.4 Amps
0.4 Amps through 0.47 Ohm = 0.188 Volt drop per resistor, 0.376V total.
0.4 Amps through 0.57 Ohm = 0.228 Volt drop per resistor, 0.456V total.
The question is, how much voltage comes off the filament winding with all the following factors:
Your Local Power Mains Voltage. 117V, 120V, 123V, etc.
Your Power Transformer Primary voltage rating, 115V, 117V, 120V, etc.
The Load current rating of the 6.3V winding (or 12.6V winding), 2A, 3A, 5A, etc.
The Load of the ECC99 filament puts on the filament winding.
All of that determines what the voltage is from the filament winding (the exact voltage under actual load of the "6.3V" or "12.6V" winding).
Those resistors are there to adjust the voltage at the filament as close as can be to 6.3V (or 12.6V).
I bet both the 0.47 Ohm and 0.57 Ohm resistors will put the voltage within +/- 10% of the ECC99 nominal filament voltage.
Lol, you skipped over to this thread! I was scratching my head there for a minute!
I may need to read your posts 20 times before I grasp them.
I can get a read on what voltage at my [current] home, and report back.
Primary is 120v
The Edcor transformer I purchased is 6.3v CT.
As for the Speaker I plan on using is the Fostex FE167E:
FE167E Enclosure plans I have a powered sub I use sometimes to fill in the low end, and have been thinking to add a tweeter to to fill in the top end. Input/suggestions is very welcome as there as well.
Last edited:
The ECC99 wired properly for 6.3V requires you to tie pins 4 and 5 together.
Then apply one end of 6.3 volts to pin 9 and the other end of 6.3V to the tied pins 4&5.
In The 6.3v “version” You’re saying one end and the other. What happens to the CT leg?
Hagerman Clarion schematic
I have made some notes and changes of the original schematic with the minor changes and just cheats for myself. Can anyone confirm my changes and notes?
6A3sUMMER, is what I have hanged on the ECC99 filament circuit correct to the way you were describing the circuit to be run.
I have made some notes and changes of the original schematic with the minor changes and just cheats for myself. Can anyone confirm my changes and notes?
6A3sUMMER, is what I have hanged on the ECC99 filament circuit correct to the way you were describing the circuit to be run.
Yes, connect the 6.3V filament center tap to ground.
The ECC99 cathode is only a few volts above ground (the voltage across the self bias resistor).
A totally different use of dual triodes (like an SRPP stage) would require the center tap to be elevated above ground, because the top cathode of the SRPP might be at 100V, 150V etc.
But not your Hagerman Clarion.
Keep your ECC99 filament winding center tap at ground potential.
Current status:
The “Apple-Fire”
Looking at your photo. Looks nice but... myself I've never been comfortable where wafer sockets have those little brass rivets so very close to the chassis (hole edge). You might want to put a nylon washer between the wafer socket and the chassis for each screw. This does two things... It will pull those brass rivets farther away from the chassis on the top at least 1/8 of an inch, right now they are probably only 1/32 of an inch away from being grounded. And two, I find that the nylon washers pad those all-ceramic sockets better from stress cracks when tightening down the screws, it adds some springy tension on the nuts as you torque them.
- Status
- This old topic is closed. If you want to reopen this topic, contact a moderator using the "Report Post" button.
- Home
- Amplifiers
- Tubes / Valves
- My Hagerman Clarion Build - seeking advice from pro’s