Had a spare couple of hours on the weekend to start building the chassis frame. The material is ~3/8 inch (9mm) Baltic Birch comprised of 9 layers. Incredibly dense stuff. The outer layer on one side is nice enough that I can stain and clear coat it and it will look just fine.
I had to do the ripping with a Skil saw so the long cuts weren't "perfect" but after a little bit of sanding they are "close enough". My new-ish power miter saw with lazer certainly made the 45s simple and extremely precise. Holes in the back panel for power, inputs and outputs went well. Now I am delayed waiting for the VU meters from China - I want to measure them before drilling the holes in the front panel. I won't put the frame together until all this drilling/prep work is done. Note: the front panel is leaning sideways in the photo, but the fit is actually perfect.

I had to do the ripping with a Skil saw so the long cuts weren't "perfect" but after a little bit of sanding they are "close enough". My new-ish power miter saw with lazer certainly made the 45s simple and extremely precise. Holes in the back panel for power, inputs and outputs went well. Now I am delayed waiting for the VU meters from China - I want to measure them before drilling the holes in the front panel. I won't put the frame together until all this drilling/prep work is done. Note: the front panel is leaning sideways in the photo, but the fit is actually perfect.
Attachments

Last edited:
I have to admit I am now second-guessing my decision to order the meters from China. A few of them have not even shipped yet and meanwhile I am starting to lose interest in building this amp. This is just the way my mind works. I have become focused on my daughter's mental health which recently became much more than a "quirk", and distracted by motorcycle upgrades/maintenance.
I hope I have the inspiration, time, and focus to complete this project once all the parts finally arrive. I have at least $800 invested so far, so it would be a shame to leave it half finished.
I hope I have the inspiration, time, and focus to complete this project once all the parts finally arrive. I have at least $800 invested so far, so it would be a shame to leave it half finished.
Last edited:
cogitech,
It's very much understandable that you have to focus on more important things in life, especially the well-being of ones family members. Hope you can get your kiddo's issues sorted out soon. And in the meantime, if the motorcycle keeps you busy, let it be - just ride safely!
Some audio projects take longer than expected. Anything we can do to spur you on with you SSE build? You think you would be willing to proceed with a temporary box for your SSE, maybe something made of plywood scraps or spare wood pieces? The top can be done with 1/2" ply too, relieving you of any metalwork.
Hi Zia,
Most of the work on the wood frame and top is done. I just don't want to put it all together until I have it 100% prepared (all holes drilled, etc.). I don't want to be messing with it once it is put together. The idea of a temporary chassis crossed my mind, but I just know I would never complete the final build if I got it up and running. I really want to avoid that. My plan is to do the opposite; get it all finished and looking the way I want it before even testing it.
I received notification that the Transcendars have shipped, so that's inspirational. Also, I will be working from home for at least the next 3 weeks to watch over my daughter. This puts my mind at ease, and since I can start work much earlier in the morning I will have more time in the afternoons to tinker. My daughter wants me to help her build some bat boxes so maybe we will do that as well.
Thanks for sharing the journey, I have been reading about this amp for so long it feels like I have built one. The design, documentation and support on this site have completely convinced me the SSE needs to be my first tube build. I like the binding posts for the caps, a switch seems like a good idea as well if you like to roll.
Thanks for sharing the journey, I have been reading about this amp for so long it feels like I have built one. The design, documentation and support on this site have completely convinced me the SSE needs to be my first tube build. I like the binding posts for the caps, a switch seems like a good idea as well if you like to roll.
So far I have zero regrets about choosing the SSE as my first tube amp build. It is costing me more than anticipated, but I don't care. I am really enjoying the build.
I have considered a switch for variable resistance but I will do that as an add-on later if I really think I am going to roll tubes that often.
Time for a big update.
I've had all the parts I need to build the amp for a few weeks now, but due to some major household projects the SSE has been on hold. On Saturday I did the final prep on the chassis frame and got it glued together. Yesterday was a big day:
- drilled the holes for the voltmeter and ammeters in the top plate
- drilled the holes for the transformers and installed grommets in the wire holes
- drilled the holes and secured the top plate to the wood frame
- installed the SSE board in the chassis
- installed the transformers onto the top plate
- installed power connector, input and output terminals
- wired up the power transformer, power switch, power connector
- wired up the OPTs
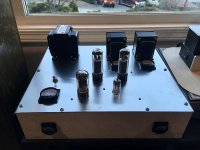
I still need to wire the inputs, install the choke and supplemental cap, and then thoroughly double and triple check my work before I can go through a checkout. The amp will be tested and run for a while without any of the meters connected. Here's a pic to show the progress (tubes installed just so I could see what it looks like). I'll have to remember to take a pic inside the chassis next time. Note: the chassis will be stained the same colour as the speaker to the left in the pic.
https://www.diyaudio.com/forums/attachment.php?attachmentid=833463&stc=1&d=1586787676
I've had all the parts I need to build the amp for a few weeks now, but due to some major household projects the SSE has been on hold. On Saturday I did the final prep on the chassis frame and got it glued together. Yesterday was a big day:
- drilled the holes for the voltmeter and ammeters in the top plate
- drilled the holes for the transformers and installed grommets in the wire holes
- drilled the holes and secured the top plate to the wood frame
- installed the SSE board in the chassis
- installed the transformers onto the top plate
- installed power connector, input and output terminals
- wired up the power transformer, power switch, power connector
- wired up the OPTs
I still need to wire the inputs, install the choke and supplemental cap, and then thoroughly double and triple check my work before I can go through a checkout. The amp will be tested and run for a while without any of the meters connected. Here's a pic to show the progress (tubes installed just so I could see what it looks like). I'll have to remember to take a pic inside the chassis next time. Note: the chassis will be stained the same colour as the speaker to the left in the pic.
https://www.diyaudio.com/forums/attachment.php?attachmentid=833463&stc=1&d=1586787676
Attachments
Last edited:

It works!!!
Yesterday I wired up the inputs and installed the choke, then double and triple-checked all the wiring and decided there was no point in waiting any longer.
Note: Always powered down and unplugged between steps.
1) Powered it up with no tubes and watched, listened, sniffed for problems - no problems detected
2) Same as above with a 5AR4 installed - no problems detected
3) Same as above with all tubes installed and old crappy speakers hooked up - no problems detected
4) Same as #3 - measured B+ voltage (R4 to GND) = 414-416v
5) Measured R17 voltage = 31v
6) Measured R27 voltage = 31v
7) Hooked up a source = Music from both speakers!
I let it play like this for about 15 minutes and then shut down and unplugged everything, then hooked it up in my main system and powered it up.
Some observations:
1) It is dead quiet! With my ear 2 inches from the cones, the speakers literally sound like the amp is powered off when there is no audio signal.
2) Initially, it sounded a bit crunchy in the top end, but then I remembered I had installed a questionable "NOS" GE 12AT7 for the initial testing, so I swapped in a Marconi Radiotron 12AT7 and I couldn't believe how much that improved things.
3) (After a few hours of burn in) this amp sounds fantastic to me! It is in triode mode with no CFB and I am perfectly satisfied with the power/SPL.
4) Yes, my B+ is much lower than anticipated, but I think I know why. The new version of the Hammond 274BX has two primary windings - one for 115v mains and one for 125v mains. My mains power measures at 119.8-119.9v so I decided to go conservative at first and wired up the 125v primary winding - therefore all the secondary NLVs will be lower than spec. At this point I feel like I should just go head and us the 115v winding and my rough math tells me I should gain around 30-35 volts from that.
***I really would appreciate some feedback from the community on #4 above. Do you think I am right about the 125v vs. 115v windings causing my low B+? What other issues could be contributing to a low B+?
Right now, these are my numbers:
B+ = 415v
Cathode v = 31v
Cathode R = 680
Cathode I = 45.5mA
Dissipation = 17.5W
* Shuguang 5AR4, Radiotron 12AT7, 2x EH EL34
Last edited:
Congratulations! It's a great thing when all your preparation and hard work pay off!
Yes, your primary tap is likely the reason for lower B+, but you're not really too low. Try using the 115 tap and monitor the results. You might check your heater voltage to see where it is. In my build, I over-spec'd the power tranny a bit and I got closer to 7v, which I didn't really want. So I run the amp on a variable transformer to keep it close to the 6.3 spec. Plus it's isolated from any line garbage, which may or may not be a benefit.
At any rate, enjoy the music! Let us know if you change anything up, and how it turns out.
Thanks for the feedback!
I should note that I am running one of these MS22 12103-B Ametherm | Mouser Canada on the L terminal of the AC power connector. According to the datasheet, R at 50% current is 2.65 ohms. I am guessing I am losing about 4-5 volts here before I even hit the primary... (?)
I am questioning whether I really need it there since I have the CL-140 on the board...
Last edited:
Congrats!!! It really is an awesome amp.
I have a CL-90 on my L terminal and the CL-140 on the board, too. I'm between 454 and 457 B+ so I don't think inrush limiters affect voltage once they warm up.
Mine is also dead quiet. Likewise, I can't hear anything at all at the speaker cone with the volume down.
Great job. All of your favorite music is going to sound new to you again.
Thanks dwinstonwood!
I'll leave the inrush limiter there for now and switch to the 115v primary. I bet B+ will be close to 450v.
I hope to try it later today and report back. I've run out of solder, so it might take some ingenuity.")
Music sounds significantly different in a very good way with this amp compared to my EL34 P-P and TPA3118 amps.
I'll leave the inrush limiter there for now and switch to the 115v primary. I bet B+ will be close to 450v.
I hope to try it later today and report back. I've run out of solder, so it might take some ingenuity.
Music sounds significantly different in a very good way with this amp compared to my EL34 P-P and TPA3118 amps.
Last edited:
cogitech,
Congratulations on getting your Tubelab SSE up and running!
It's a really nice sounding amp. Enjoy the music and keep us posted.
Thank you Zia!
Once you get settled in with the setup, and start trying different driver tubes...if you do!...you'll find how transparent this amp design is. Every type of 12AT7 variant I've tried sounds different, sometimes very subtle changes, other times it's a "wow!" reaction.
Fun times ahead!
Fun times ahead!
Once you get settled in with the setup, and start trying different driver tubes...if you do!...you'll find how transparent this amp design is. Every type of 12AT7 variant I've tried sounds different, sometimes very subtle changes, other times it's a "wow!" reaction.
Fun times ahead!
So far I have only tried the previously mentioned GE 12AT7 (which came from a questionable source) and the Canadian Marconi Company Radiotron 12AT7 (which came from a reliable source and was tested as NOS). I am pretty sure the GE is borderline or worse, because I really didn't like the way the top end sounded - "crunchy/grainy". Swapping in the Radiotron made a very obvious improvement. I am glad, because I have 3 of them. Research indicates they are identical to RCA black plate 12AT7.
I haven't really looked into what other 12AT7 variants are worth trying. I do have some Russian 6P3S-E power tubes on the way to try, and a couple different 5U4 rectifier variants.
- Status
- This old topic is closed. If you want to reopen this topic, contact a moderator using the "Report Post" button.
- Home
- More Vendors...
- Tubelab
- Yet Another SSE Build Thread