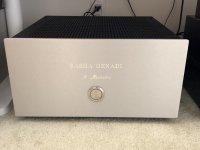
My SSE is just about completed and I wanted to share my build and my thoughts. All that's left is to get the illumination working on the front panel power button, maybe take some measurements, and tweak some settings. Otherwise, the amp powered-up on the first try and was fully functioning without any issues. Here's my new baby:
Enclosure
Since I have a young child at home, I wanted the amp to be fully enclosed for safety. The HiFi2000 Pesante 5U chassis available on the DIYAudio website looked like a great option. Although certain areas of panels closest to the tubes get quite warm (but not “hot”), both the top and bottom panels are fully vented so heat does not seem to be a problem. Leaving the amp powered-on overnight doesn’t change anything. The amp seems to operate at a constant temperature and does not get any warmer than after being on for just 5 minutes. I’m happy with the way the customized front-panel turned out and the “traditional solid state” appearance.
Tubes
Transformers
Control Panel
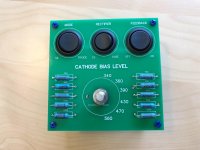
Having never heard an SSE and because of uncertainty regarding which loudspeakers will be used with the amp, I thought it would be best to include toggle switches for Ultralinear/Triode Mode, Solid State/Tube rectification, and Cathode Feedback. I also wanted to incorporate a rotary switch for selecting various cathode resistor values (i.e. forum member rknize’s build).
Instead of having all the switches on the outside of the enclosure, I decided to mount all the “controls” on a separate PCB board, to be installed inside the enclosure alongside the SSE board. Here’s a link describing how I had it made: Custom PCB Board from JCBPCB
Assembly
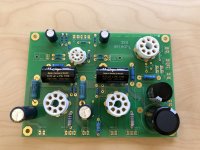
Following the instructions made the assembly process mostly uneventful. Most questions were answered through heavy searching on the forums or directly by helpful folks on the forums.
The very first sounds produced by the amp were sourced from a basic desktop computer in my workshop through an Arcam rDAC. Something about the computer, the RCA cables, the outlet(s), or a combination thereof, created quite a bit of buzzing and humming at idle. However, installed in my office, the amp is nearly silent. I must put the tweeter to my ear to hear anything.
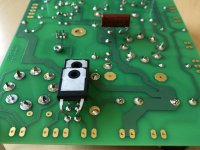
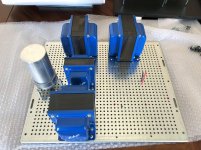
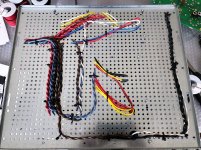
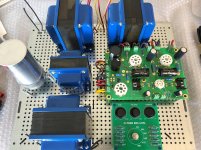
Here are some pics of the assembly process:

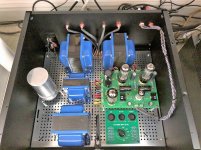
Final Thoughts
This was perhaps the easiest first DIY build because it’s been built, tested, and proven so many times before me. Still, it would not have been possible (or nearly as easy) without Tubelab and the forum community. So, thank you Mr. Tubelab and everyone else who shared their wisdom.
My SSE amp has been operational for just two days now and it’s been a joy listening to it. After a bit of fumbling around, I settled on using tube rectification, triode mode, no cathode feedback, and a cathode resistor value of approximately 470 ohms. This arrangement seems to work best with my very reasonably priced Pioneer SP‑BS22 bookshelf speakers. There may be another combination of settings I find more favorable, but it will take either more extended listening or the ability to change settings on the fly for quick A/B comparisons to find the right combo. Since I’m still uncertain what settings, if any, are safe to change with the power on, I’ll just keep powering the unit down.
As I listen to it now, the amp sits in a chain of components beginning with a DIY high-end PC as the source feeding mostly FLAC files -> Arcam rDAC via USB cable -> Carver C19 preamp via Audioquest interconnects -> SSE via BlueJeans interconnects -> Pioneer SP-BS22 via Audioquest speaker cable. Also in the mix is a Pioneer SW-8MK2 subwoofer. My next project is a pair of DIY loudspeakers so I expect the amp will remain in this position at least until the speakers are finished.
Can David possibly replace Goliath? The SSE is, perhaps temporarily, filling the space of a Carver TFM45 power amp. Let’s be generous and say it’s 10 tube watts per channel versus 375 solid state watts “voiced” to sound like tubes. Based on what I’ve heard so far, I find myself wondering yet again why Carver is no longer in business. I find the character of the TFM45’s sound to be much closer to the SSE than to anything else solid state that I can recall listening to. But this is not about Bob Carver’s creations. It’s about the SSE. And I already find the SSE to sound delightful. The SSE seems to do a brilliant job of creating a 3-dimensional space and there is a pleasant warmth and silkiness. I would think these attributes would only get better after some additional hours of burn-in.
I’ll finish by sharing this is the first tube amp I’ve ever had the pleasure of listening to in my own home. Sure, I’ve “auditioned” tube amps. At high-end audio shops. In purpose built rooms. Playing music I’m not familiar with. Through speakers and other audiophile components with other-worldly price tags far beyond anything I would willingly part with. They were all great and wonderful experiences contributing to an enthusiasm that has led to this DIY project. To be fair, I splurged on some components and spent more than initially budgeted for this project. However, in my estimation, the total cost is still a modest sum for what I received. A great sounding single-ended tube amp. I’m quite happy with the end result.

Enclosure
Since I have a young child at home, I wanted the amp to be fully enclosed for safety. The HiFi2000 Pesante 5U chassis available on the DIYAudio website looked like a great option. Although certain areas of panels closest to the tubes get quite warm (but not “hot”), both the top and bottom panels are fully vented so heat does not seem to be a problem. Leaving the amp powered-on overnight doesn’t change anything. The amp seems to operate at a constant temperature and does not get any warmer than after being on for just 5 minutes. I’m happy with the way the customized front-panel turned out and the “traditional solid state” appearance.
Tubes
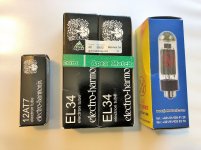
- Electro Harmonix EL34 (matched pair)
- Electro Harmonix 12AT7
- JJ GZ34

Transformers
- Edcor CXSE25-5K (pair)
- Edcor XPWR035
- Edcor CXC125-10H-200mA
Control Panel
Having never heard an SSE and because of uncertainty regarding which loudspeakers will be used with the amp, I thought it would be best to include toggle switches for Ultralinear/Triode Mode, Solid State/Tube rectification, and Cathode Feedback. I also wanted to incorporate a rotary switch for selecting various cathode resistor values (i.e. forum member rknize’s build).
Instead of having all the switches on the outside of the enclosure, I decided to mount all the “controls” on a separate PCB board, to be installed inside the enclosure alongside the SSE board. Here’s a link describing how I had it made: Custom PCB Board from JCBPCB

Assembly
Following the instructions made the assembly process mostly uneventful. Most questions were answered through heavy searching on the forums or directly by helpful folks on the forums.
The very first sounds produced by the amp were sourced from a basic desktop computer in my workshop through an Arcam rDAC. Something about the computer, the RCA cables, the outlet(s), or a combination thereof, created quite a bit of buzzing and humming at idle. However, installed in my office, the amp is nearly silent. I must put the tweeter to my ear to hear anything.
Here are some pics of the assembly process:


Final Thoughts
This was perhaps the easiest first DIY build because it’s been built, tested, and proven so many times before me. Still, it would not have been possible (or nearly as easy) without Tubelab and the forum community. So, thank you Mr. Tubelab and everyone else who shared their wisdom.
My SSE amp has been operational for just two days now and it’s been a joy listening to it. After a bit of fumbling around, I settled on using tube rectification, triode mode, no cathode feedback, and a cathode resistor value of approximately 470 ohms. This arrangement seems to work best with my very reasonably priced Pioneer SP‑BS22 bookshelf speakers. There may be another combination of settings I find more favorable, but it will take either more extended listening or the ability to change settings on the fly for quick A/B comparisons to find the right combo. Since I’m still uncertain what settings, if any, are safe to change with the power on, I’ll just keep powering the unit down.
As I listen to it now, the amp sits in a chain of components beginning with a DIY high-end PC as the source feeding mostly FLAC files -> Arcam rDAC via USB cable -> Carver C19 preamp via Audioquest interconnects -> SSE via BlueJeans interconnects -> Pioneer SP-BS22 via Audioquest speaker cable. Also in the mix is a Pioneer SW-8MK2 subwoofer. My next project is a pair of DIY loudspeakers so I expect the amp will remain in this position at least until the speakers are finished.
Can David possibly replace Goliath? The SSE is, perhaps temporarily, filling the space of a Carver TFM45 power amp. Let’s be generous and say it’s 10 tube watts per channel versus 375 solid state watts “voiced” to sound like tubes. Based on what I’ve heard so far, I find myself wondering yet again why Carver is no longer in business. I find the character of the TFM45’s sound to be much closer to the SSE than to anything else solid state that I can recall listening to. But this is not about Bob Carver’s creations. It’s about the SSE. And I already find the SSE to sound delightful. The SSE seems to do a brilliant job of creating a 3-dimensional space and there is a pleasant warmth and silkiness. I would think these attributes would only get better after some additional hours of burn-in.
I’ll finish by sharing this is the first tube amp I’ve ever had the pleasure of listening to in my own home. Sure, I’ve “auditioned” tube amps. At high-end audio shops. In purpose built rooms. Playing music I’m not familiar with. Through speakers and other audiophile components with other-worldly price tags far beyond anything I would willingly part with. They were all great and wonderful experiences contributing to an enthusiasm that has led to this DIY project. To be fair, I splurged on some components and spent more than initially budgeted for this project. However, in my estimation, the total cost is still a modest sum for what I received. A great sounding single-ended tube amp. I’m quite happy with the end result.
Hi Pitch.
Did you use the 300mm or the 400 mm depth enclosure?
thanks
altecboy
The 400mm. I also bought the aluminum handles but decided not to put them on.
That's a very nice build. I'm in the process of building mine. I'm using the same transformers as you and they also took 8 weeks to receive. Edcor must be very busy lately. Your control board is also very nice and I'd like to incorporate one of those at some point after I get mine up and running.
- Status
- This old topic is closed. If you want to reopen this topic, contact a moderator using the "Report Post" button.
- Home
- More Vendors...
- Tubelab
- SSE Build Experience