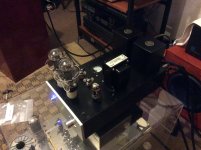
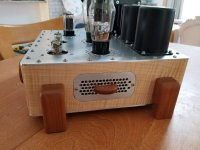
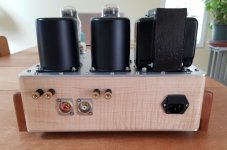
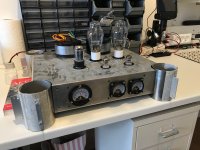
I was probably one of the last few to purchase a first gen TSE board from George before his supply ran out. This is my first tube amp build and it has been a rewarding experience, from the electrical build > to designing the top plate in AutoCAD > to my novice woodworking skills.
Many thanks to George and this great forum and those who post here. I had no issues during the checkout process and the build really went smoothly. All components (minus the power switch) are mounted to the top plate and the whole thing can be removed from the cabinet easily if needed. The amp sounds phenomenal and I couldn't ask for anything better!
Nothing out of the ordinary, but a few details:
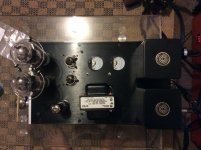
Edcore XPWR131-120 power transformer
Triad C-14X choke
Electra Print 5K@50ma audio output transformers
Temco 100mfd motor run cap
5U4 rectifier
RCA UX-245 output tubes
Front Panel Express 10" x 16-1/2" brushed aluminum top plate
Flush-mounted tube sockets
Test points in top panel for easy access
Hickory cabinet finished with shellac with oak legs
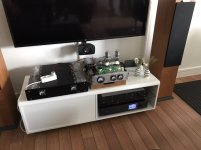
The amp currently drives a pair Klipsch KG 5.5 speakers with plenty of power for my needs.
Nice work. Very pretty.
My Tubelab SE
My last posts were a failure. I could not post pictures. I hope this time works fine.
My last posts were a failure. I could not post pictures. I hope this time works fine.
Attachments
TSE-II Complete
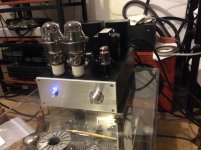
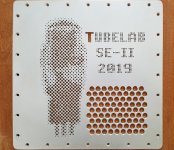
Just completed my TSE-II this afternoon after about two months of painstaking work. This all started out as a populated PC board on a temporary plywood chassis; it has since morphed into the form seen below, which was inspired by an Atomic Age (aka "Googie") -themed coffeehouse I frequent while on travel.
The chassis measures 12" x 12" x 4" on the outside (not counting the feet), and is constructed of curly maple, cherry, and 1/8" 6061-T6 aluminum plate. I paid strict attention to matching the grain on the corners of the maple box, and finished all of the woodwork with several coats of nitrocellulose lacquer. All fasteners are 18-8 stainless to eliminate the possibility of corrosion.
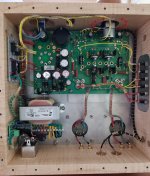
To make it easier on others in my household I installed an Arduino-based infrared remote control that drives an ALPS motorized volume pot. The power switch light is used as a status indicator; normally steady when the power is on, it flashes whenever the IR sensor receives a signal. The Arduino unit receives its power through a dedicated 5V regulated supply.
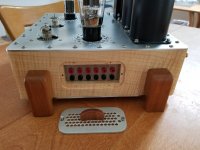
To make it easier on myself, I took advantage of some unused space on chassis side to install a complete set of tip jacks for CCS and bias adjustment (thanks to moggi1964 and kilokat7 for the nudge in that direction!). The jacks are recessed for a cleaner look, and they're covered for safety. Finally, I laced all of the wiring into cables - just for the heck of it. Covering all of this is a custom bottom plate with plenty of ventilation.
Thanks to George for such an incredible design. Of all the amps I've built over the years, this has easily become my absolute favorite. In fact, one of the reasons it took me two months to complete was that I couldn't stop listening long enough to get any work done!")
Just completed my TSE-II this afternoon after about two months of painstaking work. This all started out as a populated PC board on a temporary plywood chassis; it has since morphed into the form seen below, which was inspired by an Atomic Age (aka "Googie") -themed coffeehouse I frequent while on travel.
The chassis measures 12" x 12" x 4" on the outside (not counting the feet), and is constructed of curly maple, cherry, and 1/8" 6061-T6 aluminum plate. I paid strict attention to matching the grain on the corners of the maple box, and finished all of the woodwork with several coats of nitrocellulose lacquer. All fasteners are 18-8 stainless to eliminate the possibility of corrosion.
To make it easier on others in my household I installed an Arduino-based infrared remote control that drives an ALPS motorized volume pot. The power switch light is used as a status indicator; normally steady when the power is on, it flashes whenever the IR sensor receives a signal. The Arduino unit receives its power through a dedicated 5V regulated supply.
To make it easier on myself, I took advantage of some unused space on chassis side to install a complete set of tip jacks for CCS and bias adjustment (thanks to moggi1964 and kilokat7 for the nudge in that direction!). The jacks are recessed for a cleaner look, and they're covered for safety. Finally, I laced all of the wiring into cables - just for the heck of it. Covering all of this is a custom bottom plate with plenty of ventilation.
Thanks to George for such an incredible design. Of all the amps I've built over the years, this has easily become my absolute favorite. In fact, one of the reasons it took me two months to complete was that I couldn't stop listening long enough to get any work done!
Attachments
Last edited:
Thanks, guys.
To answer baker8's question, all of the metalwork was done by hand. I'll admit it was tempting to go the Front Panel Express route, but the effect I wanted to achieve would've cost serious money. IMHO those were dollars better spent on good components and iron. That said, there have been some gorgeous amps built on FPE plates and I may yet use them for a future project.
About the only concession I made was doing the layout in CAD. That way all I had to do was print out the pattern 1:1 and tape it to the metal. The rest was all punchwork and drill press.

My last posts were a failure. I could not post pictures. I hope this time works fine.
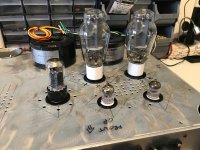
Based on the PT I am assuming this is a 300B?
Which Hashimoto's are those and how do you like them ?
Just completed my TSE-II this afternoon after about two months of painstaking work. This all started out as a populated PC board on a temporary plywood chassis; it has since morphed into the form seen below, which was inspired by an Atomic Age (aka "Googie") -themed coffeehouse I frequent while on travel.
The chassis measures 12" x 12" x 4" on the outside (not counting the feet), and is constructed of curly maple, cherry, and 1/8" 6061-T6 aluminum plate. I paid strict attention to matching the grain on the corners of the maple box, and finished all of the woodwork with several coats of nitrocellulose lacquer. All fasteners are 18-8 stainless to eliminate the possibility of corrosion.
To make it easier on others in my household I installed an Arduino-based infrared remote control that drives an ALPS motorized volume pot. The power switch light is used as a status indicator; normally steady when the power is on, it flashes whenever the IR sensor receives a signal. The Arduino unit receives its power through a dedicated 5V regulated supply.
To make it easier on myself, I took advantage of some unused space on chassis side to install a complete set of tip jacks for CCS and bias adjustment (thanks to moggi1964 and kilokat7 for the nudge in that direction!). The jacks are recessed for a cleaner look, and they're covered for safety. Finally, I laced all of the wiring into cables - just for the heck of it. Covering all of this is a custom bottom plate with plenty of ventilation.
Thanks to George for such an incredible design. Of all the amps I've built over the years, this has easily become my absolute favorite. In fact, one of the reasons it took me two months to complete was that I couldn't stop listening long enough to get any work done!
Nice job mate.
Hi all here
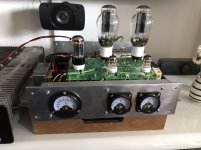
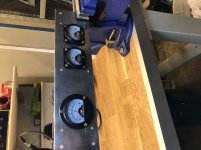
Thought i've show some pictures of my ongoing buil.
I used some time to get the build "cooled" down
to my liking
I simply mounted som alu' bars & smalish sinks... The
fan is not really needed but good to have there for hot sommerday's
(when they come, if they do)...
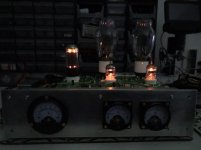
Listening to it right now in livingroom...
I like the sound so far, marvelous 👍
More to come.
Rgds; Jesper
Thought i've show some pictures of my ongoing buil.
I used some time to get the build "cooled" down
to my liking
I simply mounted som alu' bars & smalish sinks... The
fan is not really needed but good to have there for hot sommerday's
(when they come, if they do)...
Listening to it right now in livingroom...
I like the sound so far, marvelous 👍
More to come.
Rgds; Jesper
Attachments
-
 2FB94B61-644F-47B5-BED4-5D70D4D0FD61.jpeg234.8 KB · Views: 351
 -
 33B07F48-DB82-438F-A033-2ADDF64CC3E0.jpeg230.7 KB · Views: 340
 -
 331997B9-EE1F-4066-B1F5-131476DAEC55.jpeg272.3 KB · Views: 594
 -
 6F7792A3-E9E2-4C97-8402-ED71A1FB5512.jpeg228.8 KB · Views: 635
 -
 670A9A2A-85E0-4E23-807C-328B44FA3E9A.jpeg272.3 KB · Views: 611
 -
 25443D4C-AAE8-458D-8F2D-DF4E84280826.jpeg253.4 KB · Views: 623
 -
 BF4F51DC-9D67-4312-978D-F5DBC10F937D.jpeg379.5 KB · Views: 612
Such blurry pictures. Fix that.
The pics are fine. It may be your download speed and you’re not staying on each image long enough.
Regards John L.
It's weekend
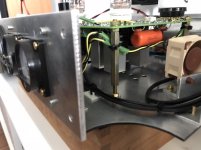
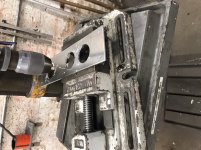
@Before_Taking_It_All_Apart_For_Finish_And_Paint_Etc...
Long term test for heat/thermal stability...
Is your real name Mikkel Leicht? I wonder how you will move that thing to your listening area...  A forklift maybe?
- Home
- More Vendors...
- Tubelab
- Pictures of your Tubelab amp