Figured some of you would get a kick out of this-
https://www.digikey.com/api/videos/videoplayer/smallplayer/4093627776001
Beware, it might give you heartburn!
https://www.digikey.com/api/videos/videoplayer/smallplayer/4093627776001
Beware, it might give you heartburn!
When I nod my head you hit it !
I remember my first speaker cabinet build.
Screwdriver on speaker bolt at front and spanner on nut at rear of cabinet.
Screwdriver slipped and went right through the cone.
Luckily I just pulled paper back flat and glued it and it was fine for many years.
I remember my first speaker cabinet build.
Screwdriver on speaker bolt at front and spanner on nut at rear of cabinet.
Screwdriver slipped and went right through the cone.
Luckily I just pulled paper back flat and glued it and it was fine for many years.
A bit long but it does send the message that it's simple to get custom jobs done nowadays. And loads of places do it.Another factor is that no matter how competent you are at cutting and drilling, there will always be some small scratch or tiny defect that nobody else will notice, but you know is there.
Been there......made that.
They forgot the all important nibbling tool, jig saw and hack saw blade wrapped in duck tape procedures. An old screwdriver sharpened on the sidewalk served as the chisel......their expert didn't understand the "whack it from the inside" method to hide the scratches......
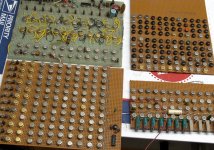
Here is a picture of one of my chassis made using the DigiKey approved method.......Yes, I did use a genuine Bud chassis, probably from the Lafayette Radio or Allied Electronics catalog. It was 1968, I was 15 years old, and DigiKey hadn't even made their DIGItal KEYer kit yet (ham radio). That kit provided the company name. Their little red and black 6 or 8 page "catalog" and ads in KiloBaud and Byte magazines were required reading for early DIY computer builders like me (late 70's). Anyone got any 2102 memory chips?
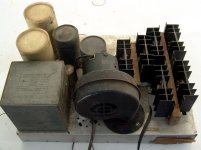
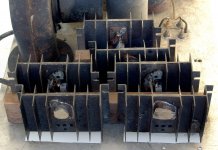
This monster made around 300 watts of audio at an unknown amount of distortion (a lot) into 4 ohms. It was used to feed 8 X 12 inch Utah (remember them) guitar speakers. B+ was about 110 volts (100 volts at full crank) and the outputs were 6 X mystery transistors from military surplus. About 15 watts of drive was required which came from another DIY guitar amp I made using a SWTPC LiL Tiger clone for the output board.
Note the beta matching stickers on the output transistors. I got a large box of these for $20 back in 1968 and graded them all out for beta. They lived on the bridge rectified output of the 75 volt 4.5 amp transformer used in this amp, but blew up on rectified wall outlet. The heat sinks were live, hence the wood blocks for mounting.
They forgot the all important nibbling tool, jig saw and hack saw blade wrapped in duck tape procedures. An old screwdriver sharpened on the sidewalk served as the chisel......their expert didn't understand the "whack it from the inside" method to hide the scratches......
Here is a picture of one of my chassis made using the DigiKey approved method.......Yes, I did use a genuine Bud chassis, probably from the Lafayette Radio or Allied Electronics catalog. It was 1968, I was 15 years old, and DigiKey hadn't even made their DIGItal KEYer kit yet (ham radio). That kit provided the company name. Their little red and black 6 or 8 page "catalog" and ads in KiloBaud and Byte magazines were required reading for early DIY computer builders like me (late 70's). Anyone got any 2102 memory chips?
This monster made around 300 watts of audio at an unknown amount of distortion (a lot) into 4 ohms. It was used to feed 8 X 12 inch Utah (remember them) guitar speakers. B+ was about 110 volts (100 volts at full crank) and the outputs were 6 X mystery transistors from military surplus. About 15 watts of drive was required which came from another DIY guitar amp I made using a SWTPC LiL Tiger clone for the output board.
Note the beta matching stickers on the output transistors. I got a large box of these for $20 back in 1968 and graded them all out for beta. They lived on the bridge rectified output of the 75 volt 4.5 amp transformer used in this amp, but blew up on rectified wall outlet. The heat sinks were live, hence the wood blocks for mounting.
Attachments
Last edited:
You should have seen some of my speaker cabinets. Cameras were not available to us kids, so unfortunately there are no photos of my early projects. Some of them were rather absurd. I had a DIY "music studio" with two RTR tape decks and several DIY "musical instruments" several guitars, a couple of DIY keyboards and other implements of sound creation.
The next BIG amp I would make had 24 X 2N3773 transistors mounted on a large heat sink complete with two blower fans. It was removed intact from a military scrap 400 Hz power inverter. No photo's exist since I sold the amp shortly after making it.
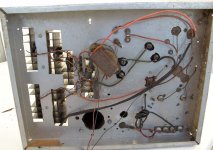
I left my parents house under less than ideal circumstances at age 20 leaving most of my creations behind, which were quickly disposed of. This amplifier and some bits from a digital music synthesizer went with me and followed me around until a few years ago. I found this old amp chassis in a shed as I was preparing to move in 2014. It had been wet several times during a hurricane. One of the large caps spewed its guts when I plugged it in, so I took these pictures and tossed it in the trash.
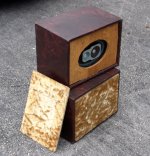
I found these speakers which I made from remnants from a bean bag chair and waterbed factory, circa 1974 or 1975. These were made with a table saw and a jig saw.....much better than the old stuff from the 60's. I made at least 10 of these for friends. They used car stereo drivers and did OK for HiFi or guitar. I used them for beach gatherings from the mid 70's to the mid 80's, set aside when cars were no longer allowed on the beach. These were in the shed, and likely had been wet as well. They lived for about 1 minute when cranked with one of my 15 watt DIY guitar amps, then I tossed them.
The synthesizer boards I made in 1970 and 1971 took several months to make each and I couldn't bear tossing them yet. I'm going to power them up to see if any of those 1960's vintage RTL logic chips still work.
The next BIG amp I would make had 24 X 2N3773 transistors mounted on a large heat sink complete with two blower fans. It was removed intact from a military scrap 400 Hz power inverter. No photo's exist since I sold the amp shortly after making it.
I left my parents house under less than ideal circumstances at age 20 leaving most of my creations behind, which were quickly disposed of. This amplifier and some bits from a digital music synthesizer went with me and followed me around until a few years ago. I found this old amp chassis in a shed as I was preparing to move in 2014. It had been wet several times during a hurricane. One of the large caps spewed its guts when I plugged it in, so I took these pictures and tossed it in the trash.
I found these speakers which I made from remnants from a bean bag chair and waterbed factory, circa 1974 or 1975. These were made with a table saw and a jig saw.....much better than the old stuff from the 60's. I made at least 10 of these for friends. They used car stereo drivers and did OK for HiFi or guitar. I used them for beach gatherings from the mid 70's to the mid 80's, set aside when cars were no longer allowed on the beach. These were in the shed, and likely had been wet as well. They lived for about 1 minute when cranked with one of my 15 watt DIY guitar amps, then I tossed them.
The synthesizer boards I made in 1970 and 1971 took several months to make each and I couldn't bear tossing them yet. I'm going to power them up to see if any of those 1960's vintage RTL logic chips still work.
Attachments
You should have seen some of my speaker cabinets. Cameras were not available to us kids, so unfortunately here are no photos of my early work..
Yes I can imagine. I was 16 in 1967 when I found a bargain 18" bass speaker. I had no means to build a cabinet, so I cut a large hole in the top of my wardrobe and seated it there. The bass on Jimi Hendrix' Purple Haze was amazing! Unfortunately the neighbours who lived upstairs didn't appreciate it.
That's when my cutting skills commenced.
Been there......made that.
They forgot the all important nibbling tool, jig saw and hack saw blade wrapped in duck tape procedures.
Can anyone here say they never did these things?
Here is a picture of one of my chassis made using the DigiKey approved method.......
The best part is the leftover "ZAPPA" from the long-gone label!
That was one of the most grotesque butcher jobs of metal working I've seen. Although I have seen similar work on things for sale at ham radio flea markets. I can honestly say that I've never mutilated a chassis like that...ever! Even before I had machine shop experience. Never used a chisel to make holes either. I know it was exaggerated to help sell their service, but it made me cringe.
Although I have seen similar work on things for sale at ham radio flea markets. I can honestly say that I've never mutilated a chassis like that...ever! Even before I had machine shop experience. Never used a chisel to make holes either. I know it was exaggerated to help sell their service, but it made me cringe.The best part is the leftover "ZAPPA" from the long-gone label!
That was my nickname from my high school days. It had nothing to do with Frank, but was given to me by the teacher because wherever I was, something zapped.
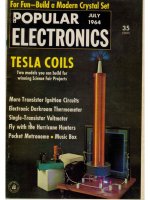
It may have also had something to do with the DIY Tesla coil that got us banned from ever exhibiting in the science fair if I was even remotely involved. I got the inspiration from this cover of Popular Electronics magazine, July 1964......You know that I couldn't just build it like the plans said......it got cranked up....big time!
Attachments
When I nod my head you hit it !
I remember my first speaker cabinet build.
Screwdriver on speaker bolt at front and spanner on nut at rear of cabinet.
Screwdriver slipped and went right through the cone.
Luckily I just pulled paper back flat and glued it and it was fine for many years.
You are not very good at this, are you???
I built a pair of JBL L300 clones back in '76. Just finished mounting the woofers, and needed to connect them to the amplifier for first sound...
Picked up the zip cord from the mess, a 16 oz claw hammer was tangled in the zip. As I pulled, the claw hammer came up, and it decided it wanted to be inside the cabinet where the crossover was.
Of course, the basket of the driver prevented that.
It's amazing how much total cone destruction can be fixed using the shards of the cone, tissue paper, and lots of elmers glue..
Screwdriver...pfffft..
If ya gonna do it, might as well excel at it..jn
- Status
- This old topic is closed. If you want to reopen this topic, contact a moderator using the "Report Post" button.
- Home
- Member Areas
- The Lounge
- A funny vid from digi-key