Flex your search muscles over at eBay and you'll come upon many possibilities. For example, the attached image.
Thanks for the suggestion.
I'll always try and share the love close to home if I can.
A limited number (batch 2, 45 units) of the Pioneer's completion kits are now available. The only notable change from batch 1 is the addition of a Euroblock for the potentiometer breakout board. Once these sell out, we'll do a pre-order for a final production batch (during January, for shipping around March). Cheers!
Korg Nutube B1 Full Kit – diyAudio Store
Korg Nutube B1 Full Kit – diyAudio Store
Pioneer kit
I am excited to see the pioneer kit come back in stock. I am just in the process of finishing up my F6 build. Should be done this weekend, barring any set backs. I am looking to pair this preamp with it.
That said, what are the expected differences between the pioneer and production run? I am on the fence only about timing, since it might be a couple months before I have time to build another kit, but I am worried the production run might not be ready. If there are no changes, then I might just pull the trigger now so I have the kit for when I have time to assemble it.
Thoughts?
Didnt bother to wait for an answer, followed instruction and finished the kit. Playing fine now on my M2 and Altecs. ")
One thing it is gatherin some static electricity and gives a small jolt when I touch the volume. Do I need to ground the case somehow?
One thing it is gatherin some static electricity and gives a small jolt when I touch the volume. Do I need to ground the case somehow?
Attachments

Last edited:
Didnt bother to wait for an answer, followed instruction and finished the kit. Playing fine now on my M2 and Altecs.
One thing it is gatherin some static electricity and gives a small jolt when I touch the volume. Do I need to ground the case somehow?
Are you sure it's not you gathering static and discharging to the knob?
No Im not sureAre you sure it's not you gathering static and discharging to the knob?
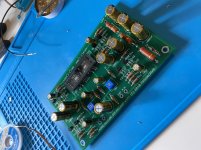
. But with my other amps its not an issue.Received and built one of the first from batch 2 today. Overall, the build was pretty quick and simple. I suppose I should have taken the time to heat shrink my wire runs.
Here are a few minor things I ran into:
1. As can be seen in the attached picture, I didn't realize that the outline for the Nutube doesn't line up with the Nutube itself and stuck the foam in the wrong place as it seemed more logical to put the foam on the board and wiggle the Nutube into place.
2. I was a little confused for a minute about the way the power switch and LED were wired; it works as described although not sure why it was done this way...
3. I can't get the chassis itself to lay completely flat with all sides screwed in. I tried screwing in the front first, back first and bottom first to no avail... When screwed down, front left (or back right) has a little lift to it.
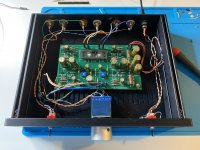
So I fired it up, calibrated test points to 9.75V each and it worked first time. With top off or on, it's microphinic when adjusting volume or tapping chassis. I did use the suggested iFlight standoffs and foam under the Nutube but still have issues. I will try using dynamat over vents.
Additionally, when touching the chassis, I pick up AM 1240. I live in Denver where it's pretty dry and also notice pops when touching the volume nob.
So now that we have all that out of the way, how does it sound? Fantastic is my take. I sold my reference LX521's a few months ago and am currently building a new reference. The bookshelf speakers I'm using in the interim have never sounded so good. Specifically, there is just a realness to the music. Imaging seems improved with just a better feel of space. I'm running ADI-2 pro DAC from RME with ATI amplifiers and bookshelf speakers of my own design.
I think this kit is well worth the asking price. I'll work on solving the microphone issues and see if I can add a remote for volume control. I sure hope that it integrates well with the Aleph J I'm finishing up this week.
Overall, it's a solid $300 spent + maybe 4 hours of work.
Enjoy!
Here are a few minor things I ran into:
1. As can be seen in the attached picture, I didn't realize that the outline for the Nutube doesn't line up with the Nutube itself and stuck the foam in the wrong place as it seemed more logical to put the foam on the board and wiggle the Nutube into place.
2. I was a little confused for a minute about the way the power switch and LED were wired; it works as described although not sure why it was done this way...
3. I can't get the chassis itself to lay completely flat with all sides screwed in. I tried screwing in the front first, back first and bottom first to no avail... When screwed down, front left (or back right) has a little lift to it.
So I fired it up, calibrated test points to 9.75V each and it worked first time. With top off or on, it's microphinic when adjusting volume or tapping chassis. I did use the suggested iFlight standoffs and foam under the Nutube but still have issues. I will try using dynamat over vents.
Additionally, when touching the chassis, I pick up AM 1240. I live in Denver where it's pretty dry and also notice pops when touching the volume nob.
So now that we have all that out of the way, how does it sound? Fantastic is my take. I sold my reference LX521's a few months ago and am currently building a new reference. The bookshelf speakers I'm using in the interim have never sounded so good. Specifically, there is just a realness to the music. Imaging seems improved with just a better feel of space. I'm running ADI-2 pro DAC from RME with ATI amplifiers and bookshelf speakers of my own design.
I think this kit is well worth the asking price. I'll work on solving the microphone issues and see if I can add a remote for volume control. I sure hope that it integrates well with the Aleph J I'm finishing up this week.
Overall, it's a solid $300 spent + maybe 4 hours of work.
Enjoy!
Attachments

Last edited:
I think this kit is well worth the asking price. I'll work on solving the microphone issues and see if I can add a remote for volume control. I sure hope that it integrates well with the Aleph J I'm finishing up this week.
I loved the combo (in my space, music, etc etc). AJ + B1K. Sounded better to me with the speaker polarity switched... Only yesterday was I able to switch it out for a different preamp.. and it sounds incredible too (Waynes BA2018).
I think you will be happy!
I loved the combo (in my space, music, etc etc). AJ + B1K. Sounded better to me with the speaker polarity switched... Only yesterday was I able to switch it out for a different preamp.. and it sounds incredible too (Waynes BA2018).
I think you will be happy!
I love the combo now as well! Just finished AJ! I sense no harshness or edge. There is plenty of treble but things just sound way more realistic.
A new Korg B1 Nutube preamplifier is alive (and makes music ...) !
I received my package the day before yesterday only 7 days after the order. Almost faster than Amazon ! And I did not have any customs fees to pay ...
Two days later, I started assembling the kit and I must say that it is very simple when you already have some experience.
So, for beginners, I recommend using a soldering iron with the finest tip and a fine solder wire, with lead, because the lead-free solder does not give such nice welds and requires a temperature of the iron soldering of at least 400° C which is a lot for some components.
I also strongly advise to use an antistatic wrist strap when handling JFET transistors that are indeed very sensitive to static electricity !
The components are really very good, like the Dale resistors, the electrochemical capacitors and the Alps potentiometer.
By cons, I find that the connection pads on the printed circuit are too small, while it is not necessary for most, except for transistors and Nutube !
It is also a pity that there are no more convenient test points (with pins ?).
Another complaint : the wiring of the LED of the ON / OFF switch is not easy and the hole provided for the LED is too small, so the LED is almost invisible when turned on, it's a shame, so I replaced the original LED by a blue LED with a serial resistance of 2.2 kOhms and I inserted it in the hole provided for this purpose after having bored to 3mm. The connection of the LED is now with a plug-in connector. This is the only modification made to 6L6's work with the use of flexible wires and a larger gauge for 24 Volt wiring.
Otherwise, I must say that I am extremely satisfied with the result and especially the excellence of the sound ! (And I have absolutely no microphonic effect, but I do not listen to music at a high level ...)
Thank you once again to Mr. Nelson Pass for making public this achievement and 6L6 among others for his valuable advice throughout the many pages devoted to the realization of this project !
Here are some pictures of the different stages of construction and the final result.
The opening of the package:
An externally hosted image should be here but it was not working when we last tested it.
The completion kit bag :
An externally hosted image should be here but it was not working when we last tested it.
Use of an antistatic wrist strap :
An externally hosted image should be here but it was not working when we last tested it.
It must be connected to the earth, of course !
An externally hosted image should be here but it was not working when we last tested it.
The printed circuit board is finished !
An externally hosted image should be here but it was not working when we last tested it.
Mechanical assembly :
An externally hosted image should be here but it was not working when we last tested it.
The Korg Nutube double triode :
An externally hosted image should be here but it was not working when we last tested it.
Mounting of power resistors with little steatite posts :
An externally hosted image should be here but it was not working when we last tested it.
Final wiring :
An externally hosted image should be here but it was not working when we last tested it.
Wiring modified ON / OFF switch and LED :
An externally hosted image should be here but it was not working when we last tested it.
In good company !
An externally hosted image should be here but it was not working when we last tested it.
It's all for today !
Why are the photo's not showing?
Why are the photo's not showing?
Looks like the (offsite) linked images are now broken
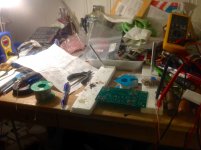
When we move to XF (soon, soon) we'll likely enforce people having to upload images onsite so this kind of thing doesn't happen.Built my Pioneer kit in roughly 5 hours, two sittings. I haven’t built a kit since the early 90s - so call me “rusty.” Been burning in for the last 24hrs, about to go do a first listen.
Notes and observations:
1. It took me a second - and to reread Papa Pass’ PDF - before I understood what was going on with JFET positions for stuffing.
2. My parts tester kept indicating different JFET pinouts than what was marked on the board... eventually decided to ¯\_(ツ)_/¯ and install as marked.
3. I didn’t see the build photos until after I’d already stuffed/soldered the board up, and was already on my way to wiring in a less-advantageous manner than what 6L6 proposed. Probably ate a half hour of my 5hr build time to undo and redo.
4. Probably took another 20-30 mins to rig up pin header test points, power supply and input/output connections. More for my own sanity than anything else.
5. The LED is...not my favorite part of this. Will def. be making a change here.
Will probably convert this to a remote control volume/power setup but am eager to do first listens today.
Attachments
Build Manual
6L6, not meaning to pester, but curious if you are still intending to publish the build manual for the Nutube pre. There's lots of great build advice and photos on this thread but I trust your accumulated knowledge the most and want to build my kit with the best guidance possible. It's a treasured opportunity I definitely don't want to screw up! Thanks, everyone, for making this opportunity possible.
6L6, not meaning to pester, but curious if you are still intending to publish the build manual for the Nutube pre. There's lots of great build advice and photos on this thread but I trust your accumulated knowledge the most and want to build my kit with the best guidance possible. It's a treasured opportunity I definitely don't want to screw up! Thanks, everyone, for making this opportunity possible.
Nutube microphony
NUTUBE ACCESSORY KIT 01 | Accessory Kit of Korg NUTUBE inluding PC | RS Components
There is this kit that can be purchased from Radiospare . It is obviously designed to protect the nu tube from microphonyI’m experimenting with microphony reduction, I have one that’s pretty bad. I’m going try soft mounts, softer mounts, silicone washers, sorbathane, and other things.
Resting the chassis on Vibrapods or similar very compliant feet is quite helpful.
Will report on my findings when I get them.
in the meantime, please post to the thread with your solutions!! The NuTubes themselves seem to be pretty variable in microphony, some people have issues, some dont, so I think it’s going to be an ongoing thing to find what works. The circuit is absolutely wonderfully sounding so it’s worth the effort.
NUTUBE ACCESSORY KIT 01 | Accessory Kit of Korg NUTUBE inluding PC | RS Components
Purchased a completion kit in December and I was very happy with how comprehensive it was. I started the project yesterday. After populating the board (except for the tube)and on final inspection I noticed I had 2 J113s paired on side. Thinking it was my error I re-checked the other 3 pairs and they were correct. I can only assume that the order was not correctly packed with 5 J113s and 3J112s in total. I have sent an email to the store in hope that they will send me a J112 (7.5) soon.
- Status
- This old topic is closed. If you want to reopen this topic, contact a moderator using the "Report Post" button.
- Home
- The diyAudio Store
- Korg B1 completion kit pioneer batch feedback