The Korg is highly microphonic even though, I mounted it on double sided tape. If I clap my hands from the listening position I get a zing! I have placed Vibrapods under the chassis for now.
There must be some tubes with more microphony than others !
I must say that concerning my preamplifier, I do not see this phenomenon, even by striking the box with the finger and I did not take special precautions to isolate or dampen the box, the tube is just welded directly to the circuit board and glued on it with the two self-adhesive double-sided foam pads provided ...
An externally hosted image should be here but it was not working when we last tested it.
Pioneer batch of completion kits has now sold out. Thanks everyone for your feedback, keep it comin'. We will announce production batch #1 shortly for those who weren't keen to blaze a trail into the wild west. Looks like any changes will be minimal.
Thanks, Jason, for the head's up. Quick question, might there be a silver-face option for the chassis in the production version?
Thanks, Jason, for the head's up. Quick question, might there be a silver-face option for the chassis in the production version?
For the pre-order, sure! Not after that though. Having two colors means twice the inventory management, storage and capital input problems.
For the pre-order, sure! Not after that though. Having two colors means twice the inventory management, storage and capital input problems.
So how do I pre-order a silver faceplate only?
I'm about 3/4 done and i have a few notes:
1) Since many of the values of the resistors are an order of magnitude away from one another EVERY resistor should be measured prior to placement. This is my 6th build, so for me it is obvious, but considering this kit can aim toward beginners I recommend pointing this out.
2) I used my smallest soldering tip since placement of a few of the parts is close together. I don't think this is required, but it maybe helpful for some.
3) In my kit some of the milling of the back plate is off visibly. Not the end of the world, but obvious.
4) The daughter board for the pot is a nice addition for making the soldering of the pot easier to some degree. Also, for those that haven't dealt with "CW" and "CCW" yet this set up is beneficial, although a new builder won't understand the nuance of that language after the build.
5) You can put the vents facing front or back: your choice!!!
6) I built the kit as-is, with almost no modifications from how it was delivered. I did this since I'm reviewing what was received (as well as building something very cool from NP). I prefer the Cardas RCAs and Kimber hook-up wire that I used on my previous B1 build in terms of perceived quality. That said, the kit parts are good, and my personal preference is just that. I haven't hooked up all the wiring yet so I have no opinion on the Blue Alps. I've read lots of differing opinions of the part, but I'm assuming it will work very well. I used Goldpoint in my last B1 build (separate l/r), my only splurge in the build, and in a completely different price category from the Blue Alps. So far the Alps seems like very high quality given the relative price. The resistors and caps are all of a very high quality.
7) I wish HIFI2000 had better feet, but that's a small complaint.I can always buy others.
8) For first time builders there may be some confusion with DPDT switches. In my previous B1 I wired the LED differently, but I think Jim's (6L6) trick for wiring it in this case is a fun application. I do think I will wire the switch a little differently, but we'll see what happens.
More soon, with photos!!!
I agree with all the above comments and especially about the wiring of the LED : it is probably the only wiring difficulty of this kit!
This is the reason why I chose to proceed differently: I preferred to wire the LED in series with the resistance by helping me with a small connector, which also allows me to change the color easily by changing LEDs without desoldering it . Then, the red and black wires of this small connector are simply soldered to the output of the ON/OFF switch and the assembly is insulated with heat shrink tubing.
And I re-drilled the hole of the LED at exactly 3mm so that it is visible on the front of the chassis ... And I chose a blue LED, of course!
This is the reason why I chose to proceed differently: I preferred to wire the LED in series with the resistance by helping me with a small connector, which also allows me to change the color easily by changing LEDs without desoldering it
. Then, the red and black wires of this small connector are simply soldered to the output of the ON/OFF switch and the assembly is insulated with heat shrink tubing.And I re-drilled the hole of the LED at exactly 3mm so that it is visible on the front of the chassis ... And I chose a blue LED, of course!
An externally hosted image should be here but it was not working when we last tested it.
An externally hosted image should be here but it was not working when we last tested it.
An externally hosted image should be here but it was not working when we last tested it.
An externally hosted image should be here but it was not working when we last tested it.
Last edited:
I made the dampers in just in case. My other Korg Nutube is the Pete Millett headphone amp and had no issues with that one.
I agree with you that some tubes are more microphonic.
Do you think the outputs of the tubes are less balanced too? I've adjusted one trim pot as low as it goes and can't get below 10.5 volts the other pot would bring the voltage much lower - or is it possible i've got a resistor out of place somewhere?
Cheers
Steve
finished Korg B1. good project. excellent chassis and parts, looks stunning. where was this back in the 70's? To think I had to use a modified PAS-3X back then. I made a few changes, one of which I would like to share. I bought a thin sheet of sorbothane with 3m adhesive on both sides from amazon. I cut 6 pieces the size of the Nutube. I put 2 pieces between the tube and board and 4 pieces between the board and chassis. also put small pieces under the supplied stick on feet. I can tap the preamp with my finger while playing and hear no microphonics that some complain about.
finished Korg B1. good project. excellent chassis and parts, looks stunning. where was this back in the 70's? To think I had to use a modified PAS-3X back then. I made a few changes, one of which I would like to share. I bought a thin sheet of sorbothane with 3m adhesive on both sides from amazon. I cut 6 pieces the size of the Nutube. I put 2 pieces between the tube and board and 4 pieces between the board and chassis. also put small pieces under the supplied stick on feet. I can tap the preamp with my finger while playing and hear no microphonics that some complain about.
What happens when you flip the source toggle switch? How efficient are your speakers?
Thanks
A big thank-you to member drpro for the tip about keyboard silicone rings. I just bought 125 of them on Amazon for seven dollars (link).
FYI, I've used the same HIFI2000 / diyAudio Store chassis on other projects, and found that these adhesive rubber feet made by 3M, really work well: Part number 517-SJ-5514BK at Mouser, cost is 4 x $0.67 .
FYI, I've used the same HIFI2000 / diyAudio Store chassis on other projects, and found that these adhesive rubber feet made by 3M, really work well: Part number 517-SJ-5514BK at Mouser, cost is 4 x $0.67 .
more results, and a few problems
I've finished my build, sort of. A few more notes:
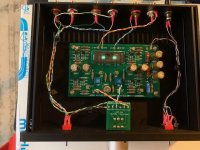
1) the voltages for my build are, T1-T8, respectively: 24.43, 23.64, 22.85, 9.36, 0.67, 0.67, 14.46, 13.62. These last two were set to 9.5 as per NP's notes/build instructions.
2) it can be seen in the attached photo that the tube lights up nicely, but not the power LED. I must have wired that incorrectly. I also changed it from green to blue! I rechecked the wiring but I don't seen anything wrong. I guess I'll need to pull it apart. Suggestions?
3) After checking the voltages I checked the operation and, whoa!!!, is that NuTube microphonic!!! When testers wrote that they could clap their hands across the room and hear it out of their speakers I thought "not possible." Running my MacBook into a Dragonfly and then into the BK1 and then into ACA1.7 monos (I thought this would be a good combination since the builds are of comparable difficulty) and then into Zu dirty weekend mk 2 (97db, 12 ohm) I can hear the high-pitch ringing of the NuTube !LOUD! and clear. I have mounted the NuTube with the supplied adhesive pads and the pre is sitting on the supplied feet without any modifications.
4) I have some Vibrapod feet in a box I will try. After that I'm not sure. The ringing is WAY TOO MUCH at this point to actually use the preamp - turning up the volume is all but impossible - so I'll need to come up with something.
More soon.
I've finished my build, sort of. A few more notes:
1) the voltages for my build are, T1-T8, respectively: 24.43, 23.64, 22.85, 9.36, 0.67, 0.67, 14.46, 13.62. These last two were set to 9.5 as per NP's notes/build instructions.
2) it can be seen in the attached photo that the tube lights up nicely, but not the power LED. I must have wired that incorrectly. I also changed it from green to blue! I rechecked the wiring but I don't seen anything wrong. I guess I'll need to pull it apart. Suggestions?
3) After checking the voltages I checked the operation and, whoa!!!, is that NuTube microphonic!!! When testers wrote that they could clap their hands across the room and hear it out of their speakers I thought "not possible." Running my MacBook into a Dragonfly and then into the BK1 and then into ACA1.7 monos (I thought this would be a good combination since the builds are of comparable difficulty) and then into Zu dirty weekend mk 2 (97db, 12 ohm) I can hear the high-pitch ringing of the NuTube !LOUD! and clear. I have mounted the NuTube with the supplied adhesive pads and the pre is sitting on the supplied feet without any modifications.
4) I have some Vibrapod feet in a box I will try. After that I'm not sure. The ringing is WAY TOO MUCH
at this point to actually use the preamp - turning up the volume is all but impossible - so I'll need to come up with something.More soon.
Attachments
Sounds great!!! Only complaint is the "whistle" when toggled on and off. I'm hoping dampening material and anti-vibration feet will eliminate or at least decrease.
This is my first ever DIY audio project. Cannot overstate how exciting it was to turn it on and hear it play.
I'd like to thank everyone who posted photos of their completed projects. It really helped me figure out how to wire this project...Could not have done this without you!
This is my first ever DIY audio project. Cannot overstate how exciting it was to turn it on and hear it play.
I'd like to thank everyone who posted photos of their completed projects. It really helped me figure out how to wire this project...Could not have done this without you!
Try replacing the top and bottom of the box with something less inclined to ring. Big lump of MDF (very sound deadening) or Acrylic. The vent holes in the case aren't required it's not going to get hot and the front back and sides should conduct any heat to the outside.
What about dynomat or the like to help deaden the chassis?
Hello, I'm new to this forum. And I have some questions about the B1 Korg Pre-Amp.
Is this a Phono pre-amp ? I have an old Pioneer PL-512 (with MM cartridge) without integrated pre-amp so could it be my pre-amp ?
And also I want to build the Starving Student 2 kit, does it fit with the B1 ?
I mean is this configuration work ? : PL-512--->Korg B1--->Starving Student ?
Thanks for your answer.
Hello, I'm new to this forum. And I have some questions about the B1 Korg Pre-Amp.
Is this a Phono pre-amp ? I have an old Pioneer PL-512 (with MM cartridge) without integrated pre-amp so could it be my pre-amp ?
And also I want to build the Starving Student 2 kit, does it fit with the B1 ?
I mean is this configuration work ? : PL-512--->Korg B1--->Starving Student ?
Thanks for your answer.
Sorry, but neither one of those has a RIAA phono stage.
My Korg B1 experience
The Pass Korg B1 is a two input Line stage only. It has enough gain to drive most power amps. I cannot turn mine up past 1/3 of the volume control. It probably would be overkill to pair it with the starving student headphone amp, since that already has a tube gain stage. It is wonderful pairing it with a solid state power amplifier as in my case.
I had a severe microphonics problem on my unit. I could clap my hands 7-8 foot away from the unit and hear the NuTube ring. I tried mounting the unit on large but cheap rubber feet. I also tried closing the vents in the top and bottom panels with multiple layers of thick duct tape with little improvement..
The cure I found is to buy a quantity of Sorbothane 1/8" inner diameter, 1/2" outer diameter thick washers from Amazon. The brand name is Isolate It! and they are sold in packs of 12 units. I bought two packs and mounted them on 1 inch #6 nylon screws and hardware. I put a washer between the screw and the bottom plate of the chassis, stacked four more washers on top, set the PC board down on top of the stacks, put another washer on top of the PC board and then screwed the nylon nut down loosely on top. This eliminated any airborne excitation of the NuTube that I can hear. It only rings now when I work the selector switch.
One problem is that the PC Board makes its chassis ground connection through the metal standoffs used it the kit. I kept one standoff in place to hold a ground lug to which I soldered a ground wire up to the PC board ground. I stacked two sorbothane washers on top of the standoff, but I don't think they contact the board. It sits quite well on the three nylon screws.
I am really enjoying the sound of my NuTube B1 now.
- Status
- This old topic is closed. If you want to reopen this topic, contact a moderator using the "Report Post" button.
- Home
- The diyAudio Store
- Korg B1 completion kit pioneer batch feedback