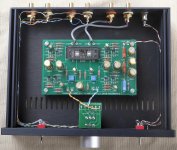
Well all's well now. I have a Hakko powered solder sucker. Removed all active components and then resoldered them.
Two possibilities, most likely my soldering skills, another could be one or more holes didn't plate through to the other side.
I know someone mentioned the fact the solder pads are very small, perhaps a bit larger in the final store boards.
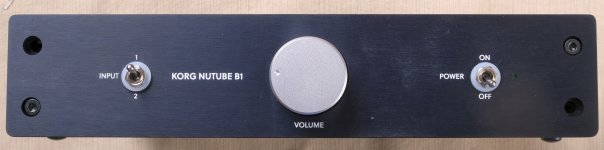
This is just me, the knob is large enough to obscure the word "volume", depending on the surface the B1K is sitting. Suggest have the "volume" printed above the knob.
I added flat nylon washers under the switch nuts to protect the front plate when tightening them, as I am sometimes clumsy. Could be a nice addition for the kits.
After some listening I will add to the thread.
Thanks all
Two possibilities, most likely my soldering skills, another could be one or more holes didn't plate through to the other side.
I know someone mentioned the fact the solder pads are very small, perhaps a bit larger in the final store boards.
This is just me, the knob is large enough to obscure the word "volume", depending on the surface the B1K is sitting. Suggest have the "volume" printed above the knob.
I added flat nylon washers under the switch nuts to protect the front plate when tightening them, as I am sometimes clumsy. Could be a nice addition for the kits.
After some listening I will add to the thread.
Thanks all
Attachments
I know just me!!
Here you go Jim, more than you need https://www.amazon.com/Sutemribor-N...rds=black+nylon+washers&qid=1570484790&sr=8-3
I just had white ones on hand, someday I to shall have black washers!!
Here you go Jim, more than you need https://www.amazon.com/Sutemribor-N...rds=black+nylon+washers&qid=1570484790&sr=8-3
I just had white ones on hand, someday I to shall have black washers!!
Although the Amp sounds excellent as-is, I am curious about replacing the Alps RK-27 volume pot with something like a TKD volume pot. I have no bias against the Alps volume pot since that is the stock volume pot in my Audio Research LS7 tube line stage, and I enjoy this as my reference preamp.
I've been listening to the unit with the Alps pot for the past couple of weeks. I have a TKD 2CP-2511 50k pot that I swapped in earlier today. In comparison to the Alps pot, it sounds like someone (me, I guess) turned down the treble and turned up the bass a bit. I would only consider swapping for a TKD if you are finding the preamp a bit overly exuberant in the treble region. I personally am not finding the TKD universally better than the Alps. It will be system dependent.
I do have to say this is a very wife friendly product. It was only last year I received permission to put a small stereo in the living room. Over time I let it expand, not a good idea.
Now I am back to the B1k, M2, very small Pi player/Dac combo and a 1U FM receiver. Now back to smiles.
Less is more.
Now I am back to the B1k, M2, very small Pi player/Dac combo and a 1U FM receiver. Now back to smiles.
Less is more.
I like the idea of the nylon washers. If I can find them in black I'll absolutely consider it.
Being that it's the only knob and a preamp, I bet everybody will already know it's the volume knob.The label in general is superfluous.
I found these on Amazon—accidentally—I was searching for metal.
https://www.amazon.com/gp/product/B07MXC1NZS/ref=ppx_yo_dt_b_asin_title_o04_s00?ie=UTF8&psc=1
Size is too small... But it's a start. Oops... just saw that someone beat me to it!
I agree with the "Volume" printed above the knob. Great call.
Unfortunately I had to put this on hold a while, but I'm back at it this afternoon, and wanted to send a couple of notes.
Some suggestions on wire length will be helpful to the novice.
My kit didn't come with the screw terminals shown on the volume control board, but I think I have some of them around somewhere and they seem like a good idea so I'm going to go look.
I'm sure I'll have more remarks/issues. (I'm intimidated by the led power indicator positioning, but will probably tackle it soon.)
Thanks for all the help.
pete
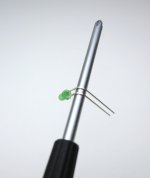
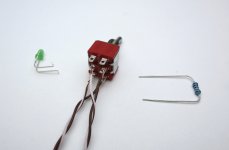
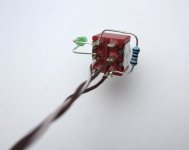
I know I'm an amateur, but isn't there a more precise way to mount the power led? There must be some kind of grommet or holder it could go in. I'm just working on guesswork about where to make the bends and cuts. (And I'm hoping I guessed right about the polarity from the hints in the photo gallery).
Oh well, here goes!
Oh well, here goes!
The kit didn't include screw terminals, that was simply showing you could add them. LED is easy solder it as shown, you can simply bend the leads to point it at the hole in the case.
This I agree with, someone pointed out how small the holes and unless you are inline you really don't see the glow from the LED. This person enlarged the hole to 3mm I believe.
I think enlarging that hole for the production run would be nice.
This I agree with, someone pointed out how small the holes and unless you are inline you really don't see the glow from the LED. This person enlarged the hole to 3mm I believe.
I think enlarging that hole for the production run would be nice.
Thanks for the encouragement. I think it went okay, but it will be helpful for the instructions to give some measurement guidance about where to bend and cut the led, and to make clear which side the longer lead goes to.
I found my screw terminals, and even learned that the two-terminal ones can be slid together to make a 6-pack! I like this because I may change to different pot/attenuator in the future.
I've got the board stuffed, so I'm moving along!
I found my screw terminals, and even learned that the two-terminal ones can be slid together to make a 6-pack! I like this because I may change to different pot/attenuator in the future.
I've got the board stuffed, so I'm moving along!
Okay, I finished and it works! Thanks to all for the help! It sounds great- quiet, clean, a little warmth- very nice!
My biggest hiccup was related to the screw terminals I added to the Alps board. I saw them in 6L6’s photo guide, but I didn’t look carefully and notice which side of the board to put them on! So after I got it all done and working, and got the test voltages dialed in, I had to desolder the board and do it again. It reminds me of my usual experience with assembly of IKEA furniture - I always have to partially disassemble it and do it again! I guess I pay better attention to worded instructions than pictorial ones.
This is my first Pass/DIYAudio kit, so I might not be getting the intended level of expertise right, but as I noted above, a novice would benefit from explicit recommendations about wire lengths, order of washers and nuts on the hardware, as well as some of the tips about stuffing the board from NP’s guide. ( It might be too elementary, but I seem to recall old Dynaco or Heathkit kits specifically indicated the length of wires and even how long the stripped part should be.)
But I’m nitpicking- it’s obviously a great kit with great support if I was able to get it (almost!) right on my first turn-on. I’m feeling the pride of construction- now I’ll have to see if (when!) I can justify my next project. I think an amp or two might be for sale sometime soon!
Great fun, great preamp. I only wish I could see the Nutube glow! Thanks everybody!
")
Given up on the Khozomo board and wired it all up to just one of the four inputs I planned until a elma rotary switch turns up.
Only problems I had with the kit itself are of a newbie nature with the numbers printed on the resistors not matching those on the board. ie 1001 not 100K 3323 not 33.2k that sort thing needs some explanation in the documentation when it goes out. Measuring them using my multimeter didn't shed much light on some of the values - too small for some meters?
I soldered the Korg to solid core cable suspending it on springs if you like but it's still pretty microphonic like that. I did it because I wanted to see it glowing that's at least part of the appeal of valves I'll work on that.
Sound wise - hooked up to a pair of ACA - getting better as the hours roll by little harsh initially but settling in. Massive deep wide soundstage with huge amounts of textural detail by that I mean acoustic guitars where you pick up a lot of the resonance coming from the body of the guitar itself. Very solid imaging. Been listening for hours now and need to shut everything down and get some sleep soon. 11.00pm Sunday night as I type this.
I built the kit in one afternoon, very straight forward. The chassis and volume knob are of very high quality. It really looks the business.
The only issues are that I get a slight buzz of hum when touching the volume knob. Each channel has the ground connected to ground-in on the board. I chose the TDK pot over the ALPS. What is the correct way to avoid this problem?
The Korg is highly microphonic even though, I mounted it on double sided tape. If I clap my hands from the listening position I get a zing! I have placed Vibrapods under the chassis for now.
I have compared the SMPS with a S11 (AMB) linear PSU and there is really no comparison. The SMPS gives a hard and grainy edge to the treble, but hey, it is great for getting started and building a better PSU is not difficult.
I would suggest to change at least the 10 uF caps for Elna Silmics. It is a matter of a few dollars more on the BOM. The coupling caps from the kit are only just sufficient.
I get great bass, liquid midrange and only the treble need a bit of improving. All in all a very successfull kit and the sound stage is really special.
Thank you to Nelson Pass for making this design available. I cannot think of many preamps provinding this level of value!
- Status
- This old topic is closed. If you want to reopen this topic, contact a moderator using the "Report Post" button.
- Home
- The diyAudio Store
- Korg B1 completion kit pioneer batch feedback