OK after a coffee and playing with the pieces I have the chassis in 1 piece.
Cool.
I was going to offer up some of the pics from 6L6. I found them in a gallery last week but I've lost the link.
There is some detail here:
Aleph J illustrated build guide
and if you dig around other 6L6 build guides you'll get further ideas.
Might help the next person ... like me.
EDIT:
This is what I was looking for:
Illustrated Guide to the 4U Deluxe Chassis
If Jason gets the chance, he could include this link to the 1st post.
Last edited:
I've bought several chassis from the store, and this is the first time I've been disappointed in HiFi2000. The order form for the Galaxy clearly states that feet are included, but no feet were in the package and Jason says they are not included (just bumpers which are shorter than a transformer bolt head). In addition, there were no sheet metal screws to hold the covers on, so I guess I'll pick some up at the hardware store and paint them black (Rolling Stones reference unintentional).
Last edited:
The Galaxy doesn't use sheetmetal screws to hold the tops and bottoms on...
There should be some small (M2? M2.5?) black countersunk screws and corresponding nuts for them. The nuts are slid into the channel on the edge of the aluminum extrusion and the screws connect to them to hold the lid.


There are more photos in the LXmini Crossover guide - Pass/Linkwitz LXmini analog crosover - diyAudio Guides
Yes, the provided stick on feet are not super tall. Use a different bolt or get different feet.
If you've actually got missing hardware, we'll get you what should be included.
There should be some small (M2? M2.5?) black countersunk screws and corresponding nuts for them. The nuts are slid into the channel on the edge of the aluminum extrusion and the screws connect to them to hold the lid.


There are more photos in the LXmini Crossover guide - Pass/Linkwitz LXmini analog crosover - diyAudio Guides
Yes, the provided stick on feet are not super tall. Use a different bolt or get different feet.
If you've actually got missing hardware, we'll get you what should be included.
Cool.
I was going to offer up some of the pics from 6L6. I found them in a gallery last week but I've lost the link.
EDIT:
This is what I was looking for:
Illustrated Guide to the 4U Deluxe Chassis
If Jason gets the chance, he could include this link to the 1st post.
That's the thread, but many of the links to photos are gone, apparently. What's still available show the various panels, but none of the hardware, so it's still a bit of a guessing game.
The Galaxy doesn't use sheetmetal screws to hold the tops and bottoms on...
There should be some small (M2? M2.5?) black countersunk screws and corresponding nuts for them. The nuts are slid into the channel on the edge of the aluminum extrusion and the screws connect to them to hold the lid.


There are more photos in the LXmini Crossover guide - Pass/Linkwitz LXmini analog crosover - diyAudio Guides
Yes, the provided stick on feet are not super tall. Use a different bolt or get different feet.
If you've actually got missing hardware, we'll get you what should be included.
My bad on the screws - should have looked closer at the diagram.
But the order form says I should have gotten feet. Your response is frankly not great on this one.
Attachments
The little peel-off black sticky dots are the regular feet. Were they not included?
Check your PM
The other cases I have bought, when I select "regular feet", include plastic disk feet that bolt on. I see this one is different and I'm fine sourcing feet for it. Maybe too much coffee this morning has me cranky.
Those big plastic feet are for heavier things like the power amp chassis.
Also, they mount to the chassis in a way that a Galaxy's construction can't accommodate because of the aluminum extrusions - they screw into the bent metal frame rails that the heatsinks are attached to in a Dissipante, for example.
Also, they mount to the chassis in a way that a Galaxy's construction can't accommodate because of the aluminum extrusions - they screw into the bent metal frame rails that the heatsinks are attached to in a Dissipante, for example.
I've bought several chassis from the store, and this is the first time I've been disappointed in HiFi2000. The order form for the Galaxy clearly states that feet are included, but no feet were in the package and Jason says they are not included (just bumpers which are shorter than a transformer bolt head). In addition, there were no sheet metal screws to hold the covers on, so I guess I'll pick some up at the hardware store and paint them black (Rolling Stones reference unintentional).
Thanks for writing into the helpdesk email ticket system yesterday. As I said in my reply to your helpdesk ticket yesterday:
1. Yes feet are included and those bumpers are the feet. Hifi2000 has been selling the Galaxy chassis for decades without any major changes and it has always been this way. A while back they upgraded the feet (bumpers) from a harder material to the current hemispherical ones which IMO have a softer more squishy feel and I prefer them. They are both "small feet" however, and I will certainly document this better in the future.
The rub is that to stick the Pesante Dissipante feet on 90% of Galaxy chassis (ie: small ones) would be overkill and they would be grossly oversized. I think the issue here is you've bought one of the largest Galaxy chassis and for that size it falls in between the use cases for the two different kinds of feet.
2. When you asked about the missing screws, I requested you send a photo of what you got so we could ascertain if something was (a) missing in which case we would would send an immediately replacement for the missing screws, or (b) this was a case of the included assembly manual not being super intuitive.
From the conversation here it looks like it was the latter in this case. I do apologize that we don't have assembly videos of each chassis yet, this is something I would like to do in 2019 for sure, and it would in this case have both shown the style of feet included as well as shown how to assemble the chassis. You're not the first person to be confused about how to assemble a Hifi2000 case.
Thank you for your past and present patronage of the store and I'm sorry about the lack of good instructional medium in this case (pun intended).
Last edited:
Thanks for writing into the helpdesk email ticket system yesterday. As I said in my reply to your helpdesk ticket yesterday:
1. Yes feet are included and those bumpers are the feet. Hifi2000 has been selling the Galaxy chassis for decades without any major changes and it has always been this way. A while back they upgraded the feet (bumpers) from a harder material to the current hemispherical ones which IMO have a softer more squishy feel and I prefer them. They are both "small feet" however, and I will certainly document this better in the future.
The rub is that to stick the Pesante Dissipante feet on 90% of Galaxy chassis (ie: small ones) would be overkill and they would be grossly oversized. I think the issue here is you've bought one of the largest Galaxy chassis and for that size it falls in between the use cases for the two different kinds of feet.
2. When you asked about the missing screws, I requested you send a photo of what you got so we could ascertain if something was (a) missing in which case we would would send an immediately replacement for the missing screws, or (b) this was a case of the included assembly manual not being super intuitive.
From the conversation here it looks like it was the latter in this case. I do apologize that we don't have assembly videos of each chassis yet, this is something I would like to do in 2019 for sure, and it would in this case have both shown the style of feet included as well as shown how to assemble the chassis. You're not the first person to be confused about how to assemble a Hifi2000 case.
Thank you for your past and present patronage of the store and I'm sorry about the lack of good instructional medium in this case (pun intended).
Hi Jason, thanks for the response. I had some pads on hand that make good feet, and I understand now how the case goes together (different from the Pesante I bought recently. I jumped the gun on my post.
Please see attached for some models I made of the Dissipante 2U, 3U and 4U 400mm chassis with a 10mm faceplate and 3mm Al panels. These were created from a 2U chassis I purchased and was able to use to identify differences between the dwg files available on diyaudio store. I haven't validated the 3U and 4U models against the physical hardware. It would be great to learn about any errors in the models.
Model in Onshape: Onshape
The step file zips are slightly to large to post here, instead are links to google drive.
2U Step File: 2U.zip - Google Drive
3U Step File: 3U.zip - Google Drive
4U Step File: 4U.zip - Google Drive
Hopefully useful for somebody else! Happy New Year.
Model in Onshape: Onshape
The step file zips are slightly to large to post here, instead are links to google drive.
2U Step File: 2U.zip - Google Drive
3U Step File: 3U.zip - Google Drive
4U Step File: 4U.zip - Google Drive
Hopefully useful for somebody else! Happy New Year.
I like the Deluxe Amp Chassis offering, but would prefer a blank back panel since I am using Powercons and speakons. So the only way to get the deluxe chassis with blank back panel is to get the Deluxe chassis and a blank back panel or buy each of the parts separately 4U dissipante chasis, UMS heat sinks substitution, and baseplate (am I missing something)?
There's no way to order that directly through the website, but if you email contact@diyaudiostore.com we can make you up a custom invoice for this. A choose-your-own-adventure® style chassis configurator is on the cards for the future, and in the meantime we could add a substitution for this option, but it's not a common request so it hasn't been done to date.
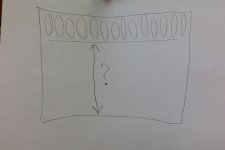
What are the size and position of the row of holes in the default aluminum cover of the 350 mm deep Slimline chassis? If you can show a drawing, it would be super helpful; otherwise, I'm mostly interested in the distance marked by the question mark in the attached drawing.
Thank you!
View attachment 739648
There's about 29,8 - 29,9 cm from the end of the vent holes to the edge of the cover
- Home
- The diyAudio Store
- Chassis Discussion

