..........
I have another question here, should I place the speaker completely on the outside or make a cavity with the router? The latter will weaken the deflector if it is too deep .....
Deep 1/4 ? 1/2 ?
What do you think? Any suggestions ?

´Tas contento, wacho! Felicitaciones.
Congratulations for the championship.
Muy feliz !
Very happy !
Muchas gracias !
Pero no se si sabes que cada vez que Racing sale campeón el pais está como el hortelano.....así que hubiera preferido salir últimos pero en un país normal....
Thank you !
But I do not know if you know that every time Racing is champion the country is like the gardener ..... so I would have preferred to leave last but in a normal country ....
Maldiciones del Deporte: Racing y la leyenda de los siete gatos negros - VICE Sports Latinoamerica
Sorry Off Topic....
Attachments

I have another question here, should I place the speaker completely on the outside or make a cavity with the router? The latter will weaken the deflector if it is too deep .....
Deep 1/4 ? 1/2 ?
What do you think? Any suggestions ?
Acoustically it should make no difference.
The wavelengths are so long at subwoofer frequencies that there will be no problem with edge diffraction effects that could be a problem for a mid or high driver if they were mounted on the surface of the baffle.
Aesthetically, it might look nicer recessed so the edge of the driver frame is level with the surface of the baffle.
Structurally, I've had anecdotal evidence that recessing an 18" driver by 8mm in 18mm birch ply (so leaving 10 mm of material supporting the driver) made no difference to the strength of the enclosure. However I don't recall if the material you're using is as strong as birch ply, so that may be useless info to you, sorry.
<EDIT> I just read back in the thread to where you said you will use 2x18mm MDF laminated together for the baffle - that will be strong enough to recess the driver all the way with no problems if you want to do that, and the rest of the design allows it.
HTH,
David.
Last edited:
Acoustically it should make no difference.
The wavelengths are so long at subwoofer frequencies that there will be no problem with edge diffraction effects that could be a problem for a mid or high driver if they were mounted on the surface of the baffle.
Aesthetically, it might look nicer recessed so the edge of the driver frame is level with the surface of the baffle.
Structurally, I've had anecdotal evidence that recessing an 18" driver by 8mm in 18mm birch ply (so leaving 10 mm of material supporting the driver) made no difference to the strength of the enclosure. However I don't recall if the material you're using is as strong as birch ply, so that may be useless info to you, sorry.
<EDIT> I just read back in the thread to where you said you will use 2x18mm MDF laminated together for the baffle - that will be strong enough to recess the driver all the way with no problems if you want to do that, and the rest of the design allows it.
HTH,
David.
Hello David
That answer is very pleasant for me, thank you !
Because when placing the speaker on the outside, the sealing will be perfect, the rear sealing gasket will settle on a very smooth surface.
In addition, the thickness of 36 mm of the panel will allow me to place screws directly for wood, without piercing the panel, nor will have to use nuts T behind, etc.
When I built DTQWTII, I reinforced the back panel and placed the two twoofers flush with it. As you say, aesthetically they look very good, but the task was very hard, so I'll pay attention to Troels here.
Rolando
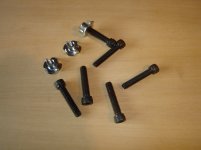
Screws for mounting drivers
" First of all: Threaded inserts and T-nuts: I hate them! They do nothing good a standard wood screw cannot do.
Threaded inserts are a pain to mount correctly and most often there is not enough space to mount them properly due to chamfering of driver hole.
T-Nuts: Even worse! I had numerous diy-speakers in for crossover work and the first thing that happens when you have to un-mount a T-nut mounted driver is that one of the T-nuts gets loose and starts rotating with too little of the screw exposed for cutting. And mostly you cannot get to the inside of the cabinet to get hold of the loose T-nut.
Next: 6-8 good wood screws will fasten any driver more than needed. If I know I have to remove the driver several times I start drilling a 2.5 mm hole (in MDF) and fill the hole with synthetic lacquer. Leave it overnight and you'll have a plasticised hole even stronger. For solid wood this is not needed. In all cases with the above shown screws, drill a 2.5 mm hole before mounting the driver. "
Tips and ideas Copyright 2012-14
Attachments
Last edited:
No, just can be an added perk if done with this in mind.
............
Note that best to double up the bottom plate if not sitting hard on the floor.
..............
GM
Not only have I taken note, your advice has been put into practice.
Attachments
-
 IMG_20190406_151113.jpg626.6 KB · Views: 43
 -
 IMG_20190406_150732.jpg555.5 KB · Views: 30
 -
 IMG_20190406_150721.jpg644.8 KB · Views: 32
 -
 IMG_20190406_150317.jpg760.8 KB · Views: 52
 -
 IMG_20190406_150230.jpg666.7 KB · Views: 48
 -
 IMG_20190406_150220.jpg638.3 KB · Views: 29
 -
 IMG_20190406_144840.jpg565.5 KB · Views: 29
 -
 IMG_20190406_144829.jpg526.2 KB · Views: 39
 -
 IMG_20190406_143310.jpg453.2 KB · Views: 39
 -
 IMG_20190406_143240.jpg509.6 KB · Views: 53
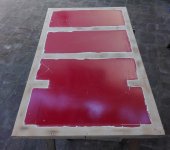
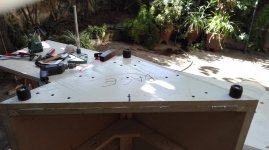
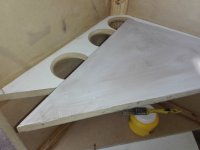
As always, the order of the photographs may differ from the sequence in which the task was performed.
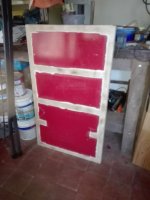
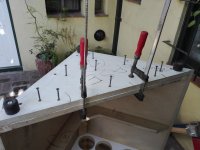
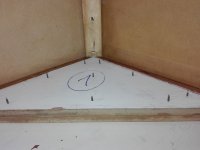
Here the reinforcement panel, with the glue applied before fixing it with the presses and then screwing them.
All the screws are of the self-piercing type, but as they are not suitable for MDF of this thickness (actually I think that for no thickness) they have made their respective holes previously.
The hole in the plate that carries the head of the screw must not interfere with the threads of the thread or they will lock, they must be of the external diameter and the hole so that they "grip and pull" the screw must be of the internal diameter (without measuring the threads ) !
I do not think you understand, you know, my English is very limited. I will draw a picture later for a better understanding.
Attachments
Boxes, frames, etc., historically were clamped to sufficiently rigid/massive tables so that they could be twist tested, so in your case, once it can't be twisted at all, you're done........ except now there's still the issue of panel 'drumming' and for a 'sub' woofer one ideally needs it to 'ring like a bell', which when making it out of wood normally requires very rigid material [high MOE] + some bracing. FWIW, my test is to be able to stand an old square edged coin on end and have it not 'walk' or fall over when driven at high power in the LF. Takes quite a bit of 2x4 bracing 'skinned' with 3/4" marine grade no void plywood for dual low Xmax 15" in ~30 ft^3 and why I built them like a small house.
GM
GM, thanks for the advice (in bold),
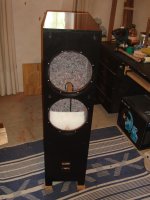
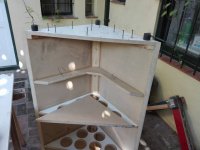
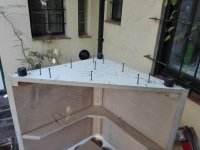
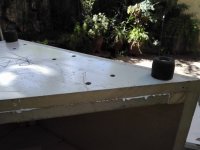
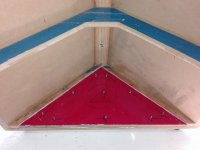
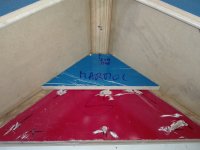
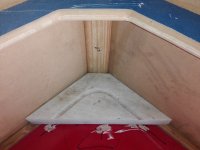
I think the loudspeaker deflector panel will not allow any torsion. (its weight is 24 kg, and the thickness is 36 mm)The "big" problem that luckily I discovered before closing the cabinet in a definitive way, is the imbalance of the artifact. If you add the weight of the speaker (almost 8 KG) to the deflector, we have a very poorly distributed load, so I also took your advice to use weights to firmly seat the cabinet on the floor.
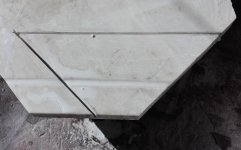
You can see in blue a piece that is the mold that I will use to mark and then cut out the pieces of marble that will go there, one on top of the other, I think there will be three for each cabinet.
We will see how it behaves. I would like to avoid a marble plate on top of the cabinet, aesthetically I do not like it, I want a veneered natural wood finish there....
Attachments
As always, the order of the photographs may differ from the sequence in which the task was performed.
Here the reinforcement panel, with the glue applied before fixing it with the presses and then screwing them.
All the screws are of the self-piercing type, but as they are not suitable for MDF of this thickness (actually I think that for no thickness) they have made their respective holes previously.
The hole in the plate that carries the head of the screw must not interfere with the threads of the thread or they will lock, they must be of the external diameter and the hole so that they "grip and pull" the screw must be of the internal diameter (without measuring the threads ) !
I do not think you understand, you know, my English is very limited. I will draw a picture later for a better understanding.
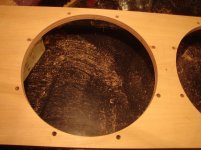
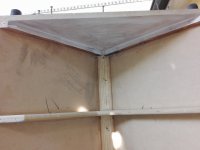
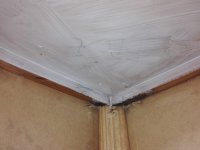
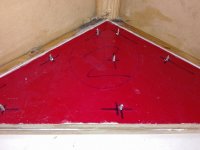
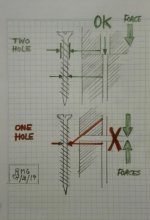
Here is what happens when joining panels of MDF, BB, or natural wood, it does not matter ...
If the panels are pre-pressed firmly, a single hole for the self-drilling screw will work, but if we want the panels to come together firmly without using presses and expel the glue, a single hole can be counterproductive.
Is that the head of the self-drilling screw reaches its top on the top panel and can not move forward, this prevents further progress and is tightened on the bottom.
There can be in many cases a very important free space that spoils the work.
The way to avoid these problems is to free the top panel from the action of the screw thread, that is, the worm fillet works exclusively on the bottom panel.
That's why I prefer that the screws protrude and then cut them out, to give the maximum "grip" on the bottom panel.
Attachments
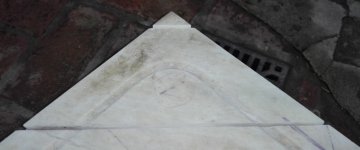
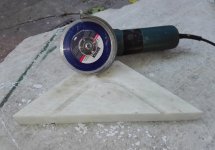
Cutting six pieces of marble is hard and dangerous work !
The cutting disc has already worn out, so I guess it would not be of good quality......
I found out and they recommended me a special one for marble, so I'll go for it.
I have also decided the way they will be placed, - and insured - to avoid that they could be detached, there will be no silicone sealant as I thought at first ...
Please do not harass me with questions about it and be patient !
The corresponding chapter will arrive in the next installment ....
Attachments

I have bought a "special" disc for marble or similar hard surfaces.
Current price in Argentina (hyperinflation through) $ 200, equivalent today (tomorrow changes ) to U$S 4.50 .....
It has been used to cut 3 pieces, shows signs of deterioration and no longer cuts easily ... so I will have to buy another to cut three more pieces.
Well, it's still "good business", it's more convenient than buying a high quality disc, whose price oscillates at U$S 20 or more .....
I guess the quality lies in the amount of synthetic diamond that they carry on the cutting edge ....
Each cut block weighs approximately 2.5 KG, then will have 7.5 kg equivalent to the weight of the Eminence speaker of the project.
I think that will be enough.
Again, I mention that this task is very dangerous, to those inexperienced in work with manual cutting tools of this type, I would recommend that you refrain from doing so, it is better to get an assistant to help lift the entire block of marble in the trunk of the car and take it to a specialized house so they can do the work.
I mean it very seriously, no joke this time....
Current price in Argentina (hyperinflation through) $ 200, equivalent today (tomorrow changes
) to U$S 4.50 .....It has been used to cut 3 pieces, shows signs of deterioration and no longer cuts easily ... so I will have to buy another to cut three more pieces.
Well, it's still "good business", it's more convenient than buying a high quality disc, whose price oscillates at U$S 20 or more .....
I guess the quality lies in the amount of synthetic diamond that they carry on the cutting edge ....
Each cut block weighs approximately 2.5 KG, then will have 7.5 kg equivalent to the weight of the Eminence speaker of the project.
I think that will be enough.
Again, I mention that this task is very dangerous, to those inexperienced in work with manual cutting tools of this type, I would recommend that you refrain from doing so, it is better to get an assistant to help lift the entire block of marble in the trunk of the car and take it to a specialized house so they can do the work.
I mean it very seriously, no joke this time....
Attachments
Last edited:
Much easier, but impractical ....
1) Hummm, you would have to put the bag of sand with the cabinet installed in its final place. (That thing that is not cleaned under the cabinet was a joke, crazy!, must be moved every so often)
2) To do the above, it is necessary to remove the speaker, place the bag of sand, arrange it over the back corner (fundamental) solder the terminals, screw the speaker again, etc ...
3) Are you contemplating the insults of WAF by doing all that in the living room?
This is not a cart pulled by horse with melons, which are accommodated alone at the beginning of the movement, friend ....
Last edited:
I supposed you will understand that the bag would be INSIDE the cabinet, in tha same place as the piece of marble stone.
Of course I understand, it is deduced from my previous post
For your idea to be applicable, you would have to fix the bag of sand in that corner, you could tie it, or make a wooden box with the sand inside it, or something similar ...
I repeat that the bag of sand should not move from its corner when moving the cabinet.
In addition, the specific weight of the sand is much lower than the marble, it would occupy more volume, which would reduce even more the available space, then, the Qts would increase.
http://www.euroimportadora.com.mx/SYS_user/tips_tecnicos/es/Peso_Especifico_de_Materiales.pdf
Thanks Osvaldo equally for the idea
The advantage of the sand bag is that it doesn't vibrate.
I agree with that...
- Status
- This old topic is closed. If you want to reopen this topic, contact a moderator using the "Report Post" button.
- Home
- Loudspeakers
- Subwoofers
- Eminence Delta Pro 18 A in prism sealed 150 liters