You might want to double check with Ricci. I want to say he likes designing some of his enclosures with Alpine Type R's.
Ill check on that! I know i did model the Sundown sa18v2 and the sundown x18 in the othorn. X18 was obsurdly overkill. You could run that thing full power/no filter and never reach its xmax of 30mm. Both modeled very well with compression ratio. But again, an x18 is over 600 a piece and the sav2 is almost 500. I love the designs and i love the sound, but i face the math. My setups will most likely never exceed a crowd of 400-500. So for me I cant justify the $500+ drivers used in some.
My mistake, it's lilmike that designs Alpine enclosures.
Yep. Best budget speaker in a TH ive found to date! Alpine sws! around 150usd a speaker!
NEW TH18 build !
SO !! I just did the Due diligence and read through this mammoth thread, in almost Its entirety...
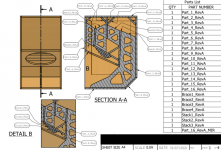
I have acquired what I believe to be the most up-to-date version of the cut-sheet, for the Mark1
I have the Schematic, and I have settled on a driver, based on the most complete cone volume correction methodology and blueprint that I could find.
I have settled to model after Crescendos build, and am opting for a B&C18SW100 4 ohm
I have already purchased 18000 Watts of Class D amplification 3000watt program per channel. and am getting quotes for 6 drivers and precut wood for 6 boxes.
Watch this space !!
SO !! I just did the Due diligence and read through this mammoth thread, in almost Its entirety...
I have acquired what I believe to be the most up-to-date version of the cut-sheet, for the Mark1
I have the Schematic, and I have settled on a driver, based on the most complete cone volume correction methodology and blueprint that I could find.
I have settled to model after Crescendos build, and am opting for a B&C18SW100 4 ohm
I have already purchased 18000 Watts of Class D amplification 3000watt program per channel. and am getting quotes for 6 drivers and precut wood for 6 boxes.
Watch this space !!
Build Is coming along great, I have been coalescing with a CAD designer to improve the schematic sourced, and add rebates for the interior horn into the side panels, for ease of accurate assembly, but I am wondering, do you have any suggestions for screws?
I am very sure we can get away with some self-tapping wood screws, But I thought some type of tapping screw with a partner insert it can tap into to prevent wood damage may be a superior choice...
Any Suggestions...
Also, the amplifiers I decided on got changed, and now I am building 8 Cabinets, with Two 27200 watt @ 4 Ohm 4 channel Powersoft clones, will post a piccy when they arrive... Also opting for the SW115's instead!
But for now.. Screw Suggestions : P
Threaded inserts would not be an advantage.
Drywall screws work fine, and are the least expensive option. Use plenty of them!
Depending on the hardness of the plywood, they may require countersinking to avoid heads snapping off when set flush, though seldom need pilot holes drilled using 3/4 inch (18mm) plywood.
Drywall screws work fine, and are the least expensive option. Use plenty of them!
Depending on the hardness of the plywood, they may require countersinking to avoid heads snapping off when set flush, though seldom need pilot holes drilled using 3/4 inch (18mm) plywood.
Any reasoning behind why you would think that threaded machine screws and counterpart inserts would not be a benefit?
We were also thinking about glueing and screwing on one side and having the opposite side, attached via screws, with no glue, and a fit gasket, recessed into the rebate slots for the interior horn panels, to make any servicing easier.
Any thoughts about that?
We were also thinking about glueing and screwing on one side and having the opposite side, attached via screws, with no glue, and a fit gasket, recessed into the rebate slots for the interior horn panels, to make any servicing easier.
Any thoughts about that?
Qkallisti,1)Any reasoning behind why you would think that threaded machine screws and counterpart inserts would not be a benefit?
2)We were also thinking about glueing and screwing on one side and having the opposite side, attached via screws, with no glue, and a fit gasket, recessed into the rebate slots for the interior horn panels, to make any servicing easier.
1) For mounting the driver, T-nuts or threaded inserts are a good idea, as those 8 screws are directly supporting the driver weight, and the driver may require replacement.
Using threaded inserts for cabinet construction would require at least double the building time and fastener expense with no benefit over standard wood (or drywall) screws.
2) A properly built sub cabinet will not require any internal service, other than access to the driver, which simply requires removing the grille, if you use one.
Art
Qkallisti,
1) For mounting the driver, T-nuts or threaded inserts are a good idea, as those 8 screws are directly supporting the driver weight, and the driver may require replacement.
Using threaded inserts for cabinet construction would require at least double the building time and fastener expense with no benefit over standard wood (or drywall) screws.
2) A properly built sub cabinet will not require any internal service, other than access to the driver, which simply requires removing the grille, if you use one.
Art
Thanks Art, this is noted
")
Sent away for quotes to a wood supplier for cuts and a routing company for finishing today.
How is this Cone Volume correction looking if utilizing a B&CSW115...
I did see some specific volume corrections labeled as B&CSW115 appropriate that involved changing the shape of the horn, but couldn't find specific schematics, I believe due to IP infringement on the Danley TH115, or something to that effect, I believe the design we implemented in the technical drawings I had produced, is one suggested by someone to CRESCENDO during his build...
Just curious if everything seems to be in order.
Attachments
As I understand it this is a slightly sub-optimal correction as the horn fold could be modified to occupy the space filled by the stacked boards, giving a little more horn path length. Additionally some of the 'reflector' panels could be removed to give slightly more volume to the horn path. Once these modifications are done however the resultant horn was so close to the TH118 that it was almost a clone and people felt uncomfortable publishing plans even if it was derived.
independently.
However I think the main benefit of the correction is reported to be improved perceived sound quality at >1000W input power caused by more even pressure across the cone, this correction should accomplish that.
independently.
However I think the main benefit of the correction is reported to be improved perceived sound quality at >1000W input power caused by more even pressure across the cone, this correction should accomplish that.
Xlim/Xmech on the BC 18SW115 (60mm peak to peak excursion) is from the driver's surround limitations, not the voice coil former slapping the back plate. The surround would need to tear loose before the voice coil former would make contact with the back plate.Does anyone get a "bucking" sound from their th118 xoc1 design? I think its maybe that it needs more bracing to stop the cab from making that noise... Im driving it with b&c sw115-18
The xoc1 TH118 design has enough bracing, a "bucking" sound is not from inadequate bracing.
The noise could be from loose glue joints or a dragging voice coil in the driver, slapping de-laminated plywood, loose bracing, or air leaks in the cabinet or around the driver.
Using a very slow sine wave sweep should help determine what frequency causes the noise. After finding the frequency, you could listen to the output of a hand held microphone through headphones to determine what area the noise originates from.
If the driver itself is not the problem, banging on various cabinet parts with a rubber mallet may also elicit the noise.
Art
Thread finished. Great amount of learning in reading front to back on this one - especially around cone correction and the impact of horn path length (amidst everything else).
Going to be modifying the Mk1 plans to consider these two items (and perhaps grow the cabinet slightly as per the post around the #1000 mark).
Will post some results here as we progress. Going to be using four of these (loaded with 18SW115's) with two PM90's.
After this build, we're going to explore a cabinet to drive 85hz to 200hz or so. Does anyone have any suggestions?
Hey Art,
Part of thinking behind our desire to building a 'kick bin' was to elevate the PM90's to reasonable height. With the TH18 sitting at 1m, the horn of the (if we stack it directly on the TH18) is around 1500mm off the ground.
My intuition tells me that the PM90's horn should sit about 2500mm off the ground. If you had any reocmmended resource for stack placement - I'd love to give it a read.
The second reason was to allow the TH18 to be crossed over around 85hz, let it cruise. Kick bin to run from 85hz to 200hz, and the PM90 from 200hz to 20khz.
Do you think that a kick bin sitting around 1500mm off ground (below ear level for the vast majority of punters) is going to hurt?
Yes, if you play it loud, that kick bin can hurt the vast majority of punters who are too close.My intuition tells me that the PM90's horn should sit about 2500mm off the ground. If you had any reocmmended resource for stack placement - I'd love to give it a read.
The second reason was to allow the TH18 to be crossed over around 85hz, let it cruise. Kick bin to run from 85hz to 200hz, and the PM90 from 200hz to 20khz.
Do you think that a kick bin sitting around 1500mm off ground (below ear level for the vast majority of punters) is going to hurt?
As well as hurting those close, the upper frequencies are lost through absorption from the meat bags, what makes it past them will be muddy sounding.
The TH18 is fine to 100, the PM90 is also, no need for a separate bin between using those designs.
2.5 meters is barely above head level, and the LF portion of the PM90 hits 130+dB at 1 meter at 600Hz, it can cause hearing hearing damage in short order.
If you plan to use the headroom available from a top cabinet or kick bin used above 100 Hz, you and your audience will end up with hearing damage if they are not elevated high enough that inverse distance (-6dB per doubling of distance) reduces SPL to a safe level.
Lifts or scaffolding are a requirement.
NIOSH and OSHA provide guidelines for what is considered "safe" levels, above those levels hearing loss is cumulative. Using the "dBA slow" meter level, you can check out level around your system.
As an example, let's say your music averages -10dB less than peak levels, so reads 120 dB SPL "Slow" when hitting 130dB peak.
Note the "A" weighting scale drops off below 1000Hz, at 200Hz is -10dB, so the 130dB peaks read 110 dBA Slow at one meter.
NIOSH allows only ONE MINUTE exposure at that level, the less stringent OSHA allows a half hour, but that assumes no exposure the rest of the day..
If the cabinet is 2 meters above people's ears, the level drops 6dB for those in front, and exposure time can be doubled.
I have over 60 dB of noise induced hearing loss at 4kHz- if you don't want to end up like me, pay attention to SPL before it's too late.
Art
Attachments
- Home
- Loudspeakers
- Subwoofers
- TH-18 Flat to 35hz! (Xoc1's design)