Baltic Birch has 13 equal thickness plies in 3/4", great for cabinet work, but usually only available 60" x 60", not great for layout of the Keystone sub.3/4 inch.
Standard 3/4" plywood has only 7, with the face plies often very thin veneer.
Still curious, how many plies in the 3/4" marine grade plywood you used?
Baltic Birch has 13 equal thickness plies in 3/4", great for cabinet work, but usually only available 60" x 60", not great for layout of the Keystone sub.
Standard 3/4" plywood has only 7, with the face plies often very thin veneer.
Still curious, how many plies in the 3/4" marine grade plywood you used?
I found a scrap piece and it's 7 ply. The faces are a little thinner, yes. But it's very dense for what it's worth.
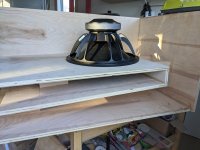
I made a little booboo on the speaker cutout and I'm wondering if I can just lay another piece of wood on top and cut the hole out again? I think it may just barely clear the front board but my worry is that it will change something tonally. Is doubling the speaker board going to cause any issues?
Singtall
please re-read post 1370
step back from the build - take a few deep breaths.
I understand your excitement but don't rush the build. As they say it's not just about the destination, it's about the journey!! - stop and smell the roses along the way.
There's a great thread on construction and finishing cabinets that you should read. I'd recommend you read that before continuing on the build.
Once completed it's difficult, if not impossible, to go back into the cabinet to find a leak - fix a panel vibration - fix the T nut misalignment - position of handles and style etc etc.
Cheers
Martin
I made a little booboo on the speaker cutout and I'm wondering if I can just lay another piece of wood on top and cut the hole out again? I think it may just barely clear the front board but my worry is that it will change something tonally. Is doubling the speaker board going to cause any issues?
There isn't much clearance to pack it out if you're using the 18SW115 - what driver did you end up getting?
Cheers
Martin
The mistake I made was on the same day that I made all of the other mistakes. lol. I'm just seeing the mistake because the speaker finally came in and I measured it and sat it on the board and realized I made a mistake and cut the hole slightly bigger than it should be.
I got the BC18TBW100-4. It looks like if I add another board on top of the speaker board I will just barely have enough clearance for the speaker to fit. I just don't want to go this far and compromise the whole box by adding another 3/4" to the board.
I got the BC18TBW100-4. It looks like if I add another board on top of the speaker board I will just barely have enough clearance for the speaker to fit. I just don't want to go this far and compromise the whole box by adding another 3/4" to the board.
sorry for being so honest with my mistakes. I've actually built cabinets before without the mistakes. lol. I've even built guitars. I just tried to do too much with too little sleep. I guess I should go back and delete all of the posts. I just thought someone else could learn from my mistakes.
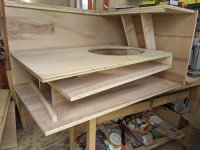
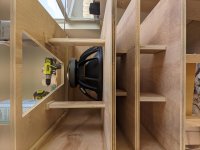
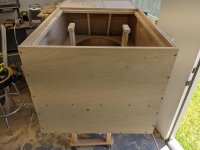
I got a little more done today. I had my wife out there helping me figure out which board goes next and etc.
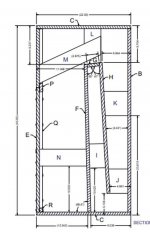
I installed the Q board first. Followed by the front board. Then P board under it. Then I was able to mount the M boards.
Trying to figure out the N boards now.
I installed the Q board first. Followed by the front board. Then P board under it. Then I was able to mount the M boards.
Trying to figure out the N boards now.
Attachments
"sorry for being so honest with my mistakes. I've actually built cabinets before without the mistakes. lol. I've even built guitars. I just tried to do too much with too little sleep. I guess I should go back and delete all of the posts. I just thought someone else could learn from my mistakes"
Singtall
all good ... agreed, leave your posts as this will help someone ...
Singtall
all good ... agreed, leave your posts as this will help someone ...
Last edited:
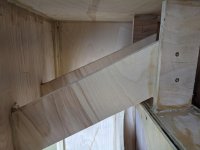
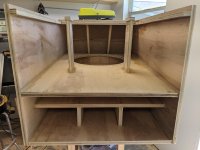
I measured the speaker board from the bottom to determine where the N boards go and marked it off. I double checked my N boards at the side wall to make sure there angle was right and that it fit snuggly. Next I sat the front board on top to get a feel for where the N boards needed to go so that they weren't so visible from outside but they were close enough to do their job. I settled on 6" from the side wall for each one. I glued down the N boards on the mark I laid out and glued the O boards on top of the N boards. I made sure the total of N plus O fit snug under the top keystone board and placed weight on the top and let the glue dry. For these boards I chose to switch to titebond glue so that the boards didn't swell too much as the glue dried.
On the next one I will glue and screw the N boards before I mount the speaker board that way I can use the expanding glue.
On the next one I will glue and screw the N boards before I mount the speaker board that way I can use the expanding glue.
Attachments
SingTall
Regarding the exit panel (E) and it's bracing (N)
I made my "N" braces 3mm shorter as I had intended to pack them with rubber. I wanted the exit panel "E" to be under a bit of tension and played around with the thickness of rubber. It worked out very well.
Cheers
Martin
Regarding the exit panel (E) and it's bracing (N)
I made my "N" braces 3mm shorter as I had intended to pack them with rubber. I wanted the exit panel "E" to be under a bit of tension and played around with the thickness of rubber. It worked out very well.
Cheers
Martin
Attachments
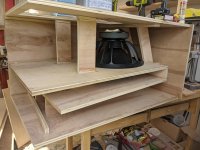
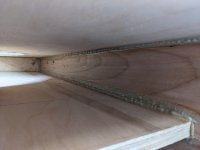
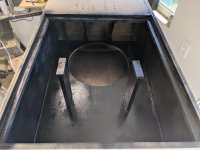
Last change to check glue squeeze out before attaching the last board. First I put the glue on the end of the boards. Then I put screws to snug everything up. Finally I use my finger with a glove on to smooth the glue like it's caulk. The glue will continue to expand and bubble after that but at least I feel like I have the glue squeezed in everywhere possible.
This was the cabinet I messed up on by cutting the side boards too short and had to attach the top and bottom on the outside instead of on the inside where they were designed to go. Still coming out pretty good.
This was the cabinet I messed up on by cutting the side boards too short and had to attach the top and bottom on the outside instead of on the inside where they were designed to go. Still coming out pretty good.
Attachments
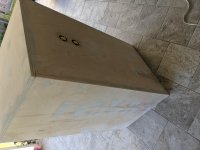
I sprayed a first coat of black paint on the inside where you will be able to see it through the keystone hole. Getting ready to sand all of the edges and use Bondo body filler for all of the screw holes and imperfections. After that it's going to get two or three coats of duratex.
I have to remember to go ahead and get the wiring and speakon connector installed before painting the outside.
I have to remember to go ahead and get the wiring and speakon connector installed before painting the outside.
Attachments
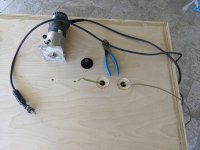
Speakon connectors successfully installed. I used my router to counter sync them. Triple checked my wiring before sealing these connectors fairly permanently on there.
Attachments

Last edited:
- Home
- Loudspeakers
- Subwoofers
- Keystone Sub Using 18, 15, & 12 Inch Speakers