You are a true audio artist Fotios!
When one speaks the truth and has the art to back it up, how could it sound like arrogance!
Once again, beautiful work")
Thanks John for your comprehension.
Nevertheless i want to give another one proof for that i wrote for myself. I ask your forgiveness, because the pictures are off topic but i hope you will enjoy a little with these.
Except others, i like very much the hobby of plastic modelling. Take a look in pictures and you will understand better my talent in fine works.
An externally hosted image should be here but it was not working when we last tested it.
This is the model of a TigerI, for which i won a prize for its ZIMERIT. Instead stucko, i made the zimerit by melting the plastic surfaces with a modified soldering tip.
An externally hosted image should be here but it was not working when we last tested it.
This is the model of a groupC Sauber Mercedes which won in the Le Mans 24h race.
An externally hosted image should be here but it was not working when we last tested it.
This is the interesting part of work on this model. You can see the many details that i added in the engine compartment.
In all models you can see as well, the careful painting.
Fotios
Fotios
Some members, they ask to informed about the tools that i use. Well, see in the pictures bellow.
For heavy soldering works i use this
For light soldering works i use this set
For cutting works i use this
For drilling works i use this
I am kidding of course. I apologise for this, but i am some worried this moment because some health problems of my mam and because the heavy expensess in doctors. I am stony, and i have yet to pay bills of arround 800 euro.
Fotios
For heavy soldering works i use this
An externally hosted image should be here but it was not working when we last tested it.
For light soldering works i use this set
An externally hosted image should be here but it was not working when we last tested it.
For cutting works i use this
An externally hosted image should be here but it was not working when we last tested it.
For drilling works i use this
An externally hosted image should be here but it was not working when we last tested it.
I am kidding of course. I apologise for this, but i am some worried this moment because some health problems of my mam and because the heavy expensess in doctors. I am stony, and i have yet to pay bills of arround 800 euro. Fotios
Impressive, at the age of 50
I looked at this tool I made in my youth
I thought, did I do that
Take a guess what its fore
In the old days a carpenter had to make his own tools, or he could not be a carpenter
Today ?
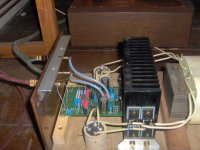
Anyway, my amps are not as impressive, dusty and all, because of house renovating
But they play, and they are quite good at that
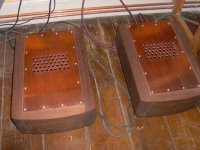
btw, the heatsink sticks through the bottom, and air comes in only through the heatsink, and leaves at its top, which makes a VERY effective convection cooling
I had all the wood, so the boxes cost nothing, just a lot of work
Im not so skilled at electronics, and have to keep it simple
Very convenient that simple can sound good too
I looked at this tool I made in my youth
I thought, did I do that
Take a guess what its fore
In the old days a carpenter had to make his own tools, or he could not be a carpenter
Today ?
Anyway, my amps are not as impressive, dusty and all, because of house renovating
But they play, and they are quite good at that
btw, the heatsink sticks through the bottom, and air comes in only through the heatsink, and leaves at its top, which makes a VERY effective convection cooling
I had all the wood, so the boxes cost nothing, just a lot of work
Im not so skilled at electronics, and have to keep it simple
Very convenient that simple can sound good too
Attachments
Last edited:
Fotios,
A quick estimate shows that you punched about 3,500 holes only in the bottom panel. Assuming the same amount on the top panel (conservative) and 10 seconds per hole (conservative, not counting center punching, deburring, assuming one pass drill (unlikely for soft aluminum) etc...) it means you spent about 20 hours at the drilling press. One hole badly off and you could need to start over.
Unless you have a CNC tool, you are a true hero.
Syn08, you have got almost right the number of holes. The true number of holes is 3260! He must be crazy someone to make all these holes with a press drill! No, i haven't a CNC router. I did the holes with this milling tool:
An externally hosted image should be here but it was not working when we last tested it.
It is a set apparted from:
1) A WABECO 2404 multi-purpose and multi-place drill stand = 160 euro
2) A WABECO 24410 400 X 180mm X - Y table = 180 euro
3) A MULLER 900W motor = 90 euro
Each turn of worm it push forward the table by 4mm.
The thing it is not so simple. First of all, the workpiece must be aligned and tightened securelly on the table. The appropriate milling cutter is a whole story, according to the proccess and the material of workpiece. There are a lot of milling cutters but the most common are the slot drills (with 2 flutes usually) and the end mills (with 3-4 flutes). The alloy of cutter it is as well of big importance. For alu milling they used the TiAIN cutters. To make single holes in alu plate, a TiAIN slot drill with 2 flutes it is the most appropriate because its speed, but only up to 5-6mm holes. Above this, a 3 flute is prefferable. To make slots, you may use an end mill cutter with 4 flutes because its excellent finish on the cutting edges of slot. The same if you want to cut a square on the alu plate. From the above, you can understand that for the holes in the 3mm thick alu plate, i used a 3mm TiAIN slot drill with 2 flutes. I did first a calculation for fast proccess. Because one turn of the worm =4mm is very easy instead of 3/4 or 1+1/4 of one turn, i decided to use the 3mm slot drill. So, the distance between the edges of holes is 1mm. I made a stop flexible rod in touch with the turning lever so i can perceive when each turn is completed. So, each hole can be drilled at 4sec. A CNC router it makes the same at 3sec.
Thus, to drill the 3260 holes it takes: 3260 X 4sec = 13040sec = 217min = 3,6Hours. If we add some intervals for rest to relax ourself to make a cigarette, and to cooled the motor the milling cutter and the alu workpiece, say another 1,5 hour, then the total work can be finished in 5 hours. I must point out that there is no need to drill the holes in each cover seperatelly. We can align and tight the two pieces together, thus with once effort we have two workpieces drilled with perfect round holes. See the detailed picture.
An externally hosted image should be here but it was not working when we last tested it.
I give you another one picture of the alu chips to perceive how much perfect it is the cutting.
An externally hosted image should be here but it was not working when we last tested it.
Now, i hope you can understand that this work it is not a tragedy! For the drawing of a pcb in our PC we spend DAYS! A CNC router makes the same work in 2,7 hours and because it is programmed for some intervals for cooling, the total time it is 3,2 hours.
As for that, you call me hero, i am not hero. Heroes was persons like dr. Ernesto.
In this picture you can see 3 cutters, in left with 2 flutes, in middle with 3 flutes and in right with 4 flutes. The corner cutters are TiAIN, the middle not.
An externally hosted image should be here but it was not working when we last tested it.
Here it is a 12mm slot drill TiAIN with 4 flutes. You can observe that its cutting edge it is flat. And it is sharp like a razor!
An externally hosted image should be here but it was not working when we last tested it.
Fotios (no hero)
Agree.
Congratulations Fotios! Well designed, nice built!
How did you do lettering on a rear panel?
Hi Wave
The letters on rear panel are ...simple Letraset Transfers ! These i had in my stock. If you take a look in Letraset site-Online store you can find amazing new graphic materials! Just now i have seen those also me. There are a lot of amazing things. I will study the stuff in the next days most carefully.
As for the black sign with the white characters in the middle, it is from simple self adhesive A4 label printed in laser printer. So simple!
Keep up your courage brothers and we will be the winners in the end!
Fotios
omg, Fotios plz tell me that you used a milling machine or cnc, because if you did all this with standard drilling equipment I will never try again to drill any chasis for my projects
Excellent job man, what can I say.
Is the back label vinil sheet printed in laser printer?


Thanks ΠΑΤΡΙΔΑΑΑΑ for your kind words!
I hope the replies that i posted already can cover your question.
ΦΩΤΗΣ
You are really very good fotios..the man... Da man!.... honorable man!
I have observed a lot, into de details, to see some signals, clues, that was made at home...screw holes misaligned and so on..i found some..but was not easy...congratulations!!!
I was searching to find failures we normally do when working at home.... a non industrial construction, alignment, position of holes and so on...it looks something that went out from a factory!
Wonderfull job... please, inform how long time you have spent to build this wonderfull amplifier... 4 years?.... how long take the mechanical chassis work
Carolos, to be sincere the development of this project it tooks about 7 months included that i have redesign for 2nd time all pcbs. I had to resolve as well a lot of other circuitry problems (mainly in inputs due to volume control and the balanced input impedance to be matched with the main amplifier. But now, i am educated. I can finish a such amplifier (working like a German) in 10 days. But because i am Greek, and as he knows everyone in earth that Greeks are lazies, you may consider 2 months ONLY and if you are lucky!
Lucio
Hi Wave
The letters on rear panel are ...simple Letraset Transfers ! These i had in my stock. If you take a look in Letraset site-Online store you can find amazing new graphic materials! Just now i have seen those also me. There are a lot of amazing things. I will study the stuff in the next days most carefully.
As for the black sign with the white characters in the middle, it is from simple self adhesive A4 label printed in laser printer. So simple!
Keep up your courage brothers and we will be the winners in the end!
It is impressive how well you aligned that letters, one by one!


My first thought when I saw the rear panel was that labeling is made with autotransfer letters, letraset or something, as many others DIYers I used them since 1989, but not in last years. After a more carefully look I decided that it is not possible, mostly because of their perfect alignment and look
Congratulations again Fotios
btw, did you purchuased the milling machine's parts locally or by online shopping? I was searching, long time ago for a similar system but I abandoned this plan when I saw that I could only find completed systems spending at least 600€
without cutting tools of course.
Last edited:
My first thought when I saw the rear panel was that labeling is made with autotransfer letters, letraset or something, as many others DIYers I used them since 1989, but not in last years. After a more carefully look I decided that it is not possible, mostly because of their perfect alignment and look
Congratulations again Fotios
btw, did you purchuased the milling machine's parts locally or by online shopping? I was searching, long time ago for a similar system but I abandoned this plan when I saw that I could only find completed systems spending at least 600€
Hi Spirtos
I purchased everything on-line.
Wabeco from a German on line store. Try a search on e-bay, there are more stores.
Muhller motor from e-bay.de. Alternativelly KRESS are better from mine motor and more expensive by 30-40 euro.
The milling cutters from e-bay.uk. Look at "Gloster Tooling" to see prices.
I will try the next days to find the exactly addresses of shops on e-bay to inform you.
Thanks again
Fotios

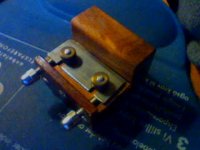
To complette the presentation of my tools:
1) Hand bending tool made in Fotios. Its maximum bending force is up to 3mm thick aluminum plate.
2) Drill Press 550W made in Taiwan (not China!) which i purchased before 12 years for 250 euro. Very good tool.
3) Mittre saw Femi = 330 euro. Bought from tool store, not from LIDL or Alex Pak!
4) Extension table made in Fotios for cutting large alu plates. It is mounted on the table of mittre saw.
My rest tools are the common of any workshop.
Fotios
1) Hand bending tool made in Fotios. Its maximum bending force is up to 3mm thick aluminum plate.
An externally hosted image should be here but it was not working when we last tested it.
2) Drill Press 550W made in Taiwan (not China!) which i purchased before 12 years for 250 euro. Very good tool.
An externally hosted image should be here but it was not working when we last tested it.
3) Mittre saw Femi = 330 euro. Bought from tool store, not from LIDL or Alex Pak!
An externally hosted image should be here but it was not working when we last tested it.
4) Extension table made in Fotios for cutting large alu plates. It is mounted on the table of mittre saw.
An externally hosted image should be here but it was not working when we last tested it.
My rest tools are the common of any workshop.
Fotios
Carolos, to be sincere the development of this project it tooks about 7 months included that i have redesign for 2nd time all pcbs.
For mortals with full time jobs, that would map to three to four years
Nice metal shop you built over there
top performance, amplifier's factory.
Brand can be "Foton"....or Photon
Why not?
regards,
Carlos
Hi Karolos
He,he,he...you are very optimist. I haven't the posibillity to do a production line. I am alone in this work and my economics are very restricted. I can't trust any other person for colaboration (i am 50 years old and i have enough ecperience about people) because i believe that the work will be degraded.
This amplifier has a cost (excluding work) of arround 600 euros. The enclosure's cost it is arround 140 euro included the Fischer heatsinks. To obtain an absolute finish, i must send the front and rear panel as well the top and bottom cover (4 pieces total) in Athens for anodising. This will add a cost of 40 euro more (20 euro shippings + 20 euro anodising) thus the cost will be 180 euro. The front panel decorative black band it is inexpensive, it can be a transparent self adhesive printed at home with the laser printer or ordered from a graphics art lab. The problem is in the markings on rear panel. But there are solutions and for this.
Modu Italy offers a line of very nice ready enclosures. A Modu enclosure similar to mine - complette with handles and feets - it costs arround 180 euro + VAT + shipping = 260 euro. I can add this extra cost in my amplifier (i make amplifiers for living as you know, not for hobby) and instead 1500 euro, say, i can sell it for 1600 euro. The problem with Modu it is that although it offers enclosures with very impresive front panels (10mm thick! alu) and very nice handles, the rest pieces of enclosure are: top and bottom covers from metal plate and the back plate from alu 1,5mm thick. In mine amplifier the covers are from 3mm thick alu plates which are screwed very tightly and directly on heatsinks (see in pictures) and offers significant assistance in heatsinks in heat disipation. Practically speaking, if one channel removed from the enclosure due to 50mA iddle current per output device its heatsink after 1,5 hour in iddle operation it touches a temp of 49 deg.C. If the channel is mounted on the enclosure, the heatsink temp in iddle state drops and remains stable at 35 deg.C continuously, and the whole enclosure it is warmed. I don't believe that a MODU enclosure can obtain this.
I will back (Terminator
)Fotios (Lucio)
For mortals with full time jobs, that would map to three to four years
Nice metal shop you built over there
Thanks syn for your kind words.
In reality, the only tools that i made by myself are the hand bending tool and the extension table for the mittre saw.
There are ready hand bending tools offered on e-bay for 70-90 euro. Unfortunatelly their endurance in bending force it is limitted for metal sheets of 1mm and for alu sheets of 1,5mm. Above these thicknes, the tool might be broken. For this reason i decided to built a more strong tool; this in the picture.
I have not space in my home (i am working in home to reduce my expensess) to install a CNC router. I have study enough the CNC routers. There is a nice and inexpensive router of CNC-STEP (made in Germany) the Hi-Z S-720 (active working area: 720mm X 420mm X 110mm, more than enough for an amplifier) for 2800 euro. In this we can mount a very good KRESS 1050 FME milling motor for 140 euro. We must add and some spares like a vacuum tube to suck out the chips and an automatic lubricant system for the cutter. The CNC software is included in the price of router and the PC would be a notebook. Total cost arround 3200 euro. The 1/3 of the price of an audio analyser
. With a such tool, except milling, cutting etc you can mount in the motor an engraving tool to make any draw on the alu surface. These CNC routers because have the posibility of mooving in 3 axes, with the adding of a special turning chuck can be transformed in lathe machines as well. A such chuck shipped with a stepper motor it costs from 600 to 900 euro. There are as well special vacuum tables (arround 500 euro) for the easy tightening of the workpiece for milling work.With 4500 euro, you can have a tool for cutting perfect square plates, for cutting holes or slots for ventilation, for opening holes of any shape to mount sockets, buttons etc, to make perfect massive alu feets and knobs, to engraving yet the smallest signs on the plates etc..etc.
You can make an enclosure exactly as you like.
For small productions (2-3 devices per month, just fine for Hi-End works) it is the best solution IMHO. The anodising it is not expensive (20 euros for a whole case in black) in external workshops.
Fotios
HI Fotios you know where I can find the same quality TiAIN slot drill with 2 flutes for hole 3.5mm ?
GlosterTooling have only 3-4mm , max deep hole ?
Thanks a lot for your tricks
Hi nico
I don't know what you have in mind for milling or drilling. I know that Gloster Tooling has TiAIN slot drills only in standard sizes 3-4-5-6 etc mm.
The only set which contains cutters in divisions of unit, it is this in picture:

I have bought one such set, and i can confirm you that it works almost the same in aluminum like TiAIN. Because the cutters are of 3 flutes gives a nice finish in the cutting edges. I use the TiAIN slot drills only for drilling. For the rest milling works, i use the cutters in picture.
This is from wikipedia:
"Coatings: The right tool coatings can have a great influence on the cutting process by increasing cutting speed and tool life, and improving the surface finish. Polycrystalline Diamond (PCD) is an exceptionally hard coating used on cutters which must withstand high abrasive wear. A PCD coated tool may last up to 100 times longer than an uncoated tool. However the coating cannot be used at temperatures above 600 degrees C, or on ferrous metals. Tools for machining aluminium are sometimes given a coating of TiAlN. Aluminium is a relatively sticky metal, and can weld itself to the teeth of tools, causing them to appear blunt. However it tends not to stick to TiAlN, allowing the tool to be used for much longer in aluminium."
Don't forget to use diesel fuel to make easiest the cutting and to keep clean the cutting tool!
Fotios
- Home
- Amplifiers
- Solid State
- Post your Solid State pics here