Re: Very nice pub.
Thanks, did you notice some trails missing? I'll etch separate boards for the protection circuitry. Shawn.
quasi said:-
It brought a tear to my eye to see my humble layout in a well thought out guide.
Cheers
Thanks, did you notice some trails missing? I'll etch separate boards for the protection circuitry. Shawn.
If you want any specifics about adapting a router to machining aluminum I would be happy to chime in, also utilizing a tables saw in said regard.
I have been a prototype machinist for 25 years and have pulled some pretty swoopy cnc look alike details out of my hat with a router, router bits and the like.
I'd be happy to accomodate any interogative.
I have been a prototype machinist for 25 years and have pulled some pretty swoopy cnc look alike details out of my hat with a router, router bits and the like.
I'd be happy to accomodate any interogative.
I was finding myself spending more time on the wretched enclosures for the 1RU widgets that I make (audio DAs, DMX Splitters etc) than I was spending on the electronics, so after much searching through "off the shelf" solutions that all had shortcomings in one way or another, finally decided to "bite the bullet" and get my own extrusion made.
and life became a lot less fraught.
M
An externally hosted image should be here but it was not working when we last tested it.
and life became a lot less fraught.
M
bigpanda said:Hi Shawn,
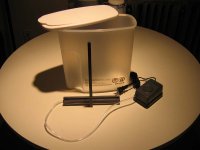
Can you show some picture of your etching tank & pump? Where did you get your liquid tim? Is it easy to use?
'Downtown' where? Anywhere near 'CAMPUS'?
Not only will I do that, but I'm going to let the cat get out of the bag
 I loved MG chemicals until I purchased the etching system, now I "like" them. The tank is frosted (can't really see through it, unlike the unit they promote in their demo video) and is a "regular" Sterilite food storage container. You'd put your granolla or baking flour in it but that's not so bad. The pump is a low-end fish-tank air dillio and the hose on it is too short to reach the bottom of the tank
 The upsidedown plastic "T" is to hold the hose under the PCB and to hold the PCB while providing the user something to drop and lift the PCB in and out of the tank without coming in contact with the etchant. The hose is regular fish tank action with a plug in the end and a series of pin holes driven through it where it sits under the PCB.
Not a waste of $40 dollars but borderline value. I will go to the dollar store and pick up a better tank that hold longer/wider PCBs:
The bottom line is a DIYer can make a much better system tailored to their own needs at a much lower cost if they chose to invest a little shopping time to get the right stuff.
Attachments
bigpanda said:Hi Shawn,
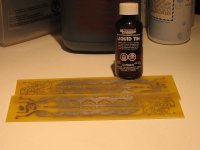
Where did you get your liquid tin? Is it easy to use?
'Downtown' where? Anywhere near 'CAMPUS'?
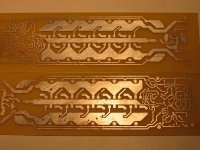
The Liquid Tin I use is from MG chemicals but I'm certain you could get it almost anywhere under different brand name? I just pour the liquid tin into a glass container that will fit my printed circuit board, drop the board into the liquid and watch it "TIN" right in front of you in a split second. Really neat! Siphon the liquid tin back into its container and reuse until it loses its action. Dispose of waste in a conscious manner! I will add all of this and more to my PDF on etching PCBs. In time, of course.
 It is very important to understand that "these chemicals" that are used to produce printed circuit boards are known to contain cancer causing agents. Don’t mess with this stuff unless you are comfortable and aware of the potential hazards. Never bring this stuff into your home without the consent of the people whom you share your home with. I would recommend that it be kept under lock and key like guns and ammunition . I'm not kidding around here, this stuff is nasty and you are dancing with the Devil when you work with it. Think of how lab technicians would handle it in a proffesional laboratory and use the same approach. Read and follow the instructions on the labels
 I live in Downtown Toronto and you can buy almost anything here except piece of mind
See my flag over on the left of your screen, I live in Canada.Attachments
mobyd said:[Bfinally decided to "bite the bullet" and get my own extrusion made and life became a lot less fraught.
M [/B]
Nice extrusion, can you show pics of it in a semi built enclosure? Can you show us a pic of a finished unit? Does this mean I can order your 1RU extrusion direct from you and use it on my DIY gear? It looks smallish and light so shipping shouldn't be too high? BTW, I love gear that fits into 1RU space, especially the idea of big fat power amps! The down side is they almost all have fans. Hmmm...perhaps a Class D Hypex mono bock...sounds nice. Can a Toroid XFMR be made to deliver the big Volt-Amps and still fit in a 1RU rack space? Homer Simpson voice "1RU power amps"
Shawn.
TomWaits said:Siphon the liquid tin back into its container
Oops! I wanted to say funnel not SIPHON
That would do some serious damage to yer lips and mouthTks Shawn for the pics.
I had been using heat transfer method but this time I have to do a different job. I am doing prototype for 10 TO264 Super Leach where I have to do a ground plane clearance from tracks is about .02 in. If I use the heat transfer method, I would surely die when doing the touch up.
I had tried the photo resist method before, but never put it to real action. Too wasteful on the board. I used a fl. lamp with a single UV tube--not too good with wide board (max up to 5in, I guess ? ). I made my own NaOH solution with NaOH crystal w/o any idea of the concentration. Exposure time, develop time, NaOH tem. and agitation are all unkown by then. I had vitually overcome all the problem expect the board cutting. But the agitation during developing...still not feeling too comfortable. You show using a soft brush during developing. Does that mean brushing the board surface while develooping? About cutting, I had been thinking of using a tile-cutter to do the job. Cutting with a knife in the dark is no fun at all.
BTW What kind of light are you using when processing the board? You take photos of peeling off the pre-senitized board. Don'you have to use red light?
I know where Toronto is. Have been there for some years. Just wondering what had become of the 'Downtown' and the 'CAMPUS' there.
Hi guys...
there seems to be a lot of misconceptions in this thread. Making your own PCBs is really not difficult at all....
The precoated boards being sold today are almost all sensivive to UV-A only - there is no need to work in a darkroom. Sunlight is a no-no, so draw the curtains or blinds or whatever have you before you start. Normal incandecest light is quite OK.
The spray-on resists works in a similar fashion, dust can be a problem using spray photo resists.
Cutting- the precoated boards are coated with a plastic film for shielding. Just do your cutting without removing the protective film. No guillotine cutter ?? Use a very sharp scriber on both sides - or use a hack saw.
Developing- there is no need to by ultra pure NaOH or caustic soda - just buy the household version where you can get it - drug store , paint shop or whatever. Conetration is usually 12g / liter, but check the recipee for the boards you buy.
Etching - there are several alternative etchants- ferric chloride and sodiumpersulphate ( or ammonium persulphate) being the most common ones. A 1-1-2 mix of 35% hydrocloric acid - hydrogen peroxide-water also does the job well , but develops gases - use outdoors or well ventilated. Take care of normal procedures when mixing chemicals - add acid to water - NOT THE OTHER WAY.
Ferric chloride makes nasty stains on your clothes - the peroxides makes nice holes instead
All processes except for HCl/peroxide needs air- any suitable size container and an aquarium pump will do, but you need some way of spreading the bubbles evenly across the board. A piece of plastic tube with lots of tiny holes will do. A slim, vertical container is better than a wide flat one. There are special glass containers in the market at a fairly modest price. The peroxide versions should be heated to appx 45- 50 degC. An aquarium heater will do, - you must readjust the temp. setting.
The toner transfer method obviously works good for non-coated boards, but I have never used it. I always use precoated boards and a special film material called "LaserStar", but normal laser transparencies also works - if you are afraid of not having anough density in the print, use two and stick them together.
Lighting - the usual light boxes for PCB work have at least 6 15-20W tubes to cover an area of appx 40 x 50 cm. Any twin tube light fixture holding two tubes in parallell should do for boards up to 30 cm width ( and 60 cm long as the tube) . The usual tube is from Philips is called TL20W/05. There are other versions too from OSRAM and others. Any good lamp supplier should be able to deliver. The tubes are called "actinious blue" and are specials for copy work.
Exposure with two tubes should be ca 2min30 sek to 3 min.
Tin coating- I have used it for years, - works very well, provided your board is CLEAN- strip the resist and scrub thoroughly with acetone and after that with a pan scrubber ( steel wool is slightly too coarse - if used, get the finest grit you can...)
AuroraB said:Hi guys...
there seems to be a lot of misconceptions in this thread. Making your own PCBs is really not difficult at all....
No misconceptions in the thread but yes in the previous post that you jumped on
The precoated boards being sold today are almost all sensivive to UV-A only - there is no need to work in a darkroom...etc.
Very good input! You beat me to it but I will answer what was adressed to me anyway, unless you are my new DIYForums agent.
Cheers,
Shawn.
I'm not working in the dark though sometimes it feels as though we are in the dark agesbigpanda said:Tks Shawn for the pics.
I had been using heat transfer method but this time ...
I am taking my photos without the flash and I don't have enough backlight so perhaps it looks as though I am working in the dark? About the chemicals, I don't mix them as they are readily available and ready to use, however this may not be the case in every part of the world and DIYer may have to "Roll Your Own" sort of speak.
The light I use is a "regular" run of the mill flourescent tube desk lamp! Using the single tube fixture has limitations; you have to wait longer and it puts a shawdow in the outer perimeter of the glass that I use to hold everything in place. So sometimes there is a tiny rim of copper left on the outside perimeter of the board.
Take some time and build a light box out of a small double tube FL fixture and you will be very happy. There is no need for special bulbs but buy them if it makes you happy. Almost every "regular" light source generates UV but some generate more than others.
AuroraB says,"Normal incandecest light is quite OK." I'm sure it would work but I'll stick to the FL tubes. My single tube lamp has a 15Watt Cool White bulb and it takes 15 to 20 minutes exposure time. So there is no red room and you don't work in the dark, however don't leave your new presensitised board sitting on the table with the protective plastic wrapper off, use it right away.
I do brush the surface of the board gently to remove the unwanted photoresist. Go to http://www.mgchemicals.com/techsupport/index.html and watch the video called photofabrication.
Well downtown is exploding and so are the burbs and there are hundreds of campus locations in the downtown core from many colleges and universities!Originally posted by bigpanda I know where Toronto is. Have been there for some years. Just wondering what had become of the 'Downtown' and the 'CAMPUS' there. [/B]
Good Luck Panda.
My comment on incandescent light was meaning that it's safe to handle precoated boards in normal room lighting - not for exposure. While "regular" light might work for the exposure, the long exposure time makes an uneven exposure. The special tubes are only appx 15-20 USD each, and makes a much better and well controlled exposure.
As for the temp of various etchants- ferric chloride and the persulphate mixes needs a little heat - the HCl/ peroxide don't.
My fault- a little too hasty in the turn.......
I've been making prototypes in this way for over 30 years, - using lab. equipment roughly as I described it, - and having seen and experienced most of all possible problems. if you intend to make boards for some time to come - at least get a proper lamp unit. Any twin tube fixture will do.
AuroraB said:As for the temp of various etchants- ferric chloride and the persulphate mixes needs a little heat - the HCl/ peroxide don't.
They don't "need" heat but it reduces time. For a first timer on this process I would suggest not using heat unless you are very comfortable with your setup. Ferric chloride gives off very little vapour at room temperature but when you heat it up it off gasses. So if you want to use heat then you must add sufficient ventilation. Good ventilation is needed regardless but some kind of exhaust fan is required for heated solutions. The container the solution comes in sometimes will indicate a recommended temperature for speedier results. A glass thermometer would be ideal. Glass everything is good too for easy clean up. Plastic containers will stain and are more difficult to keep clean.
I see no fault hereMy fault- a little too hasty in the turn........

...at least get a proper lamp unit. Any twin tube fixture will do.
Those are righteous words! I'm gonna make myself one ASAP...the old desk lamp is tired. I've been using it for years.
AuroraB, have you ever heard of Phoenix Geophysics? I used to supply them electronic components for their geophysical measurement gear.
Shawn.
bigpanda said:Tks Shawn,
I can gain access to everything mentioned but the MG liquid tin. They are never sold here (hongkong) on the shelf and they cannot be purchased from mail stores because no vendor will (or can ? ) ship them abroad over the mail.
You should be able to get Cool Amp, it just requires a little elbow grease to get it working. Funny I was introduced to Cool Amp from a Japan Web site:
http://www.interq.or.jp/japan/se-inoue/e_pwbm.htm
But first I would contact the folks at:
http://eshop.diyclub.biz/
Flat 10, 2nd Floor,Prosperity Bld,
61 Tung Choi street,MongKok,
Kowloon,Hong Kong.
Tel: 852-2304-2683
Those dudes are wizzards when it comes to electronics, I think they can make it happen. Good Luck, Shawn.
- Status
- This old topic is closed. If you want to reopen this topic, contact a moderator using the "Report Post" button.
- Home
- Amplifiers
- Solid State
- Construction Techniques(putting DIY in a proper enclosure)