sorry if the headings a bit, well basic, but this is precisely the issue.
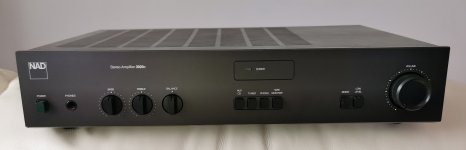
Ive been putting back together a NAD 3020E and all was going well up to about 2pm, and i had it on test for a few hours before this without any issues.
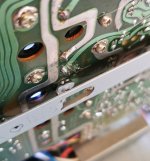
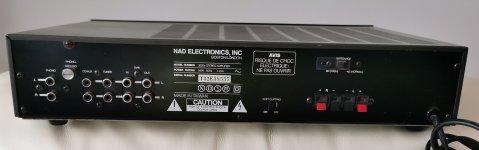
then i suddenly realised i hadnt put the grounding bar back in that ties the case to the main board.
so when i went to put it back in i got to the last screw(photos) and it was sparking like mad.Now a screw came out of there this morning, and i havent realy done very much to this unit other than check it over and correct the idle/centre voltages which were way out as it happens.But the amp was working fine.
when i checked it after the sparking episode and plugged it in with the lamp tester, it was the lamp lit up like blackpool.So 2 blown fuse (T4A x2).so back to the testing.wittled it down to a possible dry on the rectifier.
plugged it back in and all good but......little sparky screw is still there, so the question is, why is it sparking, should the screw be sleeved through the heat sink(it wasnt originaly) or should i leave it out,i dont think i should but what do you think?
the amp currently has no faults other than Mr sparky screw
Ive been putting back together a NAD 3020E and all was going well up to about 2pm, and i had it on test for a few hours before this without any issues.
then i suddenly realised i hadnt put the grounding bar back in that ties the case to the main board.
so when i went to put it back in i got to the last screw(photos) and it was sparking like mad.Now a screw came out of there this morning, and i havent realy done very much to this unit other than check it over and correct the idle/centre voltages which were way out as it happens.But the amp was working fine.
when i checked it after the sparking episode and plugged it in with the lamp tester, it was
the lamp lit up like blackpool.So 2 blown fuse (T4A x2).so back to the testing.wittled it down to a possible dry on the rectifier.plugged it back in and all good but......little sparky screw is still there, so the question is, why is it sparking, should the screw be sleeved through the heat sink(it wasnt originaly) or should i leave it out,i dont think i should but what do you think?
the amp currently has no faults other than Mr sparky screw
Attachments
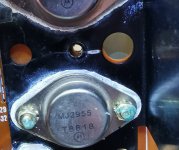
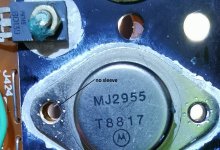
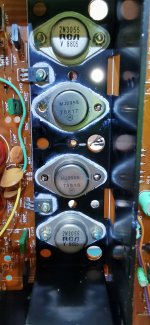
Measure the voltage on the heatsink and see if that gives a clue. If its positive supply value it could be a short on an NPN output case, if negative it would be a PNP.
It could also be an emitter short which means the heatsink is actually at the same voltage as the audio output of one channel.
I'd hate to even think what a short on a base lead would do... the drivers would complain
It could also be an emitter short which means the heatsink is actually at the same voltage as the audio output of one channel.
I'd hate to even think what a short on a base lead would do... the drivers would complain
so here we go then.
firstly these are not the originals, so these have been replaced, and who ever put them back, did so without one of the insulating sleeves on the screw.
i have a check list for when i take things apart so these important bits dont get missed.
firstly these are not the originals, so these have been replaced, and who ever put them back, did so without one of the insulating sleeves on the screw.
i have a check list for when i take things apart so these important bits dont get missed.
Attachments
 excellent.
- Home
- Amplifiers
- Solid State
- bit of advice putting a screw back