ISCSEMI
Inchange Semiconductor Company(ISC)
have many obsolete semis TO3 in Production
with good luck there can be found SIT/VFET
ISC provides MOSFETs under U.S., European, and Japanese categories, with robust performance and minimal lot-to-lot variations.
We also produce metallic packaging TO-3 MOSFETs.
Maximum Current 600A, Highest Voltage 1500V.
ISC’s new products, high-frequency high-speed low-saturation voltage transistors in TO-251, TO-252, and TO-263 packages, are unique in Chinese production, and can reach frequencies above 300MHz, and tf <100ns.
ISCSEMI
Inchange Semiconductor Company(ISC)
have many obsolete semis TO3 in Production
with good luck there can be found SIT/VFET
You really don't understand what a VFET/SIT is.
There is no other comparable semiconductor to it nor are there any second source suppliers (nor were there EVER) - except another comparable SIT.
The last ones in production were from the ex-USSR and phased out in the mid-1990s. Some larger and high voltage parts were last produced by Tokin, before it was bought by NEC when the production was permanently stopped.
Nether Sony, Yamaha, NEC/Tokin nor Hitachi are willing to license ANY of the VFET technology (and people have tried!).
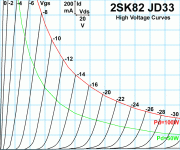
Here are characteristic curves of a N-channel VFET. Compare with any MOSFET (no comparison, really).
Attachments
I had a bunch of JANS1N4148-1 lying around and I have checked them with the DCA75 Pro.
When two of them connected in series I am getting the following reading:
Vf=1.21V at 5mA
I presume since everybody is pointing at these diodes, it is sufficiently close for the replacement of the bead diodes?
When two of them connected in series I am getting the following reading:
Vf=1.21V at 5mA
I presume since everybody is pointing at these diodes, it is sufficiently close for the replacement of the bead diodes?
When you measure G-S and G-D as diodes, what resistances does your multimeter show?
2SJ18 G-S
NOS (Rank 54) = 2.56meg
Marked bad by DCA75 = 2.1meg (Rank 56)
Marked bad by DCA75 = 1.36meg (Rank 56)
Marked bad by DCA75 = 1.36meg (Rank 56)
Marked bad by DCA75 = 1.82meg (Rank 56)
Marked good by DCA75 = 2.52meg (Rank 56)
Marked good by DCA75 = 2.72meg (Rank 56)
2SJ18 G-D
NOS (Rank 54) = 2.59meg
Marked bad by DCA75 = 2.13meg (Rank 56)
Marked bad by DCA75 = 1.37meg (Rank 56)
Marked bad by DCA75 = 1.39meg (Rank 56)
Marked bad by DCA75 = 1.82meg (Rank 56)
Marked good by DCA75 = 2.54meg (Rank 56)
Marked good by DCA75 = 2.76meg (Rank 56)
These readings show some deviation for the ones that look suspicious.
advice : ... ; wasn't impressed with sound at all ; they're what they are - milestone or something as that , but as I'm older - I learned to respect (and learn from) milestones and stop using them , when better things are around
Hi ZM,
I am assuming you noticed the low value of the coupling capacitors on these Sonys... 0.22uf, IIRC
I am thinking you probably replaced them with something more appropriate and/or your sound impressions are based on direct coupling.
I personally find the sound of this particular amp quite pleasing to my ears...very forgiving, very pleasant to listen to for many hours. I drive a set of Onkyo Monitors @6r, good match for this amp, ... just hits the right notes for me.
True, if one's preference is high accuracy, "wire-with-gain", per se, then I concur that this Sony might not be the right fit.
Why do you not replace old Internal Sony Mosfet PCB
with todays reliable High End Mosfet Technology all in one PCB ?
200 x 78 mm DC Protect, ....
Only rewire and add to heatsinks. work from 30 to 90V
Also the heat is much lower comoare old Sony V-Fet Design
OH god no, I would call this sacrilege..
I would not thing that such drastic modes would not have their benefits in very unique scenarios...but NOT for this TOTL Sony.
The VFETs that I have ordered a while back started appearing at my door step.
The one that arrived from JIMS Audio had a different TO-3 package than the ones that came out of the amplifier. The mentioned rank on the case is at the borderline of the allowed rank for this amplifier. (53).
I had a few from different sources, UtSource, etc. Once I have them all, I will start measuring them and sharing the results.
In the mean time, I gave the DCA75 a go with the curve tracing capabilities, it looks like it is limited with the voltage range. I have started looking seriously into obtaining a transistor curve tracer, not like a high end Tektronix equipment but rather a Heathkit or a Leader type. Something like below, that needs a scope.
Vintage Heathkit IM-3121 Semiconductor Curve Tracer | eBay
Do you think those can allow me to match/check these VFETs or they will not serve any purpose?
DirkSpec,
it is a silly thing to give advice, but I would not buy any measuring instrument, just make a simple test arrangement with two different voltages. A roughly 15V gate to channel voltage difference should give 100mA drain-source current. Make sure that the gate voltage is applied, preferably prior to the drain-source voltage.
it is a silly thing to give advice, but I would not buy any measuring instrument, just make a simple test arrangement with two different voltages. A roughly 15V gate to channel voltage difference should give 100mA drain-source current. Make sure that the gate voltage is applied, preferably prior to the drain-source voltage.
Adding more explanation may (or may not) lead to less misunderstanding...
My reference has been to the Sony 2SK60 / 2SJ18 pair, that seems to be the most successful realization of the concept. Certain device types going by the name of SIT / VFET do not have the characteristics of 2SK60 / 2SJ18, not by a long chalk, and are outside the scope of my interest.
Generally, high resistance means high heat generation, but there is no proportionality between channel resistance and heating (or between any other physical relationships). The 2SK60 / 2SJ18 generates less heat at high frequencies than the low resistance types.
The insulating silicon dioxide contains few metal atoms, has poor ability to cool itself and can give rise to destructive, to some extent thermally excited currents. The high channel resistance is not a significant practical problem, it is along with the gate dielectric pivotal to the superb performance of 2SK60 / 2SJ18.
It should be possible to accomplish a reliable setup of 2SK60 / 2SJ18 without introducing a qualitative deterioration.
I have finally picked my courage and built the following circuit for the 2SJ18s. I have a Hameg HM 307 with very limited curve-tacing functionality. I have connected it between D-S. I connected a current limited DC power supply between G-S and controlled the voltage from the Current fine tuning adjustment. For all the VFETs that I have, I can observe the characteristic curves in the first quadrant as I vary the DC voltage across G-S. Depending on the "rank" of these VFETs, I can observe that the characteristic curves are shifting in the horizontal and vertical axes. I am assuming that these are working in one way or another, however, to be absolutely sure about the performance, one needs to have a proper transistor curve tracer, or construct a circuit that has many current and voltage measurement points.
Is it possible for you to make a table of Id-Vds @ given Vgs values per fet?
Let's say 4 values for Vds and 4 values for Vgs, so 16 Id values are in the table.
In a spreadsheet application, these can be transformed in a (multi-) graphic curveplot.
Repaet for the collection and you get an estimation of possible pairs.
If you start with one J18 and one K82, I'm willing to generate these exampleplots.
I'm willing to generate these example plots.
Thank you very much for your offer. I will have to prepare a setup to collect that data. I think I have all the necessary components and equipment, I will try to make some time soon.
In the mean time I have been active at some other forums. Given the rarity of these VFETs, there were not many people responding, however there were some gold nuggets here and there. The common consensus was to check these with a curve tracer. And that is what I did, purchased a semiconductor curve tracer.
It is a Heathkit IT-3121. I am not yet very excited about it as I don't know the condition. It was listed as, last day's favorite phrase "for parts or not working condition" to dismiss all the return exploits (as if it can change the outcome, if you are a real mean buyer, you can even make the seller pay for both way shipment costs
 and return it). Anyway, if all goes well, I will start checking the curves with this and see if there are any differences between the VFETs that I am collecting from all over the world.
/Dirk
Last edited:
Status Update
I wanted to write down a quick update what I have been doing so far:
1- I have obtained two curve tracers to be able to check the VFETs, One is a Heathkit IT-3121 and the other one is an Eico 443. Both of them were non functional due to small problems, like the Heathkit had a blown transistor and a cable that came loose from the PCB (the solder work was really bad) The Eico 443 had noisy pots thus I had hard time calibrating the scope. After these were sorted out, I've tried to check the VFETs. It was much difficult than I anticipated. It is not as simple as someone else does on this video (YouTube) at time 1:27. I agree that that curve tracer is way better than what I have, but at least I thought I had a chance.
2- After recapping the power supply board and replacing the 10000+10000 uF capacitor, I have started checking the voltages, without the Class B boards connected. All the voltages, except from the lamp 8V were showing ~4-5V higher, for example, the voltage at the 2x10000uF capacitor was measuring 65V, the 88V was measuring 92V, etc. I thought this may be due to the unloaded case of the power supply and my suspicion was somewhat backed up with what I read on a parallel thread at AK.
3- I have installed the Class B boards and I have connected the original VFETs that came with the amplifier to their original sockets. I have followed the Service manual and left the Orange (what Violet) and Brown wires disconnected. As the ranks of these VFETs are 56, I have check across the R737(R787) for to see 33.8~38.8V. On one board, the moment I switched on the amplifier the voltage settled at 34.8V and the other settled at 35.6V.
I haven't still replaced the RT701 or RT751 as the pins of these trimmers are flipped, therefore it was difficult for me to find the right replacement. I am now waiting a new pair to arrive as the voltage on one board is not very stable and on that board the trimmer is very touchy. I want to make sure that the trimmer is not the root cause before I start hunting for a noisy component.
/Dirk
NGNG
Hello Everybody,
After replacing the RT701 and RT751, the voltages settled after a warm-up period of 20 minutes. I have adjusted the voltage at 35.0V for both channels across the R737(R787) resistors.
When I observed the voltages behaving normally, I have decided to continue with the bias adjustments. I have connected shorted RCA plugs to the inputs, moved the input switch selection to Normal, placed 8 ohm resistor across Speaker A outputs, connected a voltmeter to all the test points that are mentioned on page 6 of the Service Manual under section 3.2 and additionally attached my oscilloscope probes to the speaker outputs, to capture if there is any AC ripple going on.
I turned the amplifier on (crushed under the stress of making a silly move and blowing all away, hence NGNG), as it is stated under section 3.2 and started observing the bias and the DC at the speaker outputs of the amplifier. The bias started at around 250mV and I could be able to adjust it down to 100mV easily, by keeping an eye on the DC offset. The DC offset was present only on one channel, and adjusting it affected the bias adjustment so I had to do a back and forth between the two adjustments till I get them both where they need to be.
So, the amplifier is working now with the same set of VFETs that it arrived. It completed its' maiden voyage playing Dire Straits through my Realistic Minimus 7 speakers.
The takeaways from this project so far:
1- The best way to test the VFETs is how ilimzn has described.
2- It would help to have a component curve tracer (not semiconductor) if the matching is required, but it does not seem to be a very precise method, maybe depending on the component curve tracer (i.e. Huntron, Hameg HM307)
3- The "should have" of a semiconductor curve tracer for testing the VFETs is not for beginners.
4- PEAK Atlas DCA75 Pro can give false readings as the D-S resistance of these VFETs is very low and it can not differentiate a shorted transistor from a fully working VFET
5- The capacitance which is observed during the measurements may or may not mean anything, as I haven't done any THD or IMD measurements on the amplifier yet, even if I do, I don't have another set of VFETs to compare. I can only check my results with the Service Manual data, and yet, that is a very long shot.
I would like to thank everybody, who contributed or even just read the thread and contemplated about the problem at hand. I would be happy to reply any questions regarding the things I have done or the things that have been discussed here.
/Dirk
Hi Dirk,I turned the amplifier on (crushed under the stress of making a silly move and blowing all away, hence NGNG), as it is stated under section 3.2 and started observing the bias and the DC at the speaker outputs of the amplifier. The bias started at around 250mV and I could be able to adjust it down to 100mV easily, by keeping an eye on the DC offset. The DC offset was present only on one channel, and adjusting it affected the bias adjustment so I had to do a back and forth between the two adjustments till I get them both where they need to be.
Did you try to power on and check the amp without vfets inside, as ilimzn advised before? Have you replaced any bjt-s, resistors?
- Home
- Amplifiers
- Solid State
- Got a Sony TAN-8550 with fried 2SJ18s, now what?