@zman,
Thanks man! I had them playing individually for several hours during setup but never as stereo. Looking forward to that moment")
@meanie,
I found the heatsinks on eBay. I believe they were reclaimed from a solar system power inverter. The slightly higher USSA5 voltage and bias is no problem using these. The downside is they are taller than a typical amplifier would be.
Did you send out files to a company to have your rear panel fabricated?
Thanks man! I had them playing individually for several hours during setup but never as stereo. Looking forward to that moment
@meanie,
I found the heatsinks on eBay. I believe they were reclaimed from a solar system power inverter. The slightly higher USSA5 voltage and bias is no problem using these. The downside is they are taller than a typical amplifier would be.
Did you send out files to a company to have your rear panel fabricated?
@Vunce,
My machinist is the old school kind, manual milling and turning machine used, not CNC.
Respect.
meanie,
Please tel the gentleman that people from all over the world are waiting for you to finish your build.
I have managed to get a spare set of boards from a keen member...Thank you.
AS there are almost 1000 posts is it too much of an imposition to ask a couple of questions [which may well have already been answered?
1) I have a lot of Alef 16N20 and 16P20s. Can these be used in this amp?
2) Has anyone used a cap. multiplier PS? (I have in mind a version of Bonsai's "Ripple Eater")
Many thanks.
1) I have a lot of Alef 16N20 and 16P20s. Can these be used in this amp?
2) Has anyone used a cap. multiplier PS? (I have in mind a version of Bonsai's "Ripple Eater")
@brianco,
Meanie and myself are using the SLB psu which incorporates an Active rectifier, CRC filter and Cap. Multiplier for our USSA5 builds.
The SLB (Smooth Like Butter) Active Rect/CRC/Cap Mx Class A Power Supply GB
Thanks my friends.
i dont have any idea which part is....
it is from medical device....but i can shoot closer and i post a photo, looks yes Neutrik...
Thanks Harry and Nikosokey, I have never heard of these being used for power, I thought only for speaker connection. i might look into then, they make great umbilical cords.
Hi Luke,
you can also use the Neutrik Speakon connectors (four pole) as I think they are rated at 30amps. If I end up using an external power supply, these are the connectors that I will use.
I just received the Conrad 350mm x 151mm heatsinks to replace the smaller ones that I had.
Meanie did you use the same heatsinks and how effective are they with this amp?
I'm impatiently waiting for the guys to report back their findings on the SLB power supplies.
@Harry3,
I built and bench-test the USSA5 on the same Conrad heatsink as yours, it is enough to dissipate the heat generated. I bias at 1.3A and the heat at full operating point was a stable 51 degC, with my ambient of 23 degC.
Now it is going into a proper chassis with 300x180 heatsink, its a tad higher in temp than on the Conrads.
I m totally happy with SLB (on bench-test)spec wise, but haven't had the time to fully enclosed into the proper chassis yet. Now changing to twin mono SLB for the USSA5
Hi Brianco
The Alfet dual die mosfet output is the original part indicated in the USSA5 manual and the 20 suffix is for 200v instead of 160v so yes it is perfect.
Fab
Brilliant news...means I can build the amps for very little cost!!! I have all but the jfets !
I did plan to do this, but later I decide not to, as I do not want my AC main to run all over the amp, for fear of inducing unnecessary hums.
So my AC main comes in from the back panel, through an IEC socket with built-in fuse and switch, then directly into the trafo. The very short path...
So my AC main comes in from the back panel, through an IEC socket with built-in fuse and switch, then directly into the trafo. The very short path...
Hi meanie
Maybe you have planned but mount on your heat sink a thermal circuit breaker as a precaution, remember I mounted 85 ° for cut.
Regard's
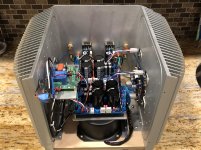
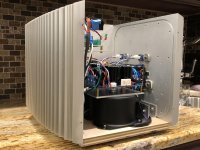
USSA-5 Amplifier is Born!!
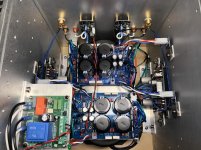
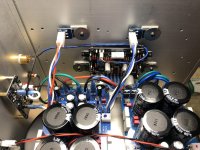
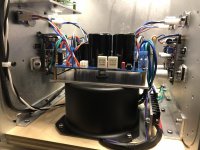
It’s been almost 1 year of possessing Fab’s USSA5 amplifier boards and finally I have it built and singing away!! This project snowballed from a basic single CRC psu to a full blown dual mono SLB psu, softstart circuit and solid state relay speaker DC Protection/delay boards. Actually, my delaying this build improved the overall outcome because the development of the SLB and SSR boards happened during that time.
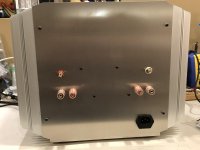
Assembling the amplifier boards and step by step adjustments along the way was made extremely easy with Fab’s well documented build guide. Thanks Fab for your support during this process. The toughest part about this build was the chassis layout and fabrication, it just kept taking longer than anticipated. I’m still not 100% complete, the top and front panels will be made from wood. I like the contrast of the aluminum with some warm wood tones.
I’ve had the USSA5 in the main system for just a couple of hours and first impressions are very good! With 99dB efficient speakers there is absolutely zero noise of any kind, even with my ear pressed up to the speaker grill. The amp also has a very powerful presentation, seemingly more than 25wpc. Maybe the slight increase in voltage (27vdc@1.3A) has some effect. The heatsinks are massive so the increased voltage is handled without a problem.
Thank you ALL for the tips help along this journey The journey is not completed, but I can enjoy the USSA5 as the final details get buttoned up. Time to let the amp settle in and ENJOY
It’s been almost 1 year of possessing Fab’s USSA5 amplifier boards and finally I have it built and singing away!! This project snowballed from a basic single CRC psu to a full blown dual mono SLB psu, softstart circuit and solid state relay speaker DC Protection/delay boards. Actually, my delaying this build improved the overall outcome because the development of the SLB and SSR boards happened during that time.
Assembling the amplifier boards and step by step adjustments along the way was made extremely easy with Fab’s well documented build guide. Thanks Fab for your support during this process. The toughest part about this build was the chassis layout and fabrication, it just kept taking longer than anticipated
. I’m still not 100% complete, the top and front panels will be made from wood. I like the contrast of the aluminum with some warm wood tones.I’ve had the USSA5 in the main system for just a couple of hours and first impressions are very good! With 99dB efficient speakers there is absolutely zero noise of any kind, even with my ear pressed up to the speaker grill. The amp also has a very powerful presentation, seemingly more than 25wpc. Maybe the slight increase in voltage (27vdc@1.3A) has some effect. The heatsinks are massive so the increased voltage is handled without a problem.
Thank you ALL for the tips help along this journey
The journey is not completed, but I can enjoy the USSA5 as the final details get buttoned up. Time to let the amp settle in and ENJOY Attachments
-
 AF0E239A-A5D7-48D7-BCB3-CA20B813205E.jpg1,006.4 KB · Views: 370
 -
 A0D64BD7-3602-4283-A95A-1E9517007E7C.jpg1 MB · Views: 358
 -
 E3F2D3A2-CD28-4950-928D-59433BFB16F5.jpg981 KB · Views: 347
 -
 544EBD28-40E9-4EDB-B5AF-E741799B5E80.jpg916.6 KB · Views: 345
 -
 876E1189-1DFB-4406-9A1F-B860CDA85AB0.jpg639.3 KB · Views: 333
 -
 A39DDC7A-6FF4-460D-AC55-B2C18505DB15.jpg1,003 KB · Views: 1,253
 -
 78C19C77-2122-410D-B1E7-114976EEDA49.jpg934.8 KB · Views: 245
It’s been almost 1 year of possessing Fab’s USSA5 amplifier boards and finally I have it built and singing away!! This project snowballed from a basic single CRC psu to a full blown dual mono SLB psu, softstart circuit and solid state relay speaker DC Protection/delay boards. Actually, my delaying this build improved the overall outcome because the development of the SLB and SSR boards happened during that time.
Assembling the amplifier boards and step by step adjustments along the way was made extremely easy with Fab’s well documented build guide. Thanks Fab for your support during this process. The toughest part about this build was the chassis layout and fabrication, it just kept taking longer than anticipated
I’ve had the USSA5 in the main system for just a couple of hours and first impressions are very good! With 99dB efficient speakers there is absolutely zero noise of any kind, even with my ear pressed up to the speaker grill. The amp also has a very powerful presentation, seemingly more than 25wpc. Maybe the slight increase in voltage (27vdc@1.3A) has some effect. The heatsinks are massive so the increased voltage is handled without a problem.
Thank you ALL for the tips help along this journey
Vunce,
Excellent. The amp needs at least 100 hours of break-in. Once broken in, it does it’s best work after an hour. However, I would advise heat cycling it to break it in faster, not just leaving it on. Also, it’s not necessary nor advisable to leave it on always.
Fab has developed a lot of skill in amplifier design through extensive design and actual listening: he knows what he’s doing.
The best designers in the audio world always understand that musicality is the process, the journey and the goal: it’s everything.
Enjoy,
Greg
Congratulations Vunce on completing the build.
A project long time in waiting, but looks like it was worthwhile given the end result.
Good work on your DIY chassis - the big heat-sinks give you plenty of thermal headroom plus space inside. Look forward to more updates on your listening impressions once you have more hours of play time, and also on the final look of your amp.
- Home
- Amplifiers
- Solid State
- USSA-5 Build with Review