I have bought recently a couple of this amps. 216 THX and open one of them for checking the caps since this is a simple way of making improvments. I was surprise to find out quite good Nichicon all the way on the power supply part of the amp.
I have measured them with quite good results. ERS = 0.11 and with good values close to what it should be originally. However I have found better caps (for replacing 4700 uF caps only) at Mouser electronics for incresing the capacitanse to 22 mF and decreasing ESR to. 0.03. No bad Elcos at all were found in these amps. Any one who knows if it was any improvement from early modells?
Tjena! What was the kind of caps did you found on mouser? I'm also thinking about changing on my 216. But I wonder if there is any downside if changing to larger caps or could one change to largest/lowest esr without problem?
Well. According to the design they are connected in parallell and they can be replace just with one cap per cahnnel. It will be as other older amps with one big cap/channel. There are some people to have replaced with just 2 caps.
I have found these ESMH800VRT223MB80T United Chemi-Con | Mouser Sverige
Ofcourse you have to do some simpel wiring in order to connect them, but is an easy way to do. do you also have Nichicon in your amp?
I have found these ESMH800VRT223MB80T United Chemi-Con | Mouser Sverige
Ofcourse you have to do some simpel wiring in order to connect them, but is an easy way to do. do you also have Nichicon in your amp?
However I have measure these 3 Nichicons LK (M) 4700 uF to have a capacitance - together all 3 - of 13.2 mF and 13.5 mF for left and right channel. So increasing to 22 mF will be an improvement. I will update the values of the new caps. as soon as they arrive and I have measured them individually.Well. According to the design they are connected in parallell and they can be replace just with one cap per channel. It will be as other older amps with one big cap/channel. There are some people who have replaced with just 2 caps. per channel.
I have found these ESMH800VRT223MB80T United Chemi-Con | Mouser Sverige
Ofcourse you have to do some simpel wiring in order to connect them, but is an easy thing to do. do you also have Nichicon in your amp?
Last edited:
Well. According to the design they are connected in parallell and they can be replace just with one cap per cahnnel. It will be as other older amps with one big cap/channel. There are some people to have replaced with just 2 caps.
I have found these ESMH800VRT223MB80T United Chemi-Con | Mouser Sverige
Ofcourse you have to do some simpel wiring in order to connect them, but is an easy way to do. do you also have Nichicon in your amp?
Sorry for the slow response, havent had much time to open the amp up. It's nichicon caps in mine as well. 25mm in diameter, 80V, 4700uF.
Haven't had a look under the pcb for how the wiring could be done(and probably wont start recapping until my Honey Badger build is complete). Your plan is to change the 6 small ones for 2 big as these other people has done if i understand correctly?
/Ejje
Well, other people have replaced 6 caps with 4 pcs. 11 mF caps.
So I do not know if someone have tried with just 2 big caps. However I have done this now and something went wrong and the amp. is not clicking on.
 I did replace back the old ones and still not clicking on. I have no idea yet what went wrong. The polarity was never inverted or something like that. I am sure that this should work. Vi hörs!
Well, other people have replaced 6 caps with 4 pcs. 11 mF caps.
So I do not know if someone have tried with just 2 big caps. However I have done this now and something went wrong and the amp. is not clicking on.
Hmm.. thats to bad. So you installed the caps you linked earlier? Maybe it's the speaker relay if it's the original? Have you checked the other caps for bulging tops or burned marks around resistors? I know I read about some resistors that often becomes faulty, I'm gonna try to find it again.
I'm very curious about the fit of the new caps. Any chance of pictures of them?
Last edited:
Hmm.. thats to bad. So you installed the caps you linked earlier? Maybe it's the speaker relay if it's the original? Have you checked the other caps for bulging tops or burned marks around resistors? I know I read about some resistors that often becomes faulty, I'm gonna try to find it again.
I'm very curious about the for of the new caps. Any chance of pictures of them?
Yes, It was that caps I hade linked to earlier and they were measure to have an ESR of 0.01 ohm. It seems to be the relay that is not clicking any longer. I read something about resistors going bad, but I don't see any looking bad or faulty. However I will start to measure them.

Yes, It was that caps I hade linked to earlier and they were measure to have an ESR of 0.01 ohm. It seems to be the relay that is not clicking any longer. I read something about resistors going bad, but I don't see any looking bad or faulty. However I will start to measure them.
View attachment 641480
Now I have changed the caps on my second amplifier. With the ones mentioned before.
The sound is now cleaner and more clear. Diana Krall is now singing closer and sounrounding me more than before.
I can only say that I highly recommend this upgrade.
Now I have changed the caps on my second amplifier. With the ones mentioned before.
The sound is now cleaner and more clear. Diana Krall is now singing closer and sounrounding me more than before.
I can only say that I highly recommend this upgrade.
Sounds awesome! Any improvements in the lower registers? So let me get this straight, you removed all 6 original caps? And then put 2 of the big 22mF caps in? Was it a clean fit or did you do any special wiring?
Sounds awesome! Any improvements in the lower registers? So let me get this straight, you removed all 6 original caps? And then put 2 of the big 22mF caps in? Was it a clean fit or did you do any special wiring?
Yes, I did change 6 caps with only 2 big 22 mF each. The improvements are in all frequencies. But it was more audible for me from ~300 Hz to 30 Khz since I drive my speakers with 2 amps. A NAD C272 for the Woofers and 216 THX for the midrange and treble. I have now tested the whole register and an improvement in the lower frequencies are also audible.
I had to make a very simpel wiring from the new cap to just one of the inputs from the old cap.
I could do this since the old 3 caps were connected in paralell. I used 4 wires, but you can also make it with just 3 wires if you conect the 2 caps in serie. Since the power supply delivers + /- 67 Volts.
I think my moded 216 THX sounds better than my C272 now.
Very nice! I will do this when i'm done building my honey badger
Thanks for reporting the results! Any luck fixing the first amp?
Last edited:
Yes, I did change 6 caps with only 2 big 22 mF each. The improvements are in all frequencies. But it was more audible for me from ~300 Hz to 30 Khz since I drive my speakers with 2 amps. A NAD C272 for the Woofers and 216 THX for the midrange and treble. I have now tested the whole register and an improvement in the lower frequencies are also audible.
I had to make a very simpel wiring from the new cap to just one of the inputs from the old cap.
I could do this since the old 3 caps were connected in paralell. I used 4 wires, but you can also make it with just 3 wires if you conect the 2 caps in serie. Since the power supply delivers + /- 67 Volts.
I think my moded 216 THX sounds better than my C272 now.
Well, I have been able to isolate the fault to the left channel, but I have not had time to start measure the components.
I attached an image of what it looks like now inside my 316 THX.
Attachments
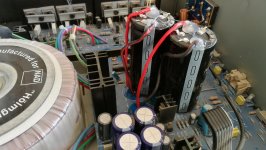
Well, it was because it will sound much better due to electrons traveling upside down.Hallå där!
Any reason why you decided to moint them upside down? Have myself a 216 that needs new caps
just joking
The main reason is that the caps don't fit on any holes on the PCB. So I decided to glue them. Mechanically speaking the top surface was better to be used due to being flat.
The contacts are also glued for electrical isolation. just in case.
Isn’t possible to drill new holes for the caps then?
Would be possible to put 4x10000uf /80v? Or 4x12000uf?
Tja igen!
Yes, I think is possible, but tricky. Due to the copper tracks on the pcb.
I think you can use 4x10000uf /80v Or 4x12000uf if they have a diameter that fits. It could be better actually. However I tried to find caps that fits, but it was not easy. Good ones were quite expensive and in searching for caps that fits came across these ones mentioned above.
Unfortunattely the original caps are of small diameter (25 mm) so you don't have plenty of space.
Good luck and let us know your findings.
Vi hörs!
From page 86, Nippon Chemicon catalog E1001Q:
• Provide the following adequate clearance space over the
pressure relief vent of a capacitor to avoid blocking the
correct opening of the pressure relief vent.
Case diameter Clearance
φ8(6.3) toφ16mm: 2mm minimum
φ18 toφ35mm: 3mm minimum
φ40 mm and above: 5mm minimum
• Do not locate any wire or circuit pattern over the pressure
relief vent of a capacitor.
• If a capacitor is mounted with its pressure relief vent facing
down on the PC board, provide a ventilation hole in the
board beneath it to let gas escape when the vent opens.
The vent is usually on the top surface of the capacitor. Mounting the capacitor upside down blocks the top surface completely. If a fault causes the capacitor to vent, a violent explosion would be expected if the vent is blocked.
Thank you for advicing this.From page 86, Nippon Chemicon catalog E1001Q:
• Provide the following adequate clearance space over the
pressure relief vent of a capacitor to avoid blocking the
correct opening of the pressure relief vent.
Case diameter Clearance
φ8(6.3) toφ16mm: 2mm minimum
φ18 toφ35mm: 3mm minimum
φ40 mm and above: 5mm minimum
• Do not locate any wire or circuit pattern over the pressure
relief vent of a capacitor.
• If a capacitor is mounted with its pressure relief vent facing
down on the PC board, provide a ventilation hole in the
board beneath it to let gas escape when the vent opens.
The vent is usually on the top surface of the capacitor. Mounting the capacitor upside down blocks the top surface completely. If a fault causes the capacitor to vent, a violent explosion would be expected if the vent is blocked.
It was something of my concern when I decided to make this changes. And I took the risk.
However I will follow the precautions you mentioned.
Thanks!
Isn’t the caps in 214: 25mm diameter and 216THX: 30mm? Have not got mine yet so can’t measure. Thx for all your answers.
I was thinking grinding down the traces to bare copper, drill new holes if needed and also use 1.5-2.5mm2 solid copper to make the traces a bit bigger where it matters at the same time. Good or bad idea?
I was thinking grinding down the traces to bare copper, drill new holes if needed and also use 1.5-2.5mm2 solid copper to make the traces a bit bigger where it matters at the same time. Good or bad idea?
Isn’t the caps in 214: 25mm diameter and 216THX: 30mm? Have not got mine yet so can’t measure. Thx for all your answers.
I was thinking grinding down the traces to bare copper, drill new holes if needed and also use 1.5-2.5mm2 solid copper to make the traces a bit bigger where it matters at the same time. Good or bad idea?
I don't know the size of the caps on 214 THX however I have measure the ones I still have and they are 25 mm diameter. On pictures of 214 THX found online, caps seems to be smaller diameter maybe 20 mm ?.
I think if you are careful, with the traces, you will make it.
Lycka till!
- Home
- Amplifiers
- Solid State
- NAD 216 THX - Make it sound better?