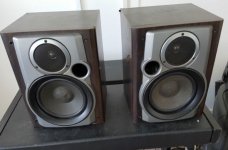
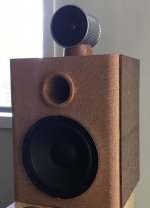
I was given these by a friend, so I thought I would have a bit of a tinker.
AIWA SX-NAV95 is the model if anyone's interested, but they are not high end of course.
I pulled them apart and removed the plastic front, sanded the boxes down ready to cover.
Pulled the two drivers out
Pulled the mesh from the plastic cover to use later.
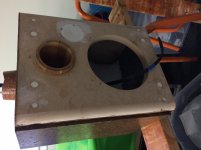
Filled in the existing port and used the tweeter hole with a bamboo cup(end removed), for the new one. Hoping it would be ok.
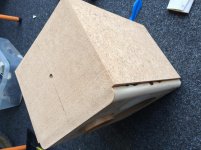
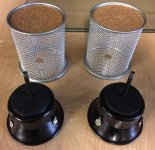
Glued cork onto the sides and top of boxes and oiled (after staining with a single coat) 6 coats, then stuck a cork block on top to hold the tweeter unit. I find most of this stuff at the 2 dollar shops.
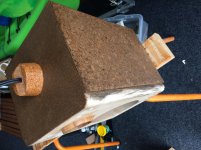
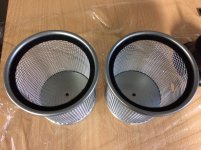
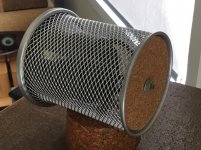
Also found a mesh basket used to hold pens and pencils, drilled a hole in the bottom and made a hole in the side to slide the cable through.
AIWA SX-NAV95 is the model if anyone's interested, but they are not high end of course.
I pulled them apart and removed the plastic front, sanded the boxes down ready to cover.
Pulled the two drivers out
Pulled the mesh from the plastic cover to use later.
Filled in the existing port and used the tweeter hole with a bamboo cup(end removed), for the new one. Hoping it would be ok.
Glued cork onto the sides and top of boxes and oiled (after staining with a single coat) 6 coats, then stuck a cork block on top to hold the tweeter unit. I find most of this stuff at the 2 dollar shops.
Also found a mesh basket used to hold pens and pencils, drilled a hole in the bottom and made a hole in the side to slide the cable through.
Attachments
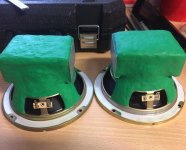
I used plastercine to cover the terminals while painting the tweeters as it can form any shape and be peeled off easily.
I also glued a circle of cork onto the back of the tweeter with a thread in it, which I would later use to attach to the rear of the basket. Cut some felt surrounds to secure up against the mesh for the tweeters.
I also glued the mesh onto the front of the tweeters.
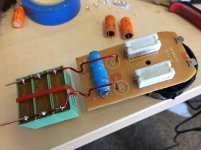
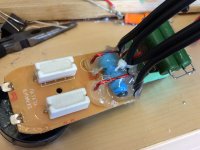
Next I replaced the caps on the cross-overs
I also glued a circle of cork onto the back of the tweeter with a thread in it, which I would later use to attach to the rear of the basket. Cut some felt surrounds to secure up against the mesh for the tweeters.
I also glued the mesh onto the front of the tweeters.
Next I replaced the caps on the cross-overs
Attachments

I took out the old orange caps and replaced them with others.
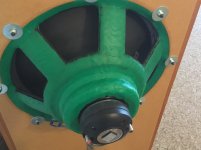
I then stated to work on the main drivers.
I took two packets of 500grm plastercine and proceeded to work in onto the rear of the drivers little by little pushing in into the gaps building up layers and including the shielding. I used a total of about 450grm per driver. I have done this before on my much more expensive OB drivers with such great success, that putting on these was not even a second thought.
It won't go hard, crack or sag. Never dries out, so no worries. My OB drivers are still going well and they are waaaaaaaaaaay more expensive than these little things.
Attachments
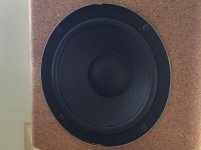
Glued the final front cork on in two steps. First the flat front was glued, then using contact glue rolled the edges down.
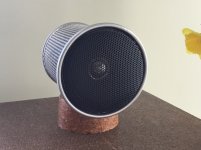
Made up some felt surrounds for the drivers.
Put felt on the bottom as well
Glued the tweeters in place
Installed the main drivers and they were done.
God I lover plastercine!
Made up some felt surrounds for the drivers.
Put felt on the bottom as well
Glued the tweeters in place
Installed the main drivers and they were done.
God I lover plastercine!
Attachments
over here, we've been using an HVAC clay based product called "DuctSeal" for at least 30yrs
An externally hosted image should be here but it was not working when we last tested it.
Very sorry my spelling mistake
Assorted Plasticine Block 500 G | Hobbycraft
It's not modelling clay, it contains petroleum jelly so will not set and go hard.
Of course to get the best results, you MUST use the Audiofile grade product and pay 10 times standard retail price.
Assorted Plasticine Block 500 G | Hobbycraft
It's not modelling clay, it contains petroleum jelly so will not set and go hard.
Of course to get the best results, you MUST use the Audiofile grade product and pay 10 times standard retail price.
Last edited:
") For all that effort you put into that project, you should have bought a decent dome tweeter instead of guilding the original rather crappy one...
For all that effort you put into that project, you should have bought a decent dome tweeter instead of guilding the original rather crappy one...GRS 1TD1-8 1" Dome Tweeter 8 Ohm
Ok. I guess in NZ is not that easy....
I did not want to spend more money, the wife would have me strung up!
yes i was looking and listening today and realised i could have easily flipped the units over, nevrmind.
those tweeters actually sound quits nice. Anyway it was fun tinkering and listening to improved sound out of these things. The audio world/industry is so full of BS! People seem to be so caught up in perceived notions that gear cant possibly sound decent if its cheap. I have long gotten over that, having to use what i have and on low budgets, so no ego issues here.
Last edited:
The modification of yours is really interesting. Good job! I have some Aiwa speakers as well, 4 or 5" bassmid and a cone tweeter. The XO filter is made only of one capacitor for the HP. In the spring time I'll try to build a new cabinet and a completely new filter. I don't see a point in acquiring a better tweeter. I'll use the wood from a cupboard, think it's 14 mm chipboard veneered. We'll see.
Sign of the times... low-end speakers used to have standard catalogue drivers poorly matched to solid enclosures. Nowadays low end speakers usually have drivers optimised (*) for the enclosures, but the enclosures themselves are often little thicker than cardboard. You can get a significant increase in performance by transferring the drivers into a solid enclosure and using a proper (though basic) crossover. You can also take the opportunity to tune for a flatter bass response rather than the hump often used to give the impression of more bass.
(*) For typical mass-produced mini-systems, with modern design software it costs no more to have a driver built to specified parameters than to accept an off-the-shelf item. The enclosure determines the driver parameters, rather than the other way round. (The enclosure size is usually chosen to match the size of the electronics unit.)
(*) For typical mass-produced mini-systems, with modern design software it costs no more to have a driver built to specified parameters than to accept an off-the-shelf item. The enclosure determines the driver parameters, rather than the other way round. (The enclosure size is usually chosen to match the size of the electronics unit.)
Im not up on all the techy side of things. I did not want build another enclosure, too much money.
These were just messing around, but the improved sound is quite remarkable considering the components used.
I have had Plasticine on my Hawthorne OB's for a few years now and are completely sold on the improvement to them, so was keen to try something else just to confirm this theory. And that Plasticine has stuck hard, no issues what so ever. Could have done a better job on them, but its all about the sound.
Attachments
- Status
- This old topic is closed. If you want to reopen this topic, contact a moderator using the "Report Post" button.
- Home
- Loudspeakers
- Multi-Way
- Playing with Aiwa book shelf speakers