Enhancing the Illumination light on the volume knob
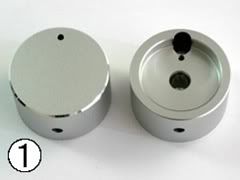
1.The knob of the TU-8300 contains a hole in the inner side in which enables the installation of a LED to emit a light on the face of the volume knob.
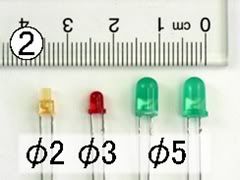
2. You can use the LED as shown in the picture below
Transparent lens are excessively bright when viewed from the front, therefore, we recommend a dispersed lens. Choose the colour of your choice (yellow, red, green, or white).
Connecting and soldering
LEDs must be connected in the correct way, the diagram may be labeled “a” or “+” for anode and “k” or “-“ for cathode (yes, it really is “k”, not “c”, for cathode!). The cathode is the shorter lead and which may contain a slight flat on the body of round LEDs. If you look inside the LED, the cathode is the larger electrode (However, this is not an official identification method).
LEDs can be damaged by heat when soldering, but the risk is minimized if you are careful and slow. No special precautions are needed for soldering most LEDs.
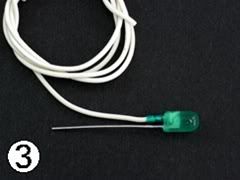
3. Solder as finely as possible to the A-node of the LED. Cover the A-node lead with tube so that there is no short circuit.
A ( anode) K(cathode)
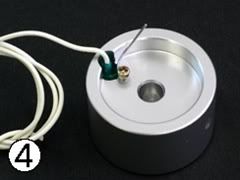
4. Insert a (M2 × 5) or (M2.3 × 5) screw into the small hole located in the back of the knob and insert the LED into the hole next to the screw. Next, tighten the screw so the lead is wound around the cathode of the LED. Finally use a nipper and cut the excess lead. See the picture below for details.
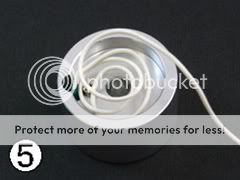
5. Make 2 to 3 loops around the inside of the volume knob as shown in the below picture.
6. Carefully attach the knob to the volume axis and ensuring the axis fits in between all the wiring.

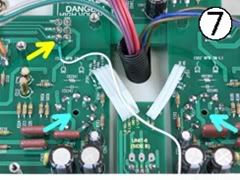
7. Appropriate a suitable length of wiring and solder it to the nearest “8.5V” pin (1kΩ was used here) (as indicated by a yellow arrow in the below picture). The two holes as indicated by the light green coloured arrows are for the illumination of the vacuum tube 12AT7 (see picture 9). A φ3 sized LED is appropriate to be installed here.
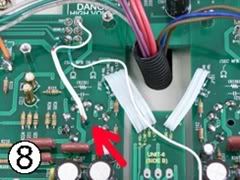
8. The tube brightness hole for 12AT7 (indicated by the red arrow) is where I have installed the φ3 sized LED. Both ends of the wire are soldered as shown in the picture below. Solder the one end of the wire connected to the 8.5V as shown in picture 7. The cathode is connected to the grounding pin as shown below
9. The emitting light from the volume knob adds to the overall appearance. (the right side of 12AT7 with LED light)

Translated from
http://www.elekit.co.jp/blog/index.php?s=tu-8300
1.The knob of the TU-8300 contains a hole in the inner side in which enables the installation of a LED to emit a light on the face of the volume knob.
2. You can use the LED as shown in the picture below
Transparent lens are excessively bright when viewed from the front, therefore, we recommend a dispersed lens. Choose the colour of your choice (yellow, red, green, or white).
Connecting and soldering
LEDs must be connected in the correct way, the diagram may be labeled “a” or “+” for anode and “k” or “-“ for cathode (yes, it really is “k”, not “c”, for cathode!). The cathode is the shorter lead and which may contain a slight flat on the body of round LEDs. If you look inside the LED, the cathode is the larger electrode (However, this is not an official identification method).
LEDs can be damaged by heat when soldering, but the risk is minimized if you are careful and slow. No special precautions are needed for soldering most LEDs.
3. Solder as finely as possible to the A-node of the LED. Cover the A-node lead with tube so that there is no short circuit.
A ( anode) K(cathode)
4. Insert a (M2 × 5) or (M2.3 × 5) screw into the small hole located in the back of the knob and insert the LED into the hole next to the screw. Next, tighten the screw so the lead is wound around the cathode of the LED. Finally use a nipper and cut the excess lead. See the picture below for details.
5. Make 2 to 3 loops around the inside of the volume knob as shown in the below picture.
6. Carefully attach the knob to the volume axis and ensuring the axis fits in between all the wiring.
7. Appropriate a suitable length of wiring and solder it to the nearest “8.5V” pin (1kΩ was used here) (as indicated by a yellow arrow in the below picture). The two holes as indicated by the light green coloured arrows are for the illumination of the vacuum tube 12AT7 (see picture 9). A φ3 sized LED is appropriate to be installed here.
8. The tube brightness hole for 12AT7 (indicated by the red arrow) is where I have installed the φ3 sized LED. Both ends of the wire are soldered as shown in the picture below. Solder the one end of the wire connected to the 8.5V as shown in picture 7. The cathode is connected to the grounding pin as shown below
9. The emitting light from the volume knob adds to the overall appearance. (the right side of 12AT7 with LED light)
Translated from
http://www.elekit.co.jp/blog/index.php?s=tu-8300
- Status
- This old topic is closed. If you want to reopen this topic, contact a moderator using the "Report Post" button.