Anyone know of any sites that gives pointers for Point-to-Point wiring? I have always done PCB's in the past, but am going to do a point to point build. Electrically I have no questions. But as far as from a mechanical/aesthetic aspect.
-Tips to make it look clean?
-What type of terminal strips/ tag boards are recommended?
-How to do it without putting 100 small bolts through the chassis top plate?
-Keeping it easily servicable. I imagine mounting sockets on the top plate and mounting terminal strips on the bottom plate could create a headach when trying to service.
Thanks!
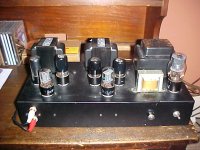
Its really usefull to consider these things right from the start of a project before you start "metal bashing". I have a large selection of tag strips on hand. Separation of tubes can then be made to suit those tag strips which have a mount each end. Place the tubes such that you can get a tag strip on either side using the tube socket mounting bolts.
Transformer mounting bolts can often have a metal tapped spacer under the chassis instead of a nut and these spacer can then have tag boards mounted on top of them.
The other thing I do since I use Hammond chassis, which is a powder coated black, is to use black cap head bolts. One or two extra of these showing above the chassis does not look particularly objectionable.
Example: This thing is full of tag strips underneath but few extra bolts show on top.
Cheers,
Ian
Attachments
Design it on paper first- it's a lot easier that way! Use tagboards if you can find them. Use short wire links to connect things. Fibreglass tag boards would be the ideal, because phenolic can "leak" apparently, but it's probably unobtainium.
Solder grid resistors and any other small components directly to the valve socket, and use a multiple star earthing layout.
Keep power supply parts well away from signal parts, and use shielded cable for sensitive areas.
Heater connections should be tight twisted and right against the metal chassis.
The best advice I can give is look at how some other people have wired their amps. My early projects were messy and each one is a little better than the last. Mouser carries the old style terminal strips with a number of different lugs. Try part number 158-1005. You won't have 100 small bolts on top of the chassis unless you use those single point turrets. You could always use socket cap screws to look a bit more professional.

lot's of good pointers!
You mean I have to quit being cheap and finally shell out the cash for a copy
"Building Valve Amplifiers," Morgan Jones. Everything you seek and more.
You mean I have to quit being cheap and finally shell out the cash for a copy
If you REALLY want to have some fun, check this out:
Wiring and Cabling: How To Lace Cable Harnesses
se
Wiring and Cabling: How To Lace Cable Harnesses
se

It's all about planning...
Step 1
Think about it.
Step 2
Plan it in your mind.
Step 3
Scribble it out on paper.
Step 5
Mock it up.
Step 6
Rest and relax. Drink a nice cup of tea (/ coffee / beer). Cuddle the wife. Kick the cat. (Or cuddle the cat and kick the wife...). Etc.
Step 7
Repeat steps 1 to 5 about a half-dozen times before you even touch the toolbox...
Gordy said:It's all about planning...
Step 1
Think about it.
Step 2
Plan it in your mind.
Step 3
Scribble it out on paper.
Step 5
Mock it up.
Step 6
Rest and relax. Drink a nice cup of tea (/ coffee / beer). Cuddle the wife. Kick the cat. (Or cuddle the cat and kick the wife...). Etc.
Step 7
Repeat steps 1 to 5 about a half-dozen times before you even touch the toolbox...
Very good advice!
An externally hosted image should be here but it was not working when we last tested it.
se
i once had a job where we built test fixtures and prototypes, and had to learn how to make wiring harnesses, and make them neat (including keeping the same wires in the same place in the bundle all the way through). we used waxed nylon lacing cord, not zip ties. it takes a bit of practice, but once you get the hang of it, you can do it quickly and easily. the best knot to use is a clove hitch, topped with a surgeon's knot. put your ties about 1" apart, and keep your wires straight in the bundle. there's no books on the subject, as far as i know, but you can see examples of it in military surplus equipment. you may not want to go that far for neatness, but it's not difficult to do. you can even prefab the wiring harnesses on a piece of wood with nails in it (laid out as a duplicate of the inside of the amp chassis, with the nails in the same places as the terminals on the tie strips), which saves a lot of time if you end up making more than one amp.
From time to time I've seen the following expression in DIY articles in magazines especially those involving high impedence circuits. The author will advice the constructor to; "minimize stray capacitance". In practise what does this mean for us when laying out circuitry. i.e. what precautions do we take.
Hi all,
Well I do my "P to P" boards this way, as shown below: there is a lot of tinkering, ultra high patience on this but in the end the results are fine.
No noises, no hum and optimum strength for all supported components.
And excellent sound.
I use a 2mm fenolite board (with tag strips) just below the amp's top plate.
The board is supported on aluminum L shapes fixed to sides/front of the chassis.
You can see many other details and projects at:
http://vacuumtuberesearch.multiply.com/
[ ]s
Ricardo
An externally hosted image should be here but it was not working when we last tested it.
An externally hosted image should be here but it was not working when we last tested it.
rwellerson said:Well I do my "P to P" boards this way, as shown below: there is a lot of tinkering, ultra high patience on this but in the end the results are fine.
Beautiful work! It really illustrates Gordy's advice.
An externally hosted image should be here but it was not working when we last tested it.
Hope you don't mind that I copied the image and loaded it on my server. Wasn't able to link it directly to the image on your end.
se
- Status
- This old topic is closed. If you want to reopen this topic, contact a moderator using the "Report Post" button.
- Home
- Amplifiers
- Tubes / Valves
- Point-to-Point, Pointers