")
I have 3 VRDN boards available for sale. Cost is $6.00 per board, $8.30 shipping lower 48 United States, cost has been around $37.00 for shipping international.
If you are interested, PM me with how many you want, shipping address and PayPal e-mail address. I will send you a PayPal invoice to pay. Once paid, I will ship.
If you are interested, PM me with how many you want, shipping address and PayPal e-mail address. I will send you a PayPal invoice to pay. Once paid, I will ship.
Boards arrived, thanks, they look fantastic.Perfect, thank you, 6L6!
You were going to use a different capacitor than on the BOM, to reduce height so it fits in a 1U case.
Do you have a mouser or digikey number for the caps you chose?
These two radial-lead electrolytic capacitors from different manufacturers, are the same size
_
- 7.5mm lead spacing ;; 16mm diameter ;; 21.5mm height above PCB
- Nichicon UBY1V222MHL6TN
- United Chemi-Con EKYC350ELL222ML20S
_
Attachments
Last edited:
A question for people who are putting VRDNs in 1U chassis...
Are you able to fit these boards in 1U with the optional steel base plate (the one with a 10mm grid of holes)? Or do you mount everything directly to the 3mm black aluminum bottom cover to save space?
I bought the caps from the BOM and they are ~26mm tall. I'm guessing these will be a no-go with the 1U chassis unless I mount everything to the chassis bottom (no base plate) and use short stand offs.
Last edited:
1U chassis
I have set myself the challenge of fitting a balanced BA18 in a 1U height chassis 240mm wide by 280mm deep, with the power supply as well, either the VRDN or the Pete Millet one. The size restriction is because I want it to match the 240 wide chassis I have fitted F5, BA3, MA3 balanced and M2X amps into, with a common remote power supply for all. I will post some photos later, its been a busy quarantine
The main issue with the 1U chassis is height. Modushop use 40mm tall side rails with either steel or Aluminium covers( I can use the British spelling if Jonny Ive can ) The 10mm faceplate is 50 mm tall so that's the maximum outside dimension possible. What you can do is use filler strips on top and bottom of the side rails so the maximum internal space with 1mm steel covers is 48mm with two 4mm fillers on top and bottom of the side rails. Using the perforated bottom plate loses a lot of space because it mounts above the base plate, and it is also smaller than the overall size so its hard to use it without an additional baseplate. Just mount everything on the bottom cover directly
( measure twice, drill once to avoid the Swiss cheese effect)
If you are really desperate you can reduce the board spacer height by using a non-conductive base cover, or reduce the problem altogether by speccing shorter capacitors. Just remember it is more fiddly to use compact cases and there will be times when you long for the generous acreage of the DIY DeLuxe case
Using this strategy, I shoehorned the Whammy into a 1U Galaxy chassis very successfully. 1U is a great form factor, so its worth the effort. The final strategy is to use power bulges on top or bottom to accommodate the biggest components...bottom is less ostentatious and more forgiving of construction flaws
I will post photos of the BA18 when its finished and we could start another thread about hacking IKEA furniture, a topic I am also very familiar with.
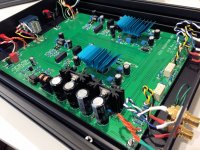
Here's a little project I built inside a 1U Galaxy chassis from the diyAudio store. The PCB is mounted to the chassis bottom using M3 bolts and 5mm tall threaded hex spacers.
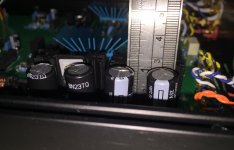
Among the various other tall parts on the board, I used Panasonic electrolytic capacitors (Mouser P/N 667-EEU-FP1E202) whose datasheet says their hight is 25mm. In the second photo you can see that it actually pokes up 26-27mm; probably I didn't mash it down tightly against the PCB, slightly compressing the rubber seal, when soldering.
Everything fit nicely inside the case, and there's plenty of clearance between the top of the components and the bottom of the ceiling panel. It played nicely too; that's what people who auditioned it at Burning Amp 2019 told me anyway.
_
Attachments
Thanks Mark and dweightman for the detailed replies. The F5 in the Deluxe 4U was my first real audio project so I wasn't familiar with how people used the smaller chassis. No baseplate it is!
I've been really careful so far, especially with the F5 since I wanted a nice serviceable layout. I'm hoping to be able to once again use my limited CAD skills and 3D printer to make custom parts for the preamp as I did with the F5.

I've been really careful so far, especially with the F5 since I wanted a nice serviceable layout. I'm hoping to be able to once again use my limited CAD skills and 3D printer to make custom parts for the preamp as I did with the F5.
Maybe...
How many volts out do you want?
24v single secondary? Dual 24v?
100VA is huge for a line project, but if you have it, use it.
I want ±12v, is single secondary. I´m thinking on this to power a SHPHA by TimS here Simple High Performing Headphone Amp - diyAudio
Thanks!!
Hello guys!
Before building the board, is 50VA dual 18V (Antek) good for +- 20 ? Is 25VA enough?
I am planning to use it for BA18 and Mesmerize supply. Thank you!
abe
Do you mean the DCB1 mezmerize?
Hasn‘t it it’s PSU Onboard, with a 15V 15V 50VA recommended? (I‘m not sure about that, but do believe it’s that way...)
Do you mean the DCB1 mezmerize?
Hasn‘t it it’s PSU Onboard, with a 15V 15V 50VA recommended? (I‘m not sure about that, but do believe it’s that way...)
Oops, my mistake! It's the I-Select (selector side of the Mesmerize).
I shortened my heatsinks to go in a 1U chassis. My tallest parts (caps) are about 26mm tall so I cut the first heatsink to the next highest full 'rung', which means cutting the black part roughly in half. Looking back to pfarrell's post on page 1, I see that he cut them one rung higher, and realize that would still fit in 1U.

Any idea if these are going to be too small now? Aside from a catastrophic failure (fiery explosion) is there a practical way to tell if it's sufficient?
If it's too short then it looks like I'll be paying 18€ to DigiKey or Farnell for shipping... If anyone in Europe has a spare I'll buy it!
Any idea if these are going to be too small now? Aside from a catastrophic failure (fiery explosion) is there a practical way to tell if it's sufficient?
If it's too short then it looks like I'll be paying 18€ to DigiKey or Farnell for shipping... If anyone in Europe has a spare I'll buy it!
Last edited:
heat sink surgery
I am waiting for parts so will soon go thru a similar exercise. My guess is that shortening the heat sinks to 32mm will be the most you might need to do. Is out consequential if the sinks touch the top cover? If so, I will be grateful that I bought the Kapton tape and will use a bit of that. We shall see......
I am waiting for parts so will soon go thru a similar exercise. My guess is that shortening the heat sinks to 32mm will be the most you might need to do. Is out consequential if the sinks touch the top cover? If so, I will be grateful that I bought the Kapton tape and will use a bit of that. We shall see......
Autocorrect kindly changed " is it consequential " in the above post to " is out consequential " which I think was a feeble attempt at UK Yorkshire slang " is owt consequential " which would at least make sense
I suspect that the heat sink touching the top cover would not be a good idea, in which case you could have left one more fin which still gives clearance, but reduces the heat ink to two thirds of its original size. Still OK for cooling?
I did look into the Mouser catalogue to find a beefier heatsink but got lost in the plethora of choice and many sizes
The parts actually arrived 5 mins after my posting so I was able to check the sizing. I plan to cut mine down to four fins and see if that's OK
- Home
- Amplifiers
- Power Supplies
- VRDN: bipolar regulator PCB for line level ckts: ±11V to ±20V @ 1.5A with "De-Noiser"