So hence forth you can refer to me as the stupid guy that read all about the dangers of making big floorstanders out of solid wood and went and did it anyway ")
Right now i am in the final stages of my first ever DIY audio project: the build of a pair of Pensil 10.2's. And what a yourney it has been.... I have been toying with the idea of building my own louspeakers for years, and back in February this year I decided to just go ahead and do it.
There are a couple of threads here in this section that I started to get an idea of which driver to use. I settled on the Alpair 10.2.
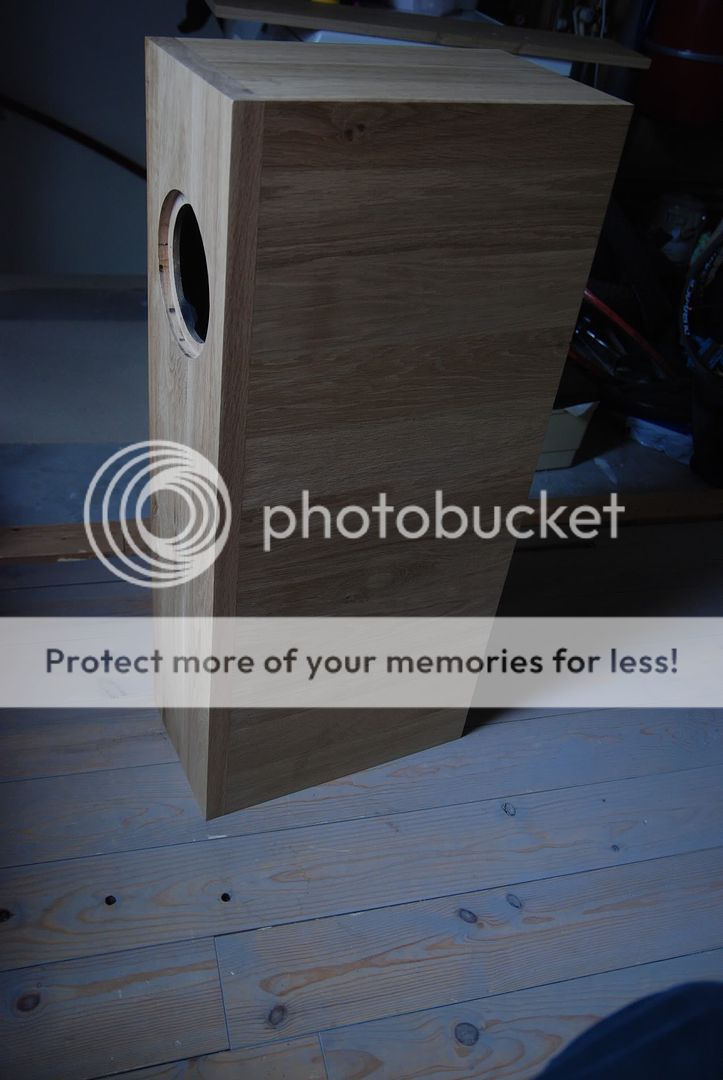
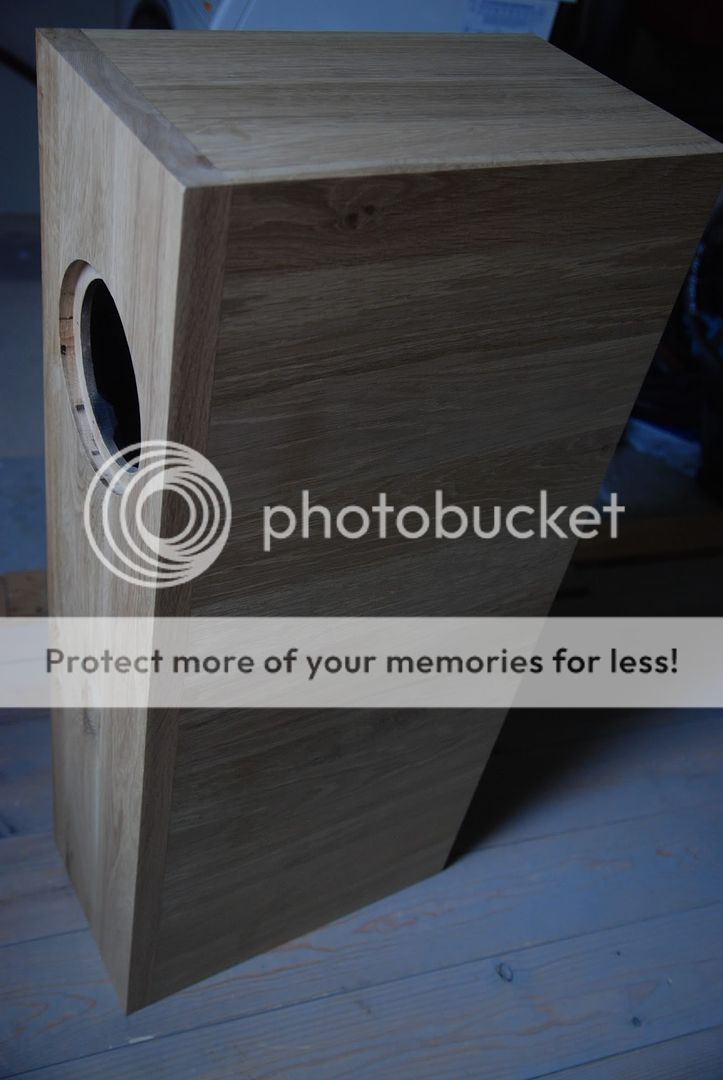
Now, I really liked to take on the challenge of building the cabinets out of solid wood. Somehow the look of "carpentry panels" as they are refered to over here really appeals to me. Well, the cabinets are all but finished but I must say that I grossly underestimated the difficulty of using solid wood over ply.
First of all I had to deal with the fact that the panels were bending slightly after being cut. I stored the wood for two weeks pressed between two heavy boards, which took care of most of the bending. Still, special care was needed during assembly.
Then I found out that the sides were not cut straight at the mill. I only discovered this after glueing up 1,5 cabinets... This required me to change plans and re-do most of the work. Fortunately I was re-imbursed for the scrapped wood.
From then on I had the panels cut about 10mm too big so I could flush-route them after glueing. For the side and top panels I used biscuits to make for a stable construction. Mind you, before this project I never touched a router or a biscuit joiner, but one learns...
Yesterday evening I completed spray painting the insides (for sealing the wood). All that is needed now is to laquer the outside. I will use a super matte two component lacquer that will remain all but invisible as I really like the look of the untreated panels.
I will post pics later.
Right now i am in the final stages of my first ever DIY audio project: the build of a pair of Pensil 10.2's. And what a yourney it has been.... I have been toying with the idea of building my own louspeakers for years, and back in February this year I decided to just go ahead and do it.
There are a couple of threads here in this section that I started to get an idea of which driver to use. I settled on the Alpair 10.2.
Now, I really liked to take on the challenge of building the cabinets out of solid wood. Somehow the look of "carpentry panels" as they are refered to over here really appeals to me. Well, the cabinets are all but finished but I must say that I grossly underestimated the difficulty of using solid wood over ply.
First of all I had to deal with the fact that the panels were bending slightly after being cut. I stored the wood for two weeks pressed between two heavy boards, which took care of most of the bending. Still, special care was needed during assembly.
Then I found out that the sides were not cut straight at the mill. I only discovered this after glueing up 1,5 cabinets... This required me to change plans and re-do most of the work. Fortunately I was re-imbursed for the scrapped wood.
From then on I had the panels cut about 10mm too big so I could flush-route them after glueing. For the side and top panels I used biscuits to make for a stable construction. Mind you, before this project I never touched a router or a biscuit joiner, but one learns...
Yesterday evening I completed spray painting the insides (for sealing the wood). All that is needed now is to laquer the outside. I will use a super matte two component lacquer that will remain all but invisible as I really like the look of the untreated panels.
I will post pics later.
Looking forward to seeing the fruits of your labour. If it is any consolation, not all plywood is perfectly flat, either. I've had to deal with some less that perfect Birch plywood while building my reference monitors for the A12. You can't tell once they're done, but you can sure tell while you are trying to join the wood!
I've had to deal with some less that perfect Birch plywood
Here, part of the FH3 flat-pak build instructions.
Bamboo ply can get real squirrely when cut. But the worst we had was a batch of BB where a sheet's thickness was not consistent.
dave
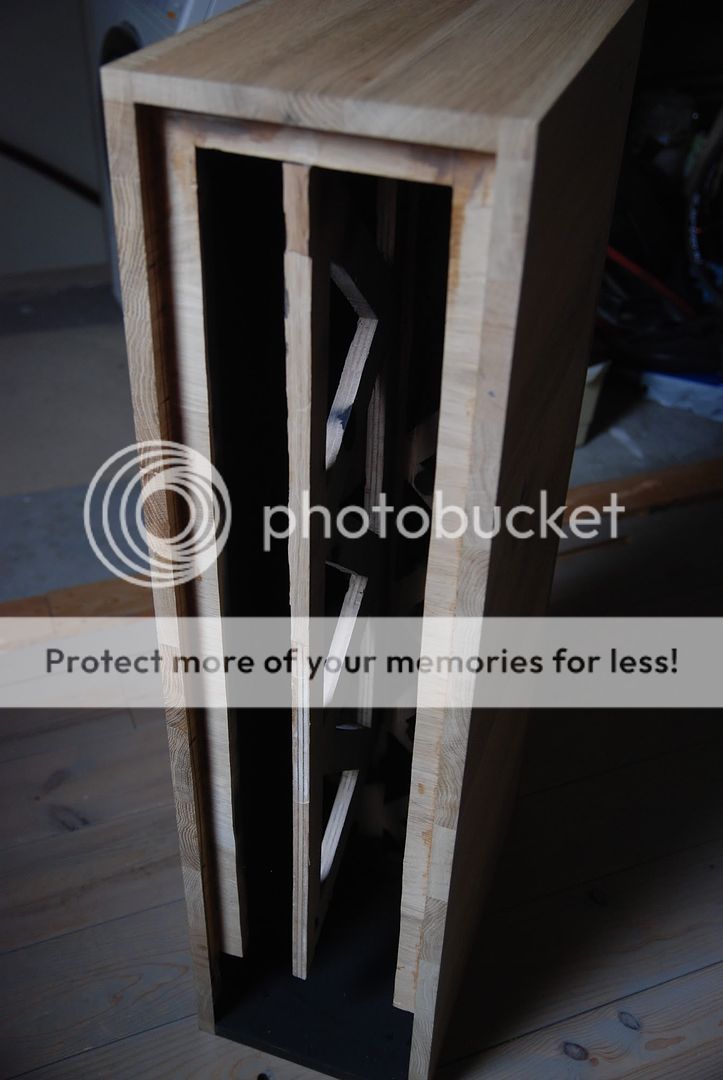
I just applied the first coat of laquer. Here are some pics, also showing the bracing I applied. I went for a criss cross type of bracing instead of a holey brace.
An externally hosted image should be here but it was not working when we last tested it.
An externally hosted image should be here but it was not working when we last tested it.
An externally hosted image should be here but it was not working when we last tested it.
An externally hosted image should be here but it was not working when we last tested it.
An externally hosted image should be here but it was not working when we last tested it.
Last edited:
Thanks for resizing the pictures Zia! All panels are 18mm thick, except the front panel, which is 30mm. The second coat just went on Tomorrow
I will sand one final time with 400 grit and apply the final coat. Almost there!
By the way, as you may have noticed, the port will be in the back. More pictures will follow.
Tomorrow I will sand one final time with 400 grit and apply the final coat. Almost there!
By the way, as you may have noticed, the port will be in the back. More pictures will follow.
Last edited:
except the front panel, which is 30mm.
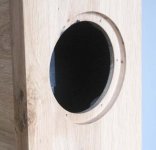
Looks like you didn't champher the back of the driver cutout (or champher as much as possible). The MA baskets start opening up right at the bezel edge, the champher should have vanishingly little vertical surface (box on its back) in the driver cutout. You will likely to be able to hear that cyclinder as early reflections.
dave
Attachments
Looks like you didn't champher the back of the driver cutout (or champher as much as possible). The MA baskets start opening up right at the bezel edge, the champher should have vanishingly little vertical surface (box on its back) in the driver cutout. You will likely to be able to hear that cyclinder as early reflections.
dave
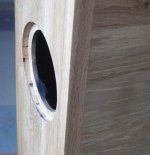
Hi dave, In fact I did chamfer the backside of the cutout. You can see it in the second picture in your reply where you can see the bit I left unchamfered at the screw hole location. The backside is chamfered to about 8mm at the edge of the cutout. It's hard to see in the pictures because I spray painted the insides black.
While 8mm is not "vanishingly little" it does not seem excessive to me? What would you recommend as the maximum depth of the driver cutout at the edge?
Last edited:
I edited my post after looking at the 2nd picture i posted. For an Alpair that 8mm is significant. When we mount the A12 in the 18mm rebated baffles, there is only 8mm of material left. That gets champhered almost to a point.
Most drivers have a lip where the bezel meets the basket proper that lets you get away with a short perpendicular column, the MA baskets have no lip so radiate directly into the flat face, and then right back (& some thru) the cone. I speculate that this is the cause of the high frequency hash in this Hobby HiFi waterfall.
Taking my tape measure out the distance corresponds to a half-wavelength of the biggest peak. The first peak would be a double transit, and the rest harmonics.

dave
Most drivers have a lip where the bezel meets the basket proper that lets you get away with a short perpendicular column, the MA baskets have no lip so radiate directly into the flat face, and then right back (& some thru) the cone. I speculate that this is the cause of the high frequency hash in this Hobby HiFi waterfall.
Taking my tape measure out the distance corresponds to a half-wavelength of the biggest peak. The first peak would be a double transit, and the rest harmonics.
dave
Ok, so you would recommend me to take a file to those edges? If I look at the cabinets done for Musik007 I'm actually not doing it very diffrently...
An externally hosted image should be here but it was not working when we last tested it.
Last edited:
Here is Mark's recommendation.
We take it a bit further and put a full 45 degrees instead of a curve. This directs any energy to the back of the box.
dave
We take it a bit further and put a full 45 degrees instead of a curve. This directs any energy to the back of the box.
dave
Ok, so you would recommend me to take a file to those edges? If I look at the cabinets done for Musik007 I'm actually not doing it very diffrently...
I would get the file out. I'm in contact with Tony, i'll mention it.
dave
Here is Mark's recommendation.
We take it a bit further and put a full 45 degrees instead of a curve. This directs any energy to the back of the box.
dave
The chamfer I did is a full 45 degrees. What I will do is listen to them as they are now and decide from there if I will decrease the "cilinder". Thanks for the guidance!
Swifty, I hate to point this out at this point, but you have a severe grain conflict. Wood expands and contracts seasonally with humidity across the grain but not in length. Your sides are going to want to get taller, but your fronts and back won't. This movement can not be stopped. Hope for the best.........
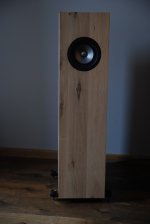
Done! First impressions (listening to Kind Of Blue by Miles Davis): Very musical. The imaging is just so good! I cannot believe how complete the sound is. I am not missing a tweeter for instance. Lows are articulate and controlled. I will post updates on the sound as the speakers break in ut they sound better than the Tannoy D300 they replace already.
Attachments

- Status
- This old topic is closed. If you want to reopen this topic, contact a moderator using the "Report Post" button.
- Home
- More Vendors...
- Planet 10 hifi
- First build ever: Pensil 10.2 - in solid oak