Hi all,
I've been planning to build the Super Pensil 12 for quite some time. Had the pieces cut for joining a few days back, finally got to doing it today.
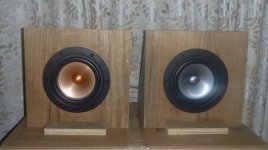
Though the boxes are glued (and screwed) up, plan to veneer them before I put the drivers in. Paint finish is also not out of the question. In the meantime, the driver break in happening in open baffle setup.
- Zia
I've been planning to build the Super Pensil 12 for quite some time. Had the pieces cut for joining a few days back, finally got to doing it today.
Though the boxes are glued (and screwed) up, plan to veneer them before I put the drivers in. Paint finish is also not out of the question. In the meantime, the driver break in happening in open baffle setup.
- Zia
Attachments
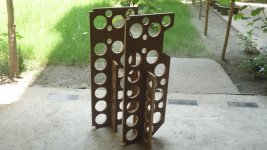
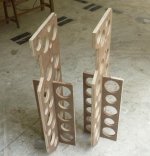
Braces, braces...
Holey braces...
The Super Pensil 12 bracing is probably the most time consuming part to make (though I myself had a decent runaround trying to get a suitable rabbet for driver flush mounting).
Here you go with 2 pics - I joined the pieces togther before putting them in the cabinets.
Sorry, forgot to take snaps when they were individual pieces.
Attachments
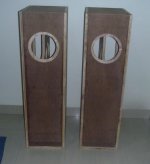
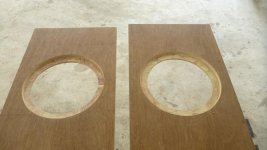
Flushmouting the driver...
A router is an absolute necessity for accomplishing this task!
I didn't have much luck with finding a guy with a router, or good router bits (or skill for that matter)...
Finally got hold of a workshop with a router and an operator with rudimentary skills. Initially I had done a 9mm rabbet, which was very much inadequate; the rabbet circumference was a bit tight too... the workmen had to chissel away to accomodate the Mark Audio Alp 12 frame (208 mm diameter outer edge, ~11 mm rabbet depth). And I had to do a lot of sanding... Still, the driver with gasket is about 1 mm proud of the front baffle . Expect compression from screwing on and the layer of veneer to take care of that and give me a nice flush mount.
Attachments
Last edited:
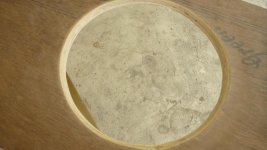
Back of the driver mounting hole needs attention too
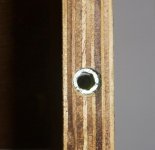
The rear part of the driver hole needs some treatment also - Mark Fenlon of Mark Audio advises that the inside edges should be rounded.
I have seen folks go for a chamfered 45 degree cut. Again since i did not have the luxury of the router, had to depend on chisel and sanding.
Have a nice curved bevel though.
Attachments
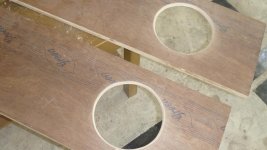
Base and baffle need slight round on the inner edges
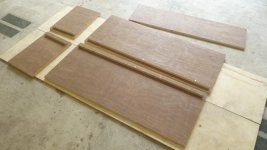
The Super Pensil 12 design calls for 10 mm radius round edges on both front baffle and base - these 2 pieces for the port.
Here you go with some pics of mine. I made a template on cardboard and used that for markeing the pieces. The workmen used a plane to do this.
The Super Pensil 12 design calls for 10 mm radius round edges on both front baffle and base - these 2 pieces for the port.
Here you go with some pics of mine. I made a template on cardboard and used that for markeing the pieces. The workmen used a plane to do this.
Attachments
Cleats for the back panel
Also made some cleats and glued thme to respective pieces so once the box is joined I will have a frame for attaching the back panel.
The width of the ply srtips I used for this is 1.25".
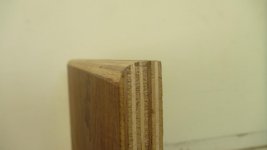
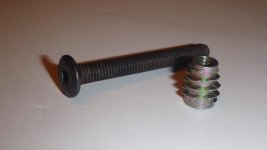
I forgot to mention - material I used is 18mm Marin Grade ply. Very sturdy and has 11 layers... best I could find at my place. I have provided a cross section for reference.
Plan to use the threaded insert and hex screws in the pic for attaching back panel later.
Also made some cleats and glued thme to respective pieces so once the box is joined I will have a frame for attaching the back panel.
The width of the ply srtips I used for this is 1.25".
I forgot to mention - material I used is 18mm Marin Grade ply. Very sturdy and has 11 layers... best I could find at my place. I have provided a cross section for reference.
Plan to use the threaded insert and hex screws in the pic for attaching back panel later.
Attachments
Last edited:
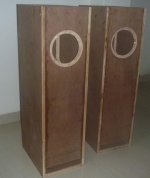
Putting it all together...
the Super Pensil is a fairly simple box to build - except the holey bracing!
Out of the 2 cabs, first one went fairly smooth. There are some imperfections on the cleats but will tend to that once the gule has dried well enough.
The second box became quite a task because of what I guess is a slightly warped board. These slight warping are a curse; not always easy to detect and once you try to join such pieces, the best laid plans of mouse and men can go awry...
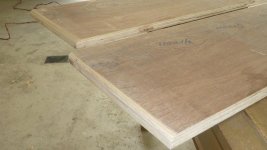
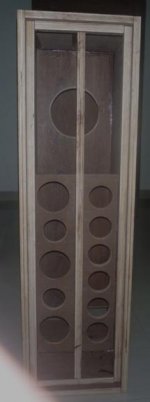
Here are the glued up boxes one again. I do not have acces to wood clamps; so had to insert screws in the right parts.
The bracing might be tough to make, but gives the cabinet a lot of rigidty. Picked up the cabs a while back - very rigid. Also please note that bracing is slightly offset from center of driver.
-Zia
the Super Pensil is a fairly simple box to build - except the holey bracing!
Out of the 2 cabs, first one went fairly smooth. There are some imperfections on the cleats but will tend to that once the gule has dried well enough.
The second box became quite a task because of what I guess is a slightly warped board. These slight warping are a curse; not always easy to detect and once you try to join such pieces, the best laid plans of mouse and men can go awry...
Here are the glued up boxes one again. I do not have acces to wood clamps; so had to insert screws in the right parts.
The bracing might be tough to make, but gives the cabinet a lot of rigidty. Picked up the cabs a while back - very rigid. Also please note that bracing is slightly offset from center of driver.
-Zia
Attachments

Keep em coming... i particularily like the stand-alone holey braces.
dave
Thanks Dave.
The stand alone braces remind me of a Griffin or something...
")
Took a lot of time to make.
Man Zia these look fantastic! You did a great job with the bracing and cleat too. Keep up the great work, can't wait to hear what you think of them once you get them all up and running. Good idea on the pre-break in also
My 12's come on Wednesday and I'll start breaking them in immediately and hopefully can get my cabinets built up quickly. Can't wait!
Scott
My 12's come on Wednesday and I'll start breaking them in immediately and hopefully can get my cabinets built up quickly. Can't wait!
Scott
Thanks Scott for the kind words. Very proud (and relieved) to have completed the cabs... was dragging it for quite some time.
I must tell you, the Super Pensil 12 are sizeable cabs - they have presence - attractively finished ones should be good a site.
I am also working on a pair of Castle Micro Towers, and in all likelihood those will be up and running before the Super Pensils - main reason is that the quad CHR-70s for that project is already broken in. My Alp 12s have 35+ hours on them now, so a looong way to go before they are ready for serious listening.
I am contemplating what finish to give the Super Pensils - veneer is always good... but I am enticed by a nice paint finish also... Ivory looks cool with Pensils, so does red...give me some suggestions on other colors!
Have you put together a list of soft music for the Alp 12 break in? Got your spare amp ready? Trust me 200+ hours is not easy...
-Zia
I must tell you, the Super Pensil 12 are sizeable cabs - they have presence - attractively finished ones should be good a site
.I am also working on a pair of Castle Micro Towers, and in all likelihood those will be up and running before the Super Pensils - main reason is that the quad CHR-70s for that project is already broken in. My Alp 12s have 35+ hours on them now, so a looong way to go before they are ready for serious listening.
I am contemplating what finish to give the Super Pensils - veneer is always good... but I am enticed by a nice paint finish also... Ivory looks cool with Pensils, so does red...give me some suggestions on other colors!
Have you put together a list of soft music for the Alp 12 break in? Got your spare amp ready? Trust me 200+ hours is not easy...
-Zia

Sculptures!
Hmmm Kristleifur, nice catch... maybe I should mkae a pair in brass and enter one of the art exhibitions... we would require a suitable name for the sculpture though!
... main reason is that the quad CHR-70s for that project is already broken in. ...
not completely
dave
Thanks Scott for the kind words. Very proud (and relieved) to have completed the cabs... was dragging it for quite some time.
I must tell you, the Super Pensil 12 are sizeable cabs - they have presence - attractively finished ones should be good a site
I am also working on a pair of Castle Micro Towers, and in all likelihood those will be up and running before the Super Pensils - main reason is that the quad CHR-70s for that project is already broken in. My Alp 12s have 35+ hours on them now, so a looong way to go before they are ready for serious listening.
I am contemplating what finish to give the Super Pensils - veneer is always good... but I am enticed by a nice paint finish also... Ivory looks cool with Pensils, so does red...give me some suggestions on other colors!
Have you put together a list of soft music for the Alp 12 break in? Got your spare amp ready? Trust me 200+ hours is not easy...
-Zia
Zia,
Since you've already done the cab's in such beautiful plywood, why not just stain or clear coat what you already have? You can make the endgrains just pop with the right finish, like a nice semi-gloss polyurethane ... I think that would look really nice.
I'm going to build mine from MDF (I know, I know) and paint them a semi-gloss white then build black semi-gloss bases.
I have a spare amp all set up in my garage so I'm just going to put some smooth jazz on and let them sing
200 hours is a long time but if you have them going 24/7 it doesn't take all that long.Scott
Zia,
I have a spare amp all set up in my garage so I'm just going to put some smooth jazz on and let them sing
Scott
Hi Scott, Guys,
Dont run drivers constantly! Pleas read..........
Due to their design, Pro-audio drivers can usually handle continuous loads but nearly all home audio drivers aren't make to take such loads.
The mass of a driver's motor system will act as a heat bank (even with a heat-sink) so each run-in session should be kept to around 4 to 5 hours with 1 to 3 hours rest. If you live in a hot climate, take particular care. If the front of the of the motor feels warm to the touch - rest the driver for a longer period.
I recommend applying this approach to ANY driver, especially those with longer X-max.
Patience will bring rewards.
Cheers
Mark.
Ahh will do, thanks Mark! I'll re-read the burn in instructions you have, as I obviously need to be re-reminded
Scott
Hi Scott, Guys,
OK, glad you read the message.
The single largest reason for driver failure is over-driving, especially full-rangers. Most folks associate over-driving with high loads without thinking about the length of time drivers are in operation. Nearly all full-rangers are "light load" emitters. While some (like mine) can take short periods of medium to higher loading (note "short"), they can't handle long period high-load operations.
Generally, the guide for run in times on most full-rangers would be........
1 - Small/medium drivers (up to 4") with SPL's above 86dB (likely they have short coils) - Very low volumes for max 4 hours with 1 hour rests. Make the total run in time around 100 hours.
2 - Small/medium drivers (up to 4") with SPL's below 86dB (likely they have longer coils) - Lower volumes for max 4 hours with 1 hour rests. Make the total run in time around 100 hours.
3 - Drivers above 4" with high SPL's (above 89dB). Be real careful! They'll likely have shorter coils or exotic suspensions, or come with limited X-max. If DIYers over-drive or over-heat their motor systems or over-extend their suspension systems - kiss the drivers "good-night" and throw them in the bin. Always take care not to over-load these drivers at ANYTIME.
4 - Drivers above 4" with lower SPL's (88dB and lower). These driver can usually take more loads for longer periods but don't treat this as "open season" to drive them hard. 4 to 5 run in periods on low volumes for at least 100 hours. The cones should hardly move.
Hope this helps.
Cheers
Mark.
main reason is that the quad CHR-70s for that project is already broken in.
-Zia
not completely
dave
You are right David, by no means break for CHR70.2En is completely done. Got ~40 hours on each till date. I am also assuming they got some time on the bench from you, and thus in a better readiness stage vs my Alp 12s.
- Status
- This old topic is closed. If you want to reopen this topic, contact a moderator using the "Report Post" button.
- Home
- More Vendors...
- Planet 10 hifi
- Super Pensil Build with Pics