Have you tried just inserting a resistor in series with the wide panels? Combined with the capacitance of the panel you get a first order low pass response.
I had thought that, too. My first crossover was built with that in mind, but didn't function like I thought it would.
Here's a picture from Capaciti's web site that seems to show series resistors. I don't read German, so maybe he'll stop by the thread to set me straight on their correct usage.

From this archived post:
Because of the capacitance of the stators, there is a simple way to obtain a drive current that drops with frequency below a certain frequency and stays constant above that frequency. Simply connect series resistors between a signal voltage source (the transformer) and the stators. The cut-off frequency is then set by the stator capacitance and the resistors.
I just found this today. If it's correct, it confirms the low cut filter.
Few, any pictures of your prototype?
BillH: My reading of the quote you posted from the archived thread is the reverse of what I was describing. Doesn't "...drive current that drops with frequency below a certain frequency and stays constant above that frequency" describe a high pass filter rather than a low pass? The wording is a bit confusing. In any case, a resistor in series with the panel's inherent capacitance should form a low pass filter and should therefore be applied to the wide panels if your goal is to radiate the high frequencies more uniformly.
I hope Capaciti chimes in, but from the photo it looks to me like there might be a central region of the panel that receives the full bandwidth and then pairs of regions flanking that central region that are low pass filtered with progressively lower cutoff frequencies. Of course, that's just a guess from the photo, I haven't seen a schematic.
I'm afraid I don't have photos of my prototypes. Being prototypes, they served their purpose and went to the big listening room in the sky. It's probably just as well---they weren't pretty! They were useful though. Most of them were lincaine aluminum panels held together with 3M double-sided foam tape. The ESL panels were then mounted in MDF panels with cut-outs for the various width panels.
Few
Hi, Few.
I tried applying some math to the resistor situation. It didn't show what I expected to see, though. I must be overlooking something.
I do believe the series resistor is forming a low-cut/high-pass filter with the ESL panel, even though my math doesn't show it happening that way.
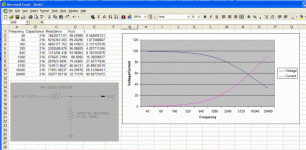
Here's an Excel sheet with a graph of voltage and current versus frequency using the capacitance of my narrow panels (216pF) and a series resistor chosen to give a useable scale. The current plotted assumes a constant voltage and is scaled to read easier.
I tried applying some math to the resistor situation. It didn't show what I expected to see, though. I must be overlooking something.
I do believe the series resistor is forming a low-cut/high-pass filter with the ESL panel, even though my math doesn't show it happening that way.
Here's an Excel sheet with a graph of voltage and current versus frequency using the capacitance of my narrow panels (216pF) and a series resistor chosen to give a useable scale. The current plotted assumes a constant voltage and is scaled to read easier.
Attachments
Hi,
A resistor and capacitor in series form a low pass filter.Capacitor's reactance decreases with frequency.Resistance R remains the same , therefore there will be more voltage drop at resistor at higher frequencies.
Standard 1st order LP filter formula should work here :
R = 1/(2*pi*f*C) , where f is the frequency at which output pressure will be 3 db less(i hope my memory serves me well.
C is the capacitance in farads.
You could even take LTSpice and make all the simulations with graphs automatically.
A resistor and capacitor in series form a low pass filter.Capacitor's reactance decreases with frequency.Resistance R remains the same , therefore there will be more voltage drop at resistor at higher frequencies.
Standard 1st order LP filter formula should work here :
R = 1/(2*pi*f*C) , where f is the frequency at which output pressure will be 3 db less(i hope my memory serves me well
. C is the capacitance in farads.
You could even take LTSpice and make all the simulations with graphs automatically.
Hi Folks,
first let me apologize for the english site is still in progress. We are implementing a new ESl-serie and will translate when that happened.
As bazukaz mentioned the resitors work as a filter.
If you watch the picture in Bills post you recognize several resitors:
1. there is a center segment havin just 0,8 inch width running fullrangewithout resistors.
2. adjacent left and right to the center segment there are segments of 1 inch width. The signal passes an array of resistors in serie to those segments. Cut off frequency is about 5Khz. The resistor array consits of more than one resistor for a simple reason. The voltage drain can be significant and can exceed 600 Volts. In order not to overload the resistors voltage handling, three resistors are connected in serie, thus drop it to 200 Volt each. Its important to select high quality resistors and such types cannot handle much voltage. Never use high voltage types or carbon ones.The show unacceptable tolerances and thermal drift
3. there are another two outer and wider segments withcut off at 800 Hz.
Segmentation needs a lot of iteration steps (width and cutoff of segments). If setup correctly the result is flat frequency response, very good high frequency dispersion and imo most important very good impedance matching.
Capaciti
Hi Capaciti. Thanks for your post. You've got some very nice looking products on your website. I'm looking forward to the English version. My great-grandparents came from Germany, but I never picked up the language. My parents used to speak it to each other when they didn't want me to know what they were talking about.
I still need to do some experimentation with series resistors. I've got a small group of 1 watt metal film resistors that I've been using, each rated at a maximum of 600 volts.
The placement of the ESLs has been a large part of getting the sound right. At the moment the ESLs are on the floor, 36" from the back wall with the woofers next to them, woofers on the inside. The crossover is set at 320Hz. I find that I want to get as much of the sound coming from the ESLs as I can and the low frequency cutoff was too high with them on top of the woofers. The ESLs and my head form roughly an equilateral triangle when viewed from above with the ESLs toed out slightly from a 'straight to my head' position.
Even with some adjusting to be done, they've got a really enjoyable sound. It still amazes me that one of the lowest distortion loudspeakers available can be built by anyone with some mechanical and electrical know-how. Thanks again to all of you who have helped out.
BillH said:Hi, WES.
The power supply did end up to be Sheldon's v1.0 with some changes. I started with his v2.0, but it didn't work. I could use all of v2.0 and add the chopper circuit from v1.0.
Sorry that was my bad, I should have double checked and informed people on my website that the V2.0 is a bit of a dog. I'm glad the V1.0 is working out for you. I've been using V1.0 for several years now, turned on 24/7.
I really like the work you folks are doing on the ESL panels. I've been away from this place for a while, but I'm back into audio tinkering and now playing with small high performance systems.
I've been writing speaker measurement software in Labview. I'll put it on my website when I get it transferred off that dog of an ISP it's on now.
Sheldon
Hi, Sheldon and welcome back. I got a lot of inspiration and information from your website.
IMHO, one of the best HV bias supplies you can build.
Please let us know what you come up with. We like pictures.
stokessd writes: I've been using V1.0 for several years now, turned on 24/7.
IMHO, one of the best HV bias supplies you can build.
stokessd writes: I'm back into audio tinkering and now playing with small high performance systems.
Please let us know what you come up with. We like pictures.
BillH said:Hi, Sheldon and welcome back. I got a lot of inspiration and information from your website.
IMHO, one of the best HV bias supplies you can build.
Thanks for the kind works. the adjustability of that high voltage supply makes it unique and allows the user to tune his panels to exactly match level-wise, which makes an insanely good imaging speaker even better. It can also compensate for sloppy tolerances in panel building, not that any of us ever have sloppy tolerances.
Please let us know what you come up with. We like pictures.
OK, nothing much exciting, but a bit of stuff. First I have an impedance bridge that I built for speaker measurement, it's a combination of a very low noise microphone preamp (for electret condenser capsules), a gain and buffer for measuring the amplifier response at the speaker terminals, and an impedance bridge for measuring passive component values (caps, inductors, resistors, the works), as well as measuring driver impedance for calculating TS parameters. It runs on 2 9V batteries. It's a bit of a battery hog as I used high performance op-amps rather than low current ones. A couple pictures are here:
http://casastokes.dyndns.org/photoalbums/index.php?album=/Audio/Impedance_Bridge
I use it with speaker measurement software I've written.
I've also packaged a 41Hz amp 6 in a sescom case with a cheap digikey toroid, nothing fancy, nothing special, but I did use my CNC milling machine for the panels. I picked a larger case than I needed because I have possible plans to put some bass contour circuitry in there to as part of my experiments to get as high a performance a speaker in as small a size as I can. I'm going to reduce box size and mess with the woofer Q electronically, I'll sacrifice SPL for size with this design, but it's looking interesting on paper. Anyway, here's a couple pictures:
http://casastokes.dyndns.org/photoalbums/index.php?album=/Audio/Tripath_Amp
I've been doing the occasional quad rebuild, but nothing extensive there either. Once you build your own ESL's, the quads are a bit....yawn.
On the non-audio front, I've supercharged my Miata, and that kit is a bit dubious, so I'm now playing with a turbo, and a stand-alone ECU.
I've been out of the audio scene for a couple years due to my move back to the DC area. I ended up commuting 3+ hours a day to my job. When I got home, it was time for bed and I was exhausted. Now that I'm living in the midwest (Fort Wayne) and working 4 miles from my home, I've got my life back and I'm starting to play with my hobbies again.
Sheldon
I'll wrap up the thread with an update and the final cost of materials.
I've finally got the crossover between the narrow and wide sections of the ESL correct. The narrow sections are running full range and the wide sections are crossed over with series resistors. I reconfigured the 6-position switch I'd been using as a variable series resistor to select from a string of 47K resistors going to the wide panels. Most of the time I prefer 94K of series resistance, theoretically low passing the wide panels at 2600Hz. The dispersion has improved while mellowing the mid-high end.
What it cost in 2006 US dollars for two ESLs:
Perforated Steel Stators and Acrylic Spacers $40
These came at wholesale price from my employer with a powder coat on the stators at no charge
Diaphragm $34
Enough to do 10 panels. $24 + $10 shipping and handling
Adhesives $25
$12 for super glue and $9 + $4 s+h for contact cement
Step-Up Transformers $128
$116 + $12 s+h
Enclosure $29
$9 for 3/4" plywood and $10 + $10 s+h for the veneer
Grilles $20
1/2" MDF and brown grille cloth
Diaphragm Stretching Jig $4
1/4-20 allthread, nuts and bolts with salvaged lumber
Auto Turn-On Electronics $8
HV Bias Supply Electronics $43
Miscellaneous Stuff $38
Binding posts, printed circuit board, nuts, bolts, crossover resistors, solvents, sandpaper, and more
Electronics Shipping and Handling $21
Three different vendors x $7
Total: $390
FYI,
Thought I'd mention that "perf metal" has two different sides.
One side is where the punch went through the top of the sheet on the press. The other side is where the punch exited the metal and where the sheet sits on top of the die. This side has the sharp edge. The side that was on the top (first hit by the punch) is actually slightly depressed and rounded in from the punch hit.
To chemically etch the metal, you could use almost anything that eats iron if you used steel sheet. That includes the standard PCB etchant ferric chloride, Muratic Acid (sold in hardware stores) but be careful with this... you may need to dilute first, and WEAR GOGGLES!!, and probably a base like Lye or more commonly spray oven cleaner.
If you used aluminum sheet, the Lye is the best bet.
These will all smooth out micro rough points and decrease the potential for discharges/arcing.
But the key is certainly to get the "smooth" side toward the diaphragm with or without polishing or etching.
If you happen to have a plating shop near you, they can drop it in the right tank and really etch the edges right off...
_-_-bear
for the coating use the glue to glue wallpaper, it will have resistance of several Mohm and its transparent, you easy put it on with a paint roller.
by the wat abit late but the heat shrinking work great for smaller elements with perforated plate. i use to bend them a little before heating you can see the wrinkles and heat those spots, then wait til cooled and let the plate go so it wil take his original shape. now you got some real tension on ur mylar. also every wrinkel in the corners you can get rid of with heat shrinking.
and last but nog least before glueing the mylar on the spacer, tension the mylar a littlle and also try to do both elements at the same time so you have the same starting tension for eacht element. from there you can use heat shrink with great result.
- Status
- This old topic is closed. If you want to reopen this topic, contact a moderator using the "Report Post" button.
- Home
- Loudspeakers
- Planars & Exotics
- The ESL Build Thread