Hi,
I almost finished my new electrostatic panels. Thanks to the help of several people at this forum I managed to get a good result. (I'm not sure what exaclty is good, but they seem to look and sound good to my own taste)
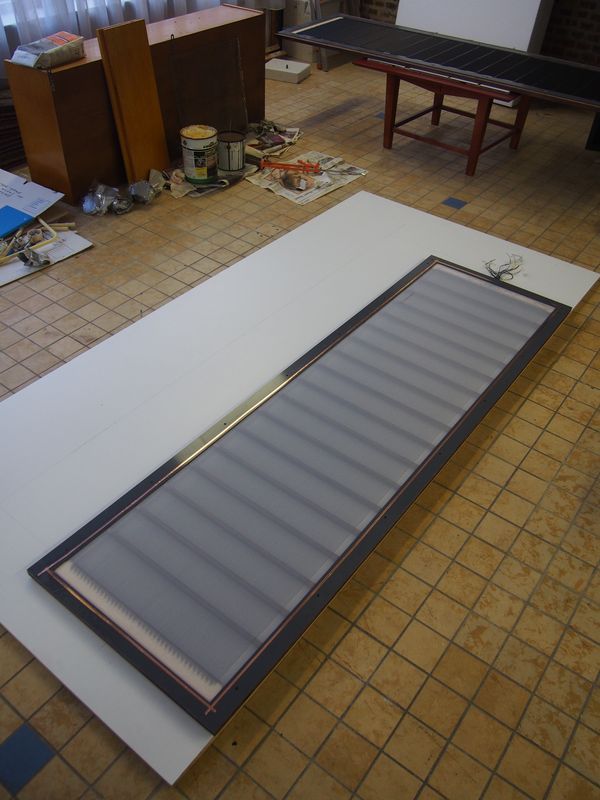
It took about eight months to (almost) finish them, 150 - 200 hours (rough guess). Especially the wood joints took lots of time.
I will post measurement pics in future. Unlike model #3, which has been in use for the last 3 years, this model has a resonance damping screen. The severe resonance of model #3 is reduced by about 8 dB. I didn't try the most difficult bass-intense cd I own, but all music that previously caused problems (heavy vibrations / resonance) in model #3 seem to play well in model #4!
At first I thought the mesh impaired mid / high sound quality, but after some initial listening tests I think the new model sounds better than the previous model. (tighter lf and because of different segmentation network better hf)
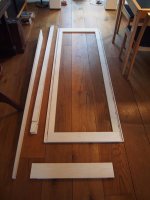
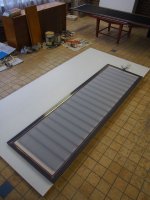
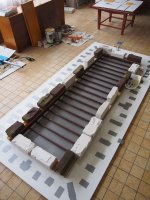
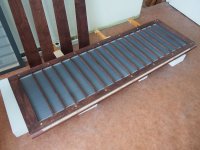
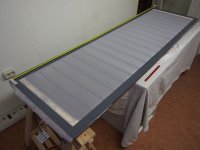
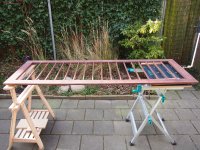
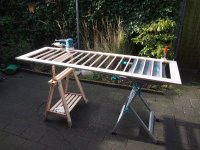
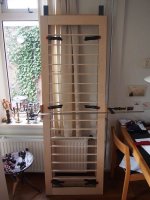
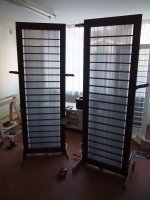
Here is a small selection of photographs I took during the building process. I hope that soon, when I have more time, I can add new photographs and measurements.
The panels are made of birch-multiplex, 18mm thick, outer dimensions are 68x200 cm.
Edit: I changed the externally hosted images with uploaded attachements in the posts below.
I almost finished my new electrostatic panels. Thanks to the help of several people at this forum I managed to get a good result. (I'm not sure what exaclty is good, but they seem to look and sound good to my own taste)
It took about eight months to (almost) finish them, 150 - 200 hours (rough guess). Especially the wood joints took lots of time.
I will post measurement pics in future. Unlike model #3, which has been in use for the last 3 years, this model has a resonance damping screen. The severe resonance of model #3 is reduced by about 8 dB. I didn't try the most difficult bass-intense cd I own, but all music that previously caused problems (heavy vibrations / resonance) in model #3 seem to play well in model #4!
At first I thought the mesh impaired mid / high sound quality, but after some initial listening tests I think the new model sounds better than the previous model. (tighter lf and because of different segmentation network better hf)
Here is a small selection of photographs I took during the building process. I hope that soon, when I have more time, I can add new photographs and measurements.
The panels are made of birch-multiplex, 18mm thick, outer dimensions are 68x200 cm.
Edit: I changed the externally hosted images with uploaded attachements in the posts below.
Last edited:
")
Hi, I just replaced the externally hosted images with uploaded attachements from my starting post.
Attachments
-
 P1010365_resultaat.JPG79.2 KB · Views: 963
 -
 P1010564_resultaat.JPG85.6 KB · Views: 641
 -
 P1010553_resultaat.JPG107.4 KB · Views: 403
 -
 P1010542_resultaat.JPG91.2 KB · Views: 394
 -
 P1010498_resultaat.JPG65.7 KB · Views: 389
 -
 P1010487_resultaat.JPG98.6 KB · Views: 387
 -
 P1010410_resultaat.JPG159.4 KB · Views: 945
 -
 P1010399_resultaat.JPG136 KB · Views: 948
 -
 P1010393_resultaat.JPG93.4 KB · Views: 959
 -
 P1010373_resultaat.JPG114.2 KB · Views: 973
Another great looking build!  Thanks for sharing.
For those that might have missed it, some details and measurements of silvershadelynx's previous build (Model #3?) were posted in these threads:
DIY ESL
Optimizing my DIY full range esl
In previous build, he stretched each wire one at a time by hand! amazing patience and persistence.
DIY ESL Post#65
Thanks for sharing.For those that might have missed it, some details and measurements of silvershadelynx's previous build (Model #3?) were posted in these threads:
DIY ESL
Optimizing my DIY full range esl
I will be interested to hear about this as well.Wow, very nice! How do you stretch your wires?
In previous build, he stretched each wire one at a time by hand! amazing patience and persistence.
DIY ESL Post#65
Last edited:
Hi, thanks for your kind replies!
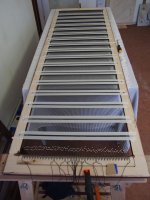
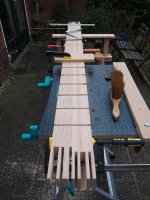
About stretching the wires: I did it by hand. I just hammered 640 nails into the birch-plywood and used about 1200 meters of stranded wires. (1.1 mm diameter) The stretching itself was not that time consuming compared to the woodworking, but all the preparation and glueing took a lot of time.
I am curious about the pre-stretching method of solid core copper wire like Charlie applies to his panels, as I'm not 100% sure my stranded wires will keep tension and keep perfectly straight after a while. (I have an obsession for perfection / straight lines...) But at the moment it looks very straight and my old stats still have straight wires, except a few. But I would think the pre-stretching method seems interesting for a next build.
Next week I have more time so I will do some measurements and I will posts them together with some new pictures here.
I did some listening tests and compared my previous big panel to this new one and this one has, in my opinion:
* better hf extension due to a new segmentation filter: I made a mistake about near / intermediate / far field in my previous stat / filter (I found a nice spreadsheet by Bolsterst): I used the segmentation wire software by Edo Hulsebos, but forgot that my panel was not a linesource at the complete frequency spectrum. I also forgot to inculde the 2.2 ohms audio-transformer series resistor. This is now fixed.
* I still need more listening tests, but it seems that the new panel didn't loose transparency. I was afraid of this because of the addition of a built-in damping screen. But it seems this has a positive effect: tighter lf and mid / high frequencies sound at least as good as the old stats, is my current conculsion.
I already did some measurements before / after glueing / attaching the "wings" (side panels) against the stators and attaching them to the footplate. I was able to measure a clear improvement in distortion levels. But my knowledge about this topic is still limited. Next week I will post all measurements, including impedance measurements, more information about d/s spacing, diaphragm coating, bias voltage, transformers, support spacers or silicone dots, etc..
Last edited:
I will make available my wire stretching jig drawing and the 3D print files for the wire spacing guides used in my last build. There are also videos on my website showing the wire stretching and stator build operations. (Google Jazzman's DIY ESL Page).
My jig and wire guides are configured to give 42% open area using UL-1061 20AWG solid wire (0.052 O.D.)
Just PM me.
My jig and wire guides are configured to give 42% open area using UL-1061 20AWG solid wire (0.052 O.D.)
Just PM me.
@Charlie: thanks for sharing your videos, very interesting to see you working on your panels!
Just some more information about my new stats:
d/s spacing: 2.0 mm
diaphragm coating: a proprietary coating by M.J. Dijkstra, I just used a soft and wide paint brush to paint it to the mylar (he is on this form as well)
6 micron mylar diaphragm
1.1 mm stranded copper wire
bias voltage: unknown: I just use a potmeter to get it as high as possible
transformers: 2x1:75=1:150 step up ratio per channel, second hand AudioStatic transformers
no silicone dots, but instread I used very cheap double sided tape and on one side I kept the thin plastic film on it so it doesn't glue to the diaphragm, so I can easily remove 1 stator if needed for repairs / inspections
Hi,
I made some initial measurements. My knowledge on this topic is still limited, so I'm not sure if the measurements do tell something and are usable. To limit room interferenece, I placed the microphone at 15 cm in front of the panels at a height of 108 cm. Room dimensions are about 6x3.5x2.5 meters.
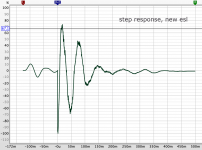
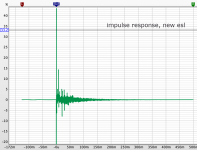
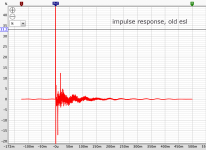
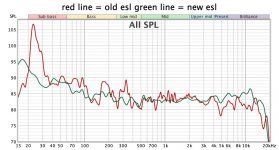
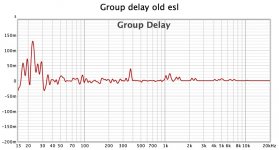
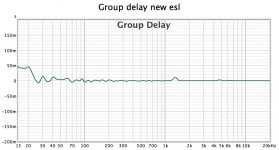
I used a callibrated MiniDSP USB microphone. I included a frequency response, step response, impulse response and group delay response of both my previous (old) big esl panel, and of my new panel. The new panel uses a different segmentation filter to get a bit more hf extension.
The new panel uses a silk mesh damping screen which results in a better controlled lf resonance which is clearly audible. My subjective opinion is that lf sounds much cleaner and tighter compared to the previous (old) big panels that don't have damping screens.
Feedback on these measurements is welcome! I can post more measurement results if wanted like phase, distortion, waterfall...
I made some initial measurements. My knowledge on this topic is still limited, so I'm not sure if the measurements do tell something and are usable. To limit room interferenece, I placed the microphone at 15 cm in front of the panels at a height of 108 cm. Room dimensions are about 6x3.5x2.5 meters.
I used a callibrated MiniDSP USB microphone. I included a frequency response, step response, impulse response and group delay response of both my previous (old) big esl panel, and of my new panel. The new panel uses a different segmentation filter to get a bit more hf extension.
The new panel uses a silk mesh damping screen which results in a better controlled lf resonance which is clearly audible. My subjective opinion is that lf sounds much cleaner and tighter compared to the previous (old) big panels that don't have damping screens.
Feedback on these measurements is welcome! I can post more measurement results if wanted like phase, distortion, waterfall...
Attachments

Last edited:
Hi,
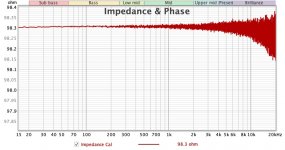
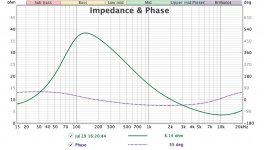
I just made some impedance measurements using an impedance measurement rig with a 100 ohms sense resistor and REW software and external usb soundcard. First image is the calibration plot, second and third one are the new esl panels, one of them has a temporary ladder network filte that combines the 3 middle segments to one segment.
I just made some impedance measurements using an impedance measurement rig with a 100 ohms sense resistor and REW software and external usb soundcard. First image is the calibration plot, second and third one are the new esl panels, one of them has a temporary ladder network filte that combines the 3 middle segments to one segment.
Attachments

Thanks for sharing your measurements. The new panel frequency response looks great, and the impulse/step response really highlight the improvement in resonance damping from the mesh screens. I’m glad to see you have finally gotten the results you were after…I know you have been wrestling with this resonance issue for a few years.
The impedance looks nice too, an easy load for amplifiers. The magnitude doesn’t dip too low and phase angle stays within about -45deg(ie not too capacitive) at higher frequencies where un-segmented panels cause sometimes case stability issues.
The impedance looks nice too, an easy load for amplifiers. The magnitude doesn’t dip too low and phase angle stays within about -45deg(ie not too capacitive) at higher frequencies where un-segmented panels cause sometimes case stability issues.
Last edited:
Hi Bolserst, thanks for your reply! Although I have one pair of AudioStatic 1:150 step-up (2x1:75) transformers for these new stats, I was thinking about ordering new ones at a local transformer builder. I can let them have custom specifications. Do you have any recommendations in order to getter performance from the audio transformers? For instance, would a lower step-up ratio (like 1:100 - 1:120) result in a higher LC resonance and therefore a higher hf-roll-off?
Thanks for your feedback on the measurements! And thanks for sharing your knowledge (toghether with all the other members at this forum) so I was able to build these panels.
Thanks for sharing your measurements. The new panel frequency response looks great, and the impulse/step response really highlight the improvement in resonance damping from the mesh screens. I’m glad to see you have finally gotten the results you were after…I know you have been wrestling with this resonance issue for a few years.
The impedance looks nice too, an easy load for amplifiers. The magnitude doesn’t dip too low and phase angle stays within about -45deg(ie not too capacitive) at higher frequencies where un-segmented panels cause sometimes case stability issues.
Thanks for your reply. I ordered a 1:120 step-up custom built transformer. I will report my findings.
Lower step up ratio makes the transformer better... It becomes less sensitive to stray capacitance etc.
It will also be a "better" load for the amplifier. Higher voltage swing and less current.
Hi,
I managed to find a few recordings that make my new panels resonate...
It's a different sound than my previous (big) panels. The measurements show a clear improvement in Q, but I guess it's still not enough damping to get completely rid of the resonances. It it not that bad, but I would like to have a full-range esl that has no audible resonance at all.
I've read about Bolserts stats having damping screen on both sides of the panel. I guess this dampens the resonance even more according to his measurements:
https://www.diyaudio.com/forums/planars-and-exotics/152979-mechanical-sectioning-vs-silicon-dots-resonance-control-3.html#post1958582
(I've read in his post and in books that for lower frequencies it doesn't make a difference what distance the damping screen is situated from the diapgragm, so I consider doing a test to attach a screen on the outer side of the front stator.
I was wondering if it sounds plausible to still experience (be it not severe) resosnance problems when applying damping screen on just one side of the stator?
Last edited:
Yes, you can still have issues with a partially damped resonance. In the end, the measurement data is what matters from a resonance/Q standpoint. While greatly improved, your speaker still looks like it has a somewhat underdamped resonance. In many designs this is allowed to remain for the benefit it gives in bass quantity. It's a trade-off.
You could try adding another layer of damping screen to the outside of your rear stator, if you want the front to keep its current look.
If you're willing to give up the see-through look, you can try a different type of damping to improve resonance suppression. I've had good luck with synthetic felt that's a little thicker than what bolserst tested. With 1/8" thick on the rear only, I was able to push resonances way down. Since the damping effect is additive, it can be layered to give more control. The felt I bought was consistent white, so the look is nicer than natural felt also.
As a test, you can attach felt to the rear of the speaker with masking tape to see if you like the result. If you're worried about it affecting high frequencies, you can just use it in the bass segments and use white grille cloth in the high frequency area.
On an undamped speaker, even a couple layers of grille cloth can make a moderate difference. I'm not sure if that would do much to yours since you already have some damping.
And I understand your situation. There is one song in particular I often use to look for this. It's like someone put a giant spotlight on the problem, while almost all other songs sound fine.
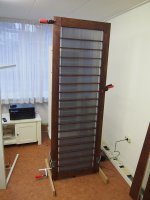
Hi - thanks for your suggestions. I was wondering: at the moment the damping mesh is glued to / between the wooden stator and pvc insulation strips. But the wooden stator has 17 horizontal laths which support the wire stator: (below is an image of the rear stator which has the damping screen on the inner side of the stator)
I could put some glue on the inner side of these laths / damping screen as well - so the damping screen will be held better in the right pane. I tried to get it as mechanically tight as posibble, but it's still not very tight.
Would you expect a better damping when fixating the damping screen to these laths?
- Status
- This old topic is closed. If you want to reopen this topic, contact a moderator using the "Report Post" button.
- Home
- Loudspeakers
- Planars & Exotics
- My new stats, model #4