In my thread about the problems with one of my ESL's I've got a lot of invaluable help from forum members like stokessd, mats31, bolserst to name a few.
( see also Quad 2805 power supply malfunction?)
They provided me with tips about diagnosing, fixing and dismantling the ESL. There is little or no coherent information on the net about dismantling the 2805 and 2905 esl's. So I have taken some pictures of the process. Don't get me wrong I am in no way an expert here. The pictures are showing just what I have done to get the thing apart. Hope it's helping other newbs. By and large I am following this contribution from member stokessd.(Quad ESL 2805 or 2905 cloth replacement)
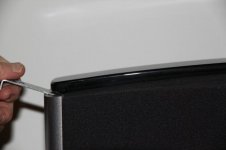
Lift the wooden top bar with a flat piece of wood/metal. Repeat at the other side and remove the bar.
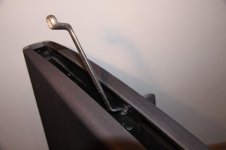
In the resulting cavity loosen the nut that holds the tensioning brace. Hold the brace firmly and loosen the tensioner at the bottom of the esl. Remove the brace.
Now pay attention to the use of the correct screwdriver. Stokessd recommends the Vessel Megadora 900 +2x100 JIS Cross Point Screwdriver. I bought it and am very glad with it. A JIS screwdriver is following the Japanese industrial standard and a Phillips screwdriver is not interchangeable.
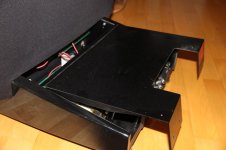
At the base of the esl remove four screws at the backside. Lift the cover a few centimeters, slide it backwards and remove it. Now you have access to the electronics.
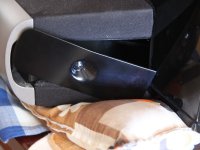
Tilt the speaker and remove two side plates at the bottom of the speaker at the left and right hand side of the electronics compartment.
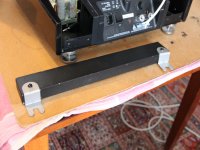
To make handling of the speaker easier I also removed the heavy counterweight at the underside of the speaker.
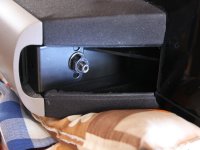
To remove the aluminium side bars remove the 14mm nuts under both side plates at the bottom of the esl.
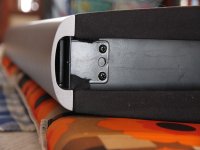
Unscrew the 2 machine screws at the top of each of the side bars, now the bars can be removed.
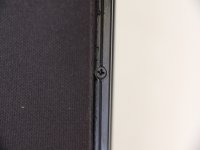
To remove the grilles loosen the 20 flat-head screws at left and right hand side of the speaker (front and rear). Now the grilles can be pulled away, but....
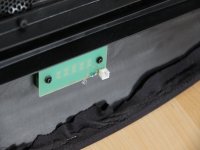
Don't forget to unplug the Quad logo at the back side of the front grille.
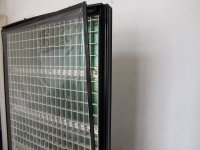
To remove the dust covers use a screwdriver or pry your fingers to ease forward a top corner. Then slide your fingers down (and around) behind it to release the dust cover. Be careful they are fragile.
This thread will to be continued in part 2
Quad 2805/2905 dismantling: in pictures (part 2)
( see also Quad 2805 power supply malfunction?)
They provided me with tips about diagnosing, fixing and dismantling the ESL. There is little or no coherent information on the net about dismantling the 2805 and 2905 esl's. So I have taken some pictures of the process. Don't get me wrong I am in no way an expert here. The pictures are showing just what I have done to get the thing apart. Hope it's helping other newbs. By and large I am following this contribution from member stokessd.(Quad ESL 2805 or 2905 cloth replacement)

Lift the wooden top bar with a flat piece of wood/metal. Repeat at the other side and remove the bar.

In the resulting cavity loosen the nut that holds the tensioning brace. Hold the brace firmly and loosen the tensioner at the bottom of the esl. Remove the brace.
Now pay attention to the use of the correct screwdriver. Stokessd recommends the Vessel Megadora 900 +2x100 JIS Cross Point Screwdriver. I bought it and am very glad with it. A JIS screwdriver is following the Japanese industrial standard and a Phillips screwdriver is not interchangeable.

At the base of the esl remove four screws at the backside. Lift the cover a few centimeters, slide it backwards and remove it. Now you have access to the electronics.

Tilt the speaker and remove two side plates at the bottom of the speaker at the left and right hand side of the electronics compartment.

To make handling of the speaker easier I also removed the heavy counterweight at the underside of the speaker.

To remove the aluminium side bars remove the 14mm nuts under both side plates at the bottom of the esl.

Unscrew the 2 machine screws at the top of each of the side bars, now the bars can be removed.

To remove the grilles loosen the 20 flat-head screws at left and right hand side of the speaker (front and rear). Now the grilles can be pulled away, but....

Don't forget to unplug the Quad logo at the back side of the front grille.

To remove the dust covers use a screwdriver or pry your fingers to ease forward a top corner. Then slide your fingers down (and around) behind it to release the dust cover. Be careful they are fragile.
This thread will to be continued in part 2
Quad 2805/2905 dismantling: in pictures (part 2)
Last edited: