Hi again,
Question to the lucky ones who completed the build already...
Once assembled, should you want to take off the bottom panel again, is this possible by just removing the top panel... or do you have to take off BOTH TOP and REAR panel to be able to remove the bottom panel?
Thanks for your kind help
Claude
@ ClaudeG
The best thing to do is ensemble all chassis parts together completely without PCBs and wiring.
If something is not perfect in the chassis, then you can drill or make flat some parts now.
Look carefully at the construction details and take your time, think about future step by step work planification.
") Best regards
Best regards
The best thing to do is ensemble all chassis parts together completely without PCBs and wiring.
If something is not perfect in the chassis, then you can drill or make flat some parts now.
Look carefully at the construction details and take your time, think about future step by step work planification.
Best regardsYes to the above.
Also, when mounting the rails to the heatsinks, press them toward the end where the rear panel will be mounted. It is best to have the rear panel flush with the heatsinks and the mounting flanges of the rails at the same time.
It is Ok if there is a slight gap between the mounting flanges and the thick front panel. This will not cause any problems.
Claude,
The bottom panel is attached to the heatsink brackets with (4) screws. So precisely speaking, that is all you’ll need to remove to open up the bottom panel from the entire chassis. As noted above, however, you’ll need to remove the PSU filter board’s screws to actually free the panel.
The bottom panel is attached to the heatsink brackets with (4) screws. So precisely speaking, that is all you’ll need to remove to open up the bottom panel from the entire chassis. As noted above, however, you’ll need to remove the PSU filter board’s screws to actually free the panel.
#079 up and running
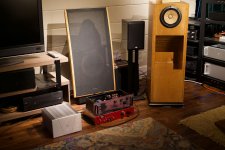
I just wanted to post an in situ photo of "the 079" working its magic. Currently, switching between the B1 and Aikido preamps and amplifying into FE208 E Sigma backloaded horns.
All I can say is, it's all very good, very, very good. Feeling fortunate is an understatement.
Thanks once again to the team for this opportunity and their hardwork!
Ryan
Attachments
Hi Soundhappy,
Yes, that's exactly the intention, blank fitting and then deciding on which best way to go in order to allow possible future dismantling.It seemed feasible based on Jim's excellent build guide but wanted confirmation as i noticed place was scarse...
Bonne soirée et encore merci
Claude
Yes, that's exactly the intention, blank fitting and then deciding on which best way to go in order to allow possible future dismantling.It seemed feasible based on Jim's excellent build guide but wanted confirmation as i noticed place was scarse...
Bonne soirée et encore merci
Claude
Last edited by a moderator:
Hi Jim
Many thanks for your kind post and explanation!
I use the opportunity to again thank you for your - as usualy - excellent build guide.
Guys, read it, copy it, look at all hints and pix before getting started: that's really a treasure mine with lot of info and if you plan to try in the future a few things like different FEs or filters, it is wise to plan ahead ...and stick to all recommandations IMHO. everything has a purpose or meaning... Can't outline it enough.
Have an excellent day
Claude
Yes to the above.
Also, when mounting the rails to the heatsinks, press them toward the end where the rear panel will be mounted. It is best to have the rear panel flush with the heatsinks and the mounting flanges of the rails at the same time.
It is Ok if there is a slight gap between the mounting flanges and the thick front panel. This will not cause any problems.
Yes do what Soundhappy says by assembling chassis 1st so you get an idea how everything fits. I've found the rails were short and I used the hammer to bend the end flanges out so they are flush with the front and rear panels. The gap poses a problem when you screw the rear panel on in that tightening the screws causes a concave bend. A gap in the front panel makes it hard for the screw 'on' tight - if you can get enough force with a limited access with the screwdriver.
As for the bottom panel, I worked with the amp front & rear panel attached first. Have the amp over the end of the table so you have easy top and bottom access. The tap threaded rails make it easy for the securing top and bottom screws to go on vs a nut and bolt situation.
I suppose there are many other ways but i've found this to way to be the easiest. Again as I learned from my uncle in his auto car restoration hobby, body panels all go on first so you have an idea of fit before you start doing painting.
Hermetically Russian sealed case with solder nipples
Good bypass for those large blue caps under boards
Come back juanitox and give us the answer


nothing fancy , too big for a silver mica , it is just a 30uf russian 160V Paper in oil that i use usually for cathode bypass in my tube amps. tons of them on ebay and cheap to try..
FE208eSjgma? Is that a tweeter on top… that driver could really benefit from a better box, but i bet it sounds quite stunning in the midrange.
dave
Dave,
Not a tweeter, rather a Bottlehead Quickie pre-amp that I tried for fun. Yes I realize that driver could use some 'support'. And, yes, the midrange is stunning and very textured. I have a RadioShack super tweeter waiting for me to finish Nelson's DIY biamp 6-24 crossover. Soooo many projects in the queue. I have entire folder on my computer with Full-range box designs from your website and others, that some day, I will get to...accepting advice/opinions on the next box build if you don't mind...
Cheers,
Ryan
#63 up and running in Japan
Hey Team....after a very patient build process, #63 is running.
I think it worth saying again and again how awesome this community is. I built my first chip amp (LM3886) almost 14 years ago...then purchased (still own) an F1. This was followed by every group buy up to F5 including anything else that was posted!
Then I started a long expat assignment in Mexico, France and now in Japan. They say sometimes in life it is better to be lucky than good and I was REALLY lucky.
After moving to Japan I decided to start building again, purchased an Elekit-8600S (300B amp). At the same time, the lottery for VFET was happening and I won!
Now I have two of the most special amps I could want and I BUILT them!
This is only possible because the generosity of Nelson and all those who give their time and knowledge on this forum!
It is truly unheard of for anyone running a commercial business to give so much to DIY community.
Thanks again for the support and life-long hobby of audio.
Elekit-8600S (300B amp). ... two of the most special amps I could want
Since the VFET can sort of be said to a SS 300B, it would be interesting to hear your comparisons.
dave
- Home
- Amplifiers
- Pass Labs
- DIY Sony VFET Builders thread