Personally, I treat it as a matter of "mandatory good hygiene" to always, always include an electrical insulator between a power transistor and its heatsink. Mica+goop, or Keratherm, or SilPad: every time. I always do this, always always, even when the heatsink is electrically floating. Even when the heatsink is electrically connected to the same circuit node as the mounting tab of the transistor.
Why? Because I have met future-me and discovered he is forgetful. He cannot be relied upon to remember whether an insulator is required, or not. This is dangerous when repairing or modifying gear 6 months later (or 6 years later!). Future-me cannot be relied upon to remember WHY an insulator is or isn't required, leading to incorrect conclusions, leading to spectacular explosions after repair.
So I prevent future-me from screwing up, by always including an insulator on every power transistor. Always, always. Zero decisions need to be made, giving zero opportunities for mistakes.
This policy has accidentally resulted in significant cost savings too. When buying insulators and mounting hardware, it turns out there are TREMENDOUS savings to be had by purchasing in bulk. Many eBay sellers are happy to sell you a thousand pieces of TO-220 shoulder washers / mount bushings, for USD 5.00 per thousand. (They cost $0.45 at Mouser in qty=1). DigiKey's price for a hundred TO-220 insulating SilPads is quite low, have a look. And a tube of Aavid Thermalcote (or a jar of Wakefield Thermal Compound) is quite affordable.
Great advice. ")
Personally, I treat it as a matter of "mandatory good hygiene" to always, always include an electrical insulator between a power transistor and its heatsink. Mica+goop, or Keratherm, or SilPad: every time. I always do this, always always, even when the heatsink is electrically floating. Even when the heatsink is electrically connected to the same circuit node as the mounting tab of the transistor.
Why? Because I have met future-me and discovered he is forgetful. He cannot be relied upon to remember whether an insulator is required, or not. This is dangerous when repairing or modifying gear 6 months later (or 6 years later!). Future-me cannot be relied upon to remember WHY an insulator is or isn't required, leading to incorrect conclusions, leading to spectacular explosions after repair.
So I prevent future-me from screwing up, by always including an insulator on every power transistor. Always, always. Zero decisions need to be made, giving zero opportunities for mistakes.
This policy has accidentally resulted in significant cost savings too. When buying insulators and mounting hardware, it turns out there are TREMENDOUS savings to be had by purchasing in bulk. Many eBay sellers are happy to sell you a thousand pieces of TO-220 shoulder washers / mount bushings, for USD 5.00 per thousand. (They cost $0.45 at Mouser in qty=1). DigiKey's price for a hundred TO-220 insulating SilPads is quite low, have a look. And a tube of Aavid Thermalcote (or a jar of Wakefield Thermal Compound) is quite affordable.
Indeed. Wise words MJ. I follow the same philosophy.
A little off topic…
For large TO-247 Mosfets and the like, I now avoid the use of Keratherm and similar products especially in the situation where the heatsink is going to be reused for different amp modules. It’s very easy to tear/pierce the Keratherm when torquing it down. Suddenly you are wondering why your amp doesn’t work. Many of these large MOSFETS have the drain pin connected on back of the MOSFET as well. So the drain is now in contact with ground. Whoops!
There are pages of troubleshooting threads posted by new builders regarding this.
So now I use Ceramic thermal interfaces and very scant amounts of thermal paste. I still use Keratherm for TO-247’s in secondary locations such as power supplies, etc…
For smaller TO-220 devices, I still use Keratherm or equivalents.
Just another perspective from yet another learner!
Eric did a very nice appraisal of different thermal interface materials. It’s a great read.
Best,
Anand.
Not sure what that entails but nothing should impede the job of the heat sinks to sink heat, no?
Also, doesn't the construction of the devices keep current out of the heat sinks?
Is there a risk of sayonara shock from any of the exposed devices? My cat would really like to know!
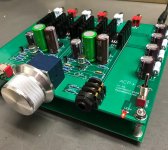
Completed board:
Somewhere in the thousands of posts I read insulators weren't necessary for the J74s but some used conductive grease...
Sorry I thought you meant using keratherm to couple the two SJ74 JFETs together - that’s what I understood from your question. But you were referring to the keratherm or silicone insulators for the main MOSFETs. Sure, silicone insulators are fine. No need for keratherm.
For the thermal coupling between the output MOSFETs and the heatsinks, I use inexpensive silicone TO220 insulator sheets. Works fine - it’s not that much heat.
If you look at the space in between my MOSFETs and the heatsinks, you will see a thin grey insulator layer. That’s a standard TO220 silicone sheet (fiberglass reinforced) available for $4 for a bag of 100 from AliExpress.
For real hot high heat flux applications (like transferring 100w out of single MOSFET, I use alumina ceramic insulator pads and thermal grease).
Last edited:
IIt’s very easy to tear/pierce the Keratherm when torquing it down. Suddenly you are wondering why your amp doesn’t work. Many of these large MOSFETS have the drain pin connected on back of the MOSFET as well. So the drain is now in contact with ground. Whoops!
So now I use Ceramic thermal interfaces and very scant amounts of thermal paste. I still use Keratherm for TO-247’s in secondary locations such as power supplies, etc…
Or you could spin it as a cost saving measure. OF COURSE you would replace the Keratherm pad every single time you removed a power transistor from the heatsink -- that's just common sense; the (reward vs risk) ratio when NOT replacing the pad is so unfavorable.
But Keratherm pads are kind of expensive, around USD 2.00 each. If you know in advance you're going to replace transistors on this heatsink, several times, then you save significant money when you buy the infinitely-reusable ceramic insulators instead of the one-time-use Keratherm.
edit- BTW, I smooth the backplate of power transistors before mounting them to Keratherm + heatsink, using eight or ten gentle swipes on a fine "6000 grit" sharpening stone. Specifically a "Japanese water stone" from the King brand, sold on Amazon.
_
Last edited:
I finally got around to trying the Toshiba 2SK2013 in the Q6 position of my ACP. Sounds and measures really nice. The only adjustment I made was to lower R15 to around 700R. I haven't done any tweaking to R12/13, as it sounds really nice with 2R2/6R8.
Hey codyt, did you change only the Q6 to the 2SK2013 mosfet along with the R15 changed from 1k to 700R? I presume you left the Q5 with IRF610 and no other changes. I am going to try the Q6 with 2013 as got a nice pair with me and for a change to see how the sound signature changes
Thanks
I'd may come in a bit harsh, and I am sorry, but there is, literally, thousands of posts through this threads mentioning that most offers for the Toshibas will be fake. There is a full thread dedicated to tell people the two or three reliable internet sources for those FETs. The Store now has them as well, which are 100% genuine (new LinearSystems stuff). Also, the store has a very significant disclaimer everywhere about extremely high probability of getting fakes if sourcing of the FETs with vendors claiming to sell originals.
I may understand people trying to find other sources of original parts, but I cannot understand buying 99.9% almost-certified fakes to safe a few bucks, and then flood this threads with attempts to test their devices, proof them fake and then start a fight with the sellers of counterfeits.
Simply buy from the 3 respected sources that are now available, being the very own DIY store a very, very secure source!
It would be great if it were always possible. For us Brazilians, buying from sellers in the United States is practically unfeasible. Shipping is very expensive. Also, for purchases of $50.00 or more, the fee is 80% of the amount spent on the item plus shipping. This results in a much larger value. Unable to buy 4 2sj74 for less than $50.00 from recommended sellers. In the case of my purchase on UTSource, I paid with Paypal and received back what I paid. It was a risk-free bet. On the other hand, I find it interesting that some people try alternatives to get these transistors cheaper, guarding against losses and posting their experience here.
I finally got around to trying the Toshiba 2SK2013 in the Q6 position of my ACP. Sounds and measures really nice. The only adjustment I made was to lower R15 to around 700R. I haven't done any tweaking to R12/13, as it sounds really nice with 2R2/6R8.
Hey codyt, did you change only the Q6 to the 2SK2013 mosfet along with the R15 changed from 1k to 700R? I presume you left the Q5 with IRF610 and no other changes. I am going to try the Q6 with 2013 as got a nice pair with me and for a change to see how the sound signature changes
Thanks
Ok I tried this change of Q6 being 2013 and R15 as 700R (piggy back via 680+22r in series). I had a problem with the current flow using R4 being 56R where my J113 IDSS was 16.8mA matched pair. So I reverted back the 700R to 1k and I was able to get around 6.5mA current via the R4. Gave a listen to the preamp and sounds pretty good and both the mosfets are hardly getting warm


Last edited:
I live in Ecuador, believe me, I understand your condition and we probably have it the same or perhaps worse in some cases.It would be great if it were always possible. For us Brazilians, buying from sellers in the United States is practically unfeasible. Shipping is very expensive. Also, for purchases of $50.00 or more, the fee is 80% of the amount spent on the item plus shipping. This results in a much larger value. Unable to buy 4 2sj74 for less than $50.00 from recommended sellers. In the case of my purchase on UTSource, I paid with Paypal and received back what I paid. It was a risk-free bet. On the other hand, I find it interesting that some people try alternatives to get these transistors cheaper, guarding against losses and posting their experience here.
Here there are companies that specialize themselves in bringing things over and charging reasonable amounts. I actually used such a company to import the ACP+ just last week. Perhaps that is an option for you?
Of all the ACP+'s that have been built.....
Here is another one. Made a few minor changes from stock. Went straight to the Toshiba 2SK2013 for Q6 since I have a few on hand (matched even). Used some of my very best matched 2SJ74's for the FE. Have 9.1 mA through R4 on both channels after some tweaking. Ended up with 500 ohms at R15 to get the LTP current closely matched, not perfect, but close. Ran a short wire from the volume control shaft to ground so nothing gets zapped hopefully. Ran into startup issues with the switching supply as I was bringing everything up. Was OK initially, then went into "let's just continue to pulse forever and not start...." Worked perfect with a lab supply. Changed all 1000 UF filter caps to 470's (Nichicon PW) and it seems to be starting OK now. I guess time will tell. C3 is 3X 330 UF Nichicon ES, just because. Film cap (underneath) for C1. Haven't had a chance to listen yet, just finished late today.
Here is another one. Made a few minor changes from stock. Went straight to the Toshiba 2SK2013 for Q6 since I have a few on hand (matched even). Used some of my very best matched 2SJ74's for the FE. Have 9.1 mA through R4 on both channels after some tweaking. Ended up with 500 ohms at R15 to get the LTP current closely matched, not perfect, but close. Ran a short wire from the volume control shaft to ground so nothing gets zapped hopefully. Ran into startup issues with the switching supply as I was bringing everything up. Was OK initially, then went into "let's just continue to pulse forever and not start...." Worked perfect with a lab supply. Changed all 1000 UF filter caps to 470's (Nichicon PW) and it seems to be starting OK now. I guess time will tell. C3 is 3X 330 UF Nichicon ES, just because. Film cap (underneath) for C1. Haven't had a chance to listen yet, just finished late today.
Attachments
Follow-up on pulsing problem
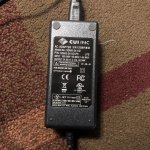
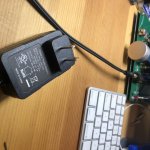
Hi, a while back I posted that I had a problem with the LED pulsing once the build was completed. I hooked the amp up to some music and heard music pulsing as well. Somebody had mentioned that it maybe the power supply and suggested to try a laptop supply, which I did. Although the only one I had was 19VDC at the time, but it worked. Once I replaced the 24VDC/1A Walmart with a larger supply (24VDC/2.71A) everything was fine. I tested the voltages as per Nelson Pass pdf and the amp has been chugging along just fine. Hope that helps. Love the amp...
Hi, a while back I posted that I had a problem with the LED pulsing once the build was completed. I hooked the amp up to some music and heard music pulsing as well. Somebody had mentioned that it maybe the power supply and suggested to try a laptop supply, which I did. Although the only one I had was 19VDC at the time, but it worked. Once I replaced the 24VDC/1A Walmart with a larger supply (24VDC/2.71A) everything was fine. I tested the voltages as per Nelson Pass pdf and the amp has been chugging along just fine. Hope that helps. Love the amp...
Attachments
Re: Follow-up
LOL, that should have been wallwart.
Once I replaced the 24VDC/1A Walmart with a larger supply (24VDC/2.71A) everything was fine.
LOL, that should have been wallwart.
Finished Kit (almost) and results
Thought I'd post my experience.
Kit was complete and worked perfectly (from the variations I have read). I did have the blinking LED issue, with sound pulsing, and had to steal a power supply from my recliner to get the required stable power. The kit included the 24V 1A wallwart. I spliced in a 20V 2A supply, and everything sounds and tests great. I'm too new to this to know if this is an issue of the provided power supply just being too low powered, or if it was indeed bad. If anyone can answer that, it would be great to know what I need to find to replace the original permanently.
The R4 measurements were spot on, coming in at 9.969mA and 10.1mA (which I assume is close enough).
Sound is nice. I don't have a great A/B way to test this, since I'm using a Monolith USB stick DAC. (Yes, I'm new... so just getting things going). Grado SR225 cans. It definitely mellows things out. Gets loud, very clean. I feel like it bloats in the bass, low mid regions, but it's still a great sound and is growing on me. The higher ends seem nice and clean. No noise at any level. I'm hard pressed to say that it 'opens up' a lot, but I think it is there to a degree. Really need a cleaner setup to judge the differences better, but...
Over all, fairly easy build. (Other than the Power Supply, which with my lack of knowledge caused me to pull many components many times trying to figure out where I had screwed up).
Was fun to do, and will be the first of many projects like this down the road.
Note on forum: It was difficult to track down the various little things that have been noted (but did not actually affect my build). It might be nice if there was a way to 'sticky' each individual 'issue' that has been noted. Sub threads or something? (I'm actually not a great forum user either, so not sure what is available).
Thanks! DIY and Mr. Pass
Attachments

My own feeling is that there is just too much capacitance for these little wallwarts to start up properly. I changed both C2's, C6, C7, C8, and C9 to 470 UF and the problem hasn't returned. This is with the kit wallwart. We'll see if it makes a liar out of me, but it seems well behaved now, no pulsing at all. By the way, brief casual listen last night turned into hours of not getting anything else done, and going to bed way too late. Proud papa sure, but it has some really nice synergy with my VFET amp going on here. Beyond just "more gain".
This may need more cases reported, but I can confirm that the Kits from the store have produced 10mA spot on! (well, 9.976 mA according to my MM)... The R4 measurements were spot on, coming in at 9.969mA and 10.1mA (which I assume is close enough)...
I created the test rig suggested to avoid soldering things and then finding out I required dramatically different R4 values (as others have reported from self-sourced J113).
The kits from the store have apparently been "screened" before hand (perhaps confirmation needed?) and matched accordingly to the 125R suplied.
Here's my rig and the measurement I got:

It's really something else to be able to just trust the values and not having to source and match a lot of pieces. Thanks!!!
Rafa.
I know my kit was spot on as well.
I would like to mention that I went a little crazy about the j113s. I ordered some, was gifted a pair by a member here, and I bought the kit. What I’m leading up to is I have some left and if anyone is in need I would like to pay it forward. I have two pairs that I can offer. Only in the states please.
I would like to mention that I went a little crazy about the j113s. I ordered some, was gifted a pair by a member here, and I bought the kit. What I’m leading up to is I have some left and if anyone is in need I would like to pay it forward. I have two pairs that I can offer. Only in the states please.
I live in Ecuador, believe me, I understand your condition and we probably have it the same or perhaps worse in some cases.
Here there are companies that specialize themselves in bringing things over and charging reasonable amounts. I actually used such a company to import the ACP+ just last week. Perhaps that is an option for you?
Yes. I would like to know about these companies and ask for a quote. Please send it to me via private message. Thanks.
Last edited:
Friends, I am now a bit confused regarding chassis ground when one is including a chassis (and not going with the ground PCB). I now understand back connectors should be isolated, that is done.
Now, I see three choices for chassis ground:
1. I do a single point of contact between the PCB and chassis ground (for example, not isolate one of the three ground-connected main screws)?
2. I leave the PCB floating with all standoffs isolated, only point of contact with case would be the front panel connectors which are also isolated?
3. I create a purposedly made connection between ground and chassis ground through a small cap (like the one used in the WHammy)
If there needs to be a connection, any particular recommendation of where to hook it on the PCB or is any ground point the same?
Thanks for any feedback. Best regards,
Rafa.
I used three or four 30 cm test leads having alligator clips / crocodile clips on both ends, to experiment with different possible grounding configurations on a different preamp/HPA ("Noir"). Turn it on, crank up the volume knob, plug in cheap, expendable headphones, and try a few dozen grounding schemes. With musical source, and also with input shorting plugs.
This turned out to be a worthwhile exercise, in my opinion, and I discovered several workable arrangements. Maybe similar experiments on the ACP+ might prove to be equally useful (?). It wouldn't take much time to do some experiments.
_
This turned out to be a worthwhile exercise, in my opinion, and I discovered several workable arrangements. Maybe similar experiments on the ACP+ might prove to be equally useful (?). It wouldn't take much time to do some experiments.
_
Last edited:
- Home
- Amplifiers
- Pass Labs
- Amp Camp Pre+Headphone Amp - ACP+