Here's a wiring diagram another member sent to me. I found it very helpful despite the labels in Korean. It departs from the ZBLS specs by using one four-gang pot instead of two two-gang pots to control input and output levels, as well as just one transformer for the power supply. But it includes balanced and unbalanced inputs and outputs so that's a big help as wiring goes.
Attachments
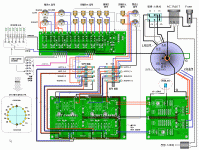
That is nice, the diagram isn't using an XLR and RCA in parallel, just separate XLR and RCA inputs.
I sent out my rear panel and the front panels for the power supply and line stage to Front Panel Express. I used their software for templates on my panels. I was debating if I was going to drill the back panel or have it CNC machined, once I saw how much a 24 mm drill bit was, well it was a no brainer. They are engraving and using a black fill for the front panels, not a bad cost at all. CNC machining was only $20 more than the drill bit I would need for the XLR connectors.
I sent out my rear panel and the front panels for the power supply and line stage to Front Panel Express. I used their software for templates on my panels. I was debating if I was going to drill the back panel or have it CNC machined, once I saw how much a 24 mm drill bit was, well it was a no brainer. They are engraving and using a black fill for the front panels, not a bad cost at all. CNC machining was only $20 more than the drill bit I would need for the XLR connectors.
Those are big holes, aren't they, even if the back panel is only 3mm thick aluminum. I was thinking of getting a cheap HSS step drill just for the biggest holes and hoping to get enough punches to finish my back panel. Think I can handle the front panel with my existing bits if I can keep the power switch a small diameter. Now the engraving or printing on the front panel is another matter.
I used the Front Panel software for a 12AX7 phono section I'm building, you can print out the template you make and then cut it out and tape it to the panel. It will even print a crosshair center point for each hole. Macro items include XLR, switches all you need to insert into the template. The software is free, download it from their website. Any help for drilling holes in a straight line I'm all for.
Member
Joined 2009
Paid Member
Elwood625, a quick question: Did you install C107 on the power supply? I bought a through-hole part and don’t see a handy way to install it across the hot and neutral leads as in the schematic. I’m thinking maybe there’s a terminal-style version for this that I can attach to my perforated base plate.
I installed mine on a 4 pin terminal strip where the transformer wires are attached. Because I built a dual power supply, I used four transformers and needed a way to connect all the wires. I ended up using two C107, one for each pair of transformers. You could install it between the IEC terminal pins hot and neutral. I used a through-hole version also.
Great. I was thinking the IEC pins were a good solid spot and seemed as good a place as any in the circuit. I’ll slip some insulation from small gauge wire over the leads. As The Man himself advises: “Safety first. There are too few DIYers as it is.” (Or words to that effect.)
The part I had trouble with is where the thermistor connects to 110v ground. One corner of the power supply PC board is the other connection to the thermistor, that corner needs to go to 110v ground. I ended up using a ringlet terminal in between the PC board and the board standoff, the wire was then connected to the chassis and the 110v ground terminal on the IEC.
I tested my power supply today. Most of the readings were right, but I got readings of 60 volts on all four the V+ and V- points. According to the guide, it should be 80 volts and 60 volts -- although I don't understand the unregulated rails reference. Do I follow the schematic and try to take a reading at some capacitor or resistor along the way? I was happy that all the readings at the transistor source/drain/gate, both on the PS and also on the main board, were correct.
I've been reading threads about volume controls. P3 & 4 still bothers me, the four gang stepped pot I have is log not linear. I'm thinking that the pot on the output should be linear to allow a greater degree of adjustment. I don't know enough about this to make a comfortable decision, besides the fact that I already have what I have.
I’m still undecided on P3 & 4. I drilled my back plate this weekend and didn’t make holes for the shafts. I had planned to have them sticking out the back for fine tuning, but am leaning toward either going with resistors in the 430 range. And I still haven’t decided about extension shafts on the selector and I put pots. I supposed it will be easy enough to make them out of aluminum rod and some plastic bushings. There is certainly a lot of back and forth wiring if you bring the signal wires up front.
I'm to the point of wiring the signal inputs and outputs. As I read various articles on balanced circuits (the clearest of these, to me, is at Sound System Interconnection), they say the XLR shield (pin 1) goes to CHASSIS ground. If I do that, what do I do when I wire my selector switch and then the pots? There's no ground lug on my selector switch. Then I'm supposed to connect the grounds out of my P1 and P2 to GND on the IN side of my main PCB. Finally, as I leave P3 and P4, do I ignore the GND lug, since I'm supposed to ground pin 1 of the output XLR to chassis?
Here is what Nelson says:
Speaking of input and output connections, I have not specified connector types for this project. Usually for this sort of project I use both XLR and RCA connectors on both the inputs and outputs. The inputs are female XLR with pin 2 = plus, 3 = minus, and 1 = ground. At the output it is a male XLR connector. In parallel with the XLR connectors are 2 RCA connectors, one for each polarity, with XLR pin 2 connected to the "live" of the positive RCA and pin and XLR pin 3 connected to the "live" of the negative RCA. XLR pin 1 is attached to the grounds of both RCA connectors. These grounds are isolated from chassis ground. The case of the XLR connector, if metal, and shield are attached to chassis ground.
I have no intention of deviating from his recommendations.
As far as grounds go, my selector does not have provisions for ground either. I plan on using a "star" ground. This is a single point where all grounds come together, I have this point just behind the selector switch so the grounds area as close to the connections on the selector switch.. The PC board grounds will also go to the "star" ground point., along with the shielded grounds on my 10K and 5K pots.
There are great articles at PASSDIY regarding grounds and proper wiring. I recommend you read them BEFORE you start wiring.
Now your father ahead of me, still waiting to get my front and rear panels back. I spent the last couple of days rereading the article on BZLS, I've read it again at least a dozen times and I'm comfortable with P 3 & 4 operation. Considering it changes gain AND noise/distortion, adjusting will be by what sounds best. I plan on selecting several different pieces of music and write down the position of P 3 & 4 which gives best sound results. I'm hoping for a happy medium for all the different music types so I don't have to keep adjusting. Otherwise, I'll mark the rear panel for the different knob positions for each music where it sounds best. I may regret having it mounted on the rear panel, however for logistics, it is the best place for it.
- Home
- Amplifiers
- Pass Labs
- Balanced Zen Line Stage Preamp