my pre, into the SissySIT, then to my Calpamos speakers
No Porn, No Glory
pics time
Pass DIY Addict
Joined 2000
Paid Member
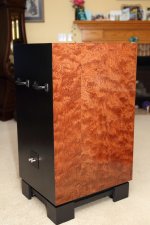
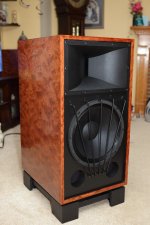
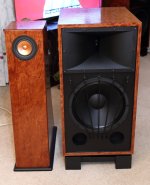
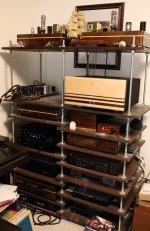
Fair enough. Here is the present equipment stack for the upstairs system and a few shots of the Calpamos speakers. Contents of the rack are as follows:
Left side shelves, top to bottom: 300B left channel (documented on the BottleHead web site), Pass modular outboard PSU for F4, Aleph-J, and M2 amps, BA-3 preamp outfitted with remote control and awaiting arrival of knobs, Denon AVR-X3500H receiver (used mostly as a preamp), Adcom GFA 545ii amp for DIY 12" sonotube sub, DIY outboard PSU for Wayne's Pearl 2 phono stage, Technics SL-1200TT and switchable bucking transformers for 300B amps to keep Jac's 300B Meshplate tube filaments on target, and a Panamax power switch/fiter.
Right side shelves, top to bottom: 300B right channel, shiny new SissySIT amp, third shelf down is F4 (not presently connected) next to Korg NuTube preamp (used for TT and 300B amps) and an Echo dot for streaming, Pearl 2 phono stage behind the Walnut face plate, Adcom GCD 700 CD player, JVC VCR, LD BluRay player, and satellite receiver on the bottom of the stack. Plus tons of crap on the floor in front of and next to the rack...
Hidden on the left side of the rack is a 2000VA 60-0-60 balanced power supply for the whole rig.
Not shown is the heavily modified Technics SL-1200 and my Sony VFet2 amp that I had to move off of the second shelf down to make room for the enormous SissySit to sit on the rack. It's all tucked into a corner in the adjacent room so only the speakers and TV sit in the family room. This is the "small" system, the big stuff is in the basement theater (link in sig).
I've also attached a few images of the Calpamos speakers. The entire build thread for them is here. The woofer guards are server rack lacing bars for network cables to keep the dog from careening into the driver as he runs the house. The third image of the Calpamos shows it next to my FHXL speakers (designed by Planet10, ScottMoose, and Chrisb here) for size comparison. The Calpamos is BIG, more than 43 inches tall including the base, 24 inches deep, and about 20" wide. Each weighs more than 150 lbs (hence the giant pair of wrought iron handles on the rear and the wheels hidden in the base).
Most of the others projects except the 300B amps are documented somewhere on the forums here. If you want more details, just shout")
Enough porn??
Left side shelves, top to bottom: 300B left channel (documented on the BottleHead web site), Pass modular outboard PSU for F4, Aleph-J, and M2 amps, BA-3 preamp outfitted with remote control and awaiting arrival of knobs, Denon AVR-X3500H receiver (used mostly as a preamp), Adcom GFA 545ii amp for DIY 12" sonotube sub, DIY outboard PSU for Wayne's Pearl 2 phono stage, Technics SL-1200TT and switchable bucking transformers for 300B amps to keep Jac's 300B Meshplate tube filaments on target, and a Panamax power switch/fiter.
Right side shelves, top to bottom: 300B right channel, shiny new SissySIT amp, third shelf down is F4 (not presently connected) next to Korg NuTube preamp (used for TT and 300B amps) and an Echo dot for streaming, Pearl 2 phono stage behind the Walnut face plate, Adcom GCD 700 CD player, JVC VCR, LD BluRay player, and satellite receiver on the bottom of the stack. Plus tons of crap on the floor in front of and next to the rack...
Hidden on the left side of the rack is a 2000VA 60-0-60 balanced power supply for the whole rig.
Not shown is the heavily modified Technics SL-1200 and my Sony VFet2 amp that I had to move off of the second shelf down to make room for the enormous SissySit to sit on the rack. It's all tucked into a corner in the adjacent room so only the speakers and TV sit in the family room. This is the "small" system, the big stuff is in the basement theater (link in sig).
I've also attached a few images of the Calpamos speakers. The entire build thread for them is here. The woofer guards are server rack lacing bars for network cables to keep the dog from careening into the driver as he runs the house. The third image of the Calpamos shows it next to my FHXL speakers (designed by Planet10, ScottMoose, and Chrisb here) for size comparison. The Calpamos is BIG, more than 43 inches tall including the base, 24 inches deep, and about 20" wide. Each weighs more than 150 lbs (hence the giant pair of wrought iron handles on the rear and the wheels hidden in the base).
Most of the others projects except the 300B amps are documented somewhere on the forums here. If you want more details, just shout
Enough porn??
Attachments
Last edited:
Pass DIY Addict
Joined 2000
Paid Member
Just out of curiosity, how many SissySIT amps are out there?
they Rule The World
all my amps are Sissy

SS has a certain right-ness, IMO. Is it the VFET? The signal iron for voltage gain? No feedback? The resulting "pleasing" distortion of all that? I guess so.. This is just me, but I continue to like the autoformer at +6 gain better than @+12 after going back and forth a few times with my various FE shenanigans. It's a little like the M2X, beast with a million buffers (except my buffer has gain  )..So my journey continues on the best way (to my ears) to "make up the rest". I've got some stuff brewing in the backrooms, if I can find my way back out I'll share it eventually.....
)..So my journey continues on the best way (to my ears) to "make up the rest". I've got some stuff brewing in the backrooms, if I can find my way back out I'll share it eventually.....ZM, another call for help!
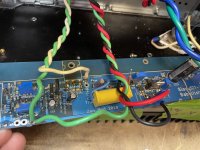
I made 2 SissySITs in 2019. One has been on long term demo session at a very good friend’s house. Last week the fuse blew. This amp got heavy daily use. He would make a joke saying the only way it is leaving his house is if a more powerful version could replace it!
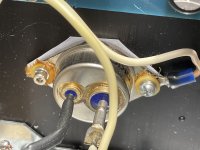
I got it on the weekend and started playing with it today. You can see the insulating shoulder washers on one channel are melted. You can also see heat marks on the board by the 9140 mosfet.
I confirmed that the other channel is OK by taking away power from the bad channel. We can say PSU and one channel are OK.
What I have tried so far:
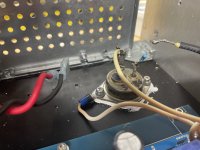
I put a ceramic SIT insulator and goop in, new hardware, and tried a different SIT. Then I turned Iq jumper to 0R measured from R15 to pin 1 of OK2. Removed jumper. Changed fuse. Shorted input. Install clamp ammeter on rail wire, voltmeter on output.
Power on. Big spike in rail amps (10+ amps), fuse blows. This one is tough because I can’t start measuring voltages at different points on the board.
Any tips on where to start checking?
Is this the audio gods saying it’s time to go from rev1 to the 42 iteration?
I made 2 SissySITs in 2019. One has been on long term demo session at a very good friend’s house. Last week the fuse blew. This amp got heavy daily use. He would make a joke saying the only way it is leaving his house is if a more powerful version could replace it!
I got it on the weekend and started playing with it today. You can see the insulating shoulder washers on one channel are melted. You can also see heat marks on the board by the 9140 mosfet.
I confirmed that the other channel is OK by taking away power from the bad channel. We can say PSU and one channel are OK.
What I have tried so far:
I put a ceramic SIT insulator and goop in, new hardware, and tried a different SIT. Then I turned Iq jumper to 0R measured from R15 to pin 1 of OK2. Removed jumper. Changed fuse. Shorted input. Install clamp ammeter on rail wire, voltmeter on output.
Power on. Big spike in rail amps (10+ amps), fuse blows. This one is tough because I can’t start measuring voltages at different points on the board.
Any tips on where to start checking?
Is this the audio gods saying it’s time to go from rev1 to the 42 iteration?
Attachments
Pass DIY Addict
Joined 2000
Paid Member
Hi Eric -
Randy may have another source, but I bought several sets from this seller on Canuck Audio Mart. Reliable and quick. I'm not sure if they're still selling. I see them occasionally on the typical auction sites, but I have never purchased them. Example below also.
https://www.canuckaudiomart.com/det...al-pad-for-tokin-2sk180-2sk182-thf-51s-v-fet/
https://www.ebay.com/itm/402775179743
Lotsa talk about various methods, but as often as I move things around, I really like these types of insulators.
Cheers,
Patrick

Pass DIY Addict
Joined 2000
Paid Member
I’ve never used one like that before. Recently, I’ve been having success with just solder braid. Glad to hear you have things back up and running again!Whoever recommended the Hakko FR-301 THANK YOU!!! It makes these types of repairs go fast and smooth. My old turkey baster solder sucker was so frustrating to use.
What I have tried so far:
you didn't test/replaced mosfet?

THANK YOU!!
I have Chinese made Basetech ZD-8925; few details how heater case is fixed to rest of "gun" could be better/of better quality, but no biggie
it's slightly above 100 bucks in my neck of wood, but worth every penny
potent membrane suck-pump is in case and I'm feeling as Eddie every time when I press the button - why I didn't had that when I was a kid?
Hey Randy, do you recall the current this amp was originally biased at, eg. the bias conditions under which the 9140 burned out?Update. I popped out the bd139, bd140, and IRFP9140. Bd’s were good. 9140 is blown. Replaced all with fresh. I’m biasing it up again. No drama.
Somehow the 9140 blew up. Weird.
- Home
- Amplifiers
- Pass Labs
- Babelfish M25, SissySIT - general building tips and tricks