I got a small batch of IPS6 and IPS7 PCBs today.
I have 5 pairs or each I can sent out to other DIY members in Europe if anybody interested.
Also if you want an extra pair of of Tucson I have some left from Mike's group buy some time ago.
I would love to try out these two boards! I'm sending you a PM.
J113 N Fairchild vs Phillips
OKay same jig same power supply same meter. Same same same.
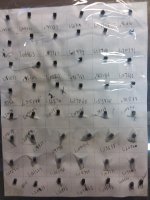
I bought 25 J113 Phillips to see how the matched up to the ON/Fairchild I bought from Mouser.
The Phillips were obtained through a vendor I trust on ebay cost $12. .48 per device.
First 6 rows ON second 6 rows Phillips.
Thoughts, the Phillips are all a lot closer overall. One other thing I noticed was that the Phillips took way longer to settle. A lot of the ON were pretty stable after only 15secs. Almost none of the Phillips were they were climbing pretty good for a minute or so. I took the initial values at 15 secs. What I found typical was someting that looked like this 1.20000 (15sec) 1.201XX (30 secs to 1min)
I understood... I have some Phillips on the way, I'll jig them and post those numbers too.
OKay same jig same power supply same meter. Same same same.
I bought 25 J113 Phillips to see how the matched up to the ON/Fairchild I bought from Mouser.
The Phillips were obtained through a vendor I trust on ebay cost $12. .48 per device.
First 6 rows ON second 6 rows Phillips.
Thoughts, the Phillips are all a lot closer overall. One other thing I noticed was that the Phillips took way longer to settle. A lot of the ON were pretty stable after only 15secs. Almost none of the Phillips were they were climbing pretty good for a minute or so. I took the initial values at 15 secs. What I found typical was someting that looked like this 1.20000 (15sec) 1.201XX (30 secs to 1min)
Attachments
Last edited:
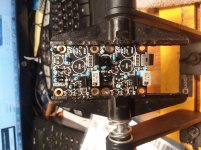
Switched to Austins and had no sound from one board. I think I found the issue, unfortunately it took out pretty much all the BJTs.
No smoke or pops, just nothing. I pulled the board and went over the soldering first cause it's a very busy board. I found what looked like a tin whisker, that appeared to be short IC1. A few of the SCs looked to be reading okay, but since they are cheap, I'm going to go ahead and replace them all.
Funny thing, when I power down, I hear music just for a sec or so as it bleeds down.
Okay guys and gals... I finally got around to pulling the parts on the Austin and doing a board repair. To be sure, I decided to replace all transistors and the regulators. I was pretty sure what was bad, but I figured I didn't want to to a chance of taking something else out, so I just did them all.
That is one little busy *** board to remove parts and clear the holes. I took my time removed all the solder, placed the new parts, double triple and then checked again. I soldered everything up and dropped the board in the MX and hit the power switch. A loud snap followed by a green cap flying in the air.... no just kidding.
 I waited a few minutes for it to warm and then sent a stream to it........................... Yah! it's working! I dropped the other Austin in the other, these are monos, and am no listening to them. Initial impression is that **** eating grin I get when I know it's good and will only get better as it runs in. I can already tell the low end is more pronouned then the ISHs. Also, it early, but the center seems to be more focused on my cheap test speakers. Grin (Nice design guys)
Now I can let them run in and go to work on Mark's boards. So, it's on to the IP boards Mark.
I will let you know when I get them done. I might not put them in for a week, or so thought because I want to listen to the Austins for a time. My last build I made to M2 specs and left it there.
Last edited:
Among the initial 5 input stage daughter cards (Ishikawa, Mountain View, Tucson, Norwood, Austin) -- Austin was the last one to be released. It took extra time and extra revisions to get everything Just Right, especially the choice of semiconductors and packages. That's why the Austin PCB layout has those weird rotationally-symmetric footprints labeled E,B,C. I figured if I wanted to (had to!) swap out transistors to get a certain performance profile that suited my tastes, other builders would want the same flexibility. That's why the Austin schematic includes written guidelines for choosing your own, customized, transistor part numbers. Because I reckon you might want to go swappin' parts some fine day.
Yes, I like that they are Marked, er marked on the board. It just makes it easy than grabbing a meter and chasing stuff down, especially witha small board with lots of parts on it.
Pulling the plug for today, got the Austin fixed and a good jump on the 6.
It just makes it easy than grabbing a meter and chasing stuff down, especially witha small board with lots of parts on it. Pulling the plug for today, got the Austin fixed and a good jump on the 6.
Attachments
I've started reviewing the content in this forum as I prepare to build the MX2. I think I saw somewhere that the Deluxe 4 Aluminum chassis works with this amp?
I used the larger one for my F5 and wouldn't mind a little smaller box to fit in my listening room unless there is a trade-off in performance?
Thanks
I used the larger one for my F5 and wouldn't mind a little smaller box to fit in my listening room unless there is a trade-off in performance?
Thanks
Deluxe 4U is fine but if you have a large toroidal transformer like 500 VA and want it to be mounted vertical you probably need a 5U.
I think 6L6 build his M2X using a 3U if you look where this thread starts.
With 3U the heatsinks may be a little hot.....?
Some like the toroid to be mounted vertical as this seems to introduce less hum into the Edcor.
I think 6L6 build his M2X using a 3U if you look where this thread starts.
With 3U the heatsinks may be a little hot.....?
Some like the toroid to be mounted vertical as this seems to introduce less hum into the Edcor.
Remember that 300VA is more than sufficient, and what Nelson uses on the FirstWatt builds. Antek are only offered in shielded up to 400VA.
3U 400mm would be a fine choice, it actually has just a bit more heatsink area then the 4U 300mm, but you'd need to drill/tap your own heatsinks, there is not yet a deluxe 3U.
3U 400mm would be a fine choice, it actually has just a bit more heatsink area then the 4U 300mm, but you'd need to drill/tap your own heatsinks, there is not yet a deluxe 3U.
Remember that 300VA is more than sufficient, and what Nelson uses on the FirstWatt builds. Antek are only offered in shielded up to 400VA.
3U 400mm would be a fine choice, it actually has just a bit more heatsink area then the 4U 300mm, but you'd need to drill/tap your own heatsinks, there is not yet a deluxe 3U.
Ah, drilling the heatsinks is above my pay grade at present.
My very first experience with drilling and tapping heatsinks, was on my M2x. Despite no prior training, I was successful and everything fit beautifully. I bought an off-off brand "tabletop" drill press ($90) from Amazon, also a small kit of metric tap-and-dies from Amazon.
There are 9 drill-and-tap holes per amp channel. 7 for the PCB attachment points and 2 for the MOSFET bolts. That's not so many! Don't rush yourself, drill in the morning, tap in the afternoon.
For me the keys to success were:
(1) draw out a drilling template on copier paper and tape it securely to the heatsink. Do NOT put a bunch of masking tape on the heatsink and draw upon the tape. It will smear and rub off and distort. Use paper.
(2) USE A CENTER PUNCH! And do the punching in a very well-lit room. When the punched indentation is precisely located, precise drilling is a breeze.
(3) Use cutting fluid when tapping, go slowly even though it's "soft" aluminum, and back out the tap / remove the swarf often. I bought "Tap Magic" cutting fluid from Amazon but there are many others.
Good tips Mark.
If you use tape to stick the paper down, it can still move, I prefer to use spray-mount on the paper; or mark directly on the surface with a fine tipped permanent marker - but you have to be careful to avoid smearing.
I find the most accurate way is to mark the centre with a sharp bradel to make a small divot to centralise the tip of an automatic centre punch. A metal scribe would probably work just as well, although I haven't tried it.
I drilled holes by hand for years, then I bought one of these PCB Art Jewleries Mini Bench Drill Press 6mm Chuck Fully Adjustable Speed 519204455146 | eBay it has more than paid for it'self, wish I'd bought one years ago, it's perfect for my kitchen machine shop!
My very first experience with drilling and tapping heatsinks, was on my M2x. Despite no prior training, I was successful and everything fit beautifully. I bought an off-off brand "tabletop" drill press ($90) from Amazon, also a small kit of metric tap-and-dies from Amazon.
There are 9 drill-and-tap holes per amp channel. 7 for the PCB attachment points and 2 for the MOSFET bolts. That's not so many! Don't rush yourself, drill in the morning, tap in the afternoon.
For me the keys to success were:
(1) draw out a drilling template on copier paper and tape it securely to the heatsink. Do NOT put a bunch of masking tape on the heatsink and draw upon the tape. It will smear and rub off and distort. Use paper.
(2) USE A CENTER PUNCH! And do the punching in a very well-lit room. When the punched indentation is precisely located, precise drilling is a breeze.
(3) Use cutting fluid when tapping, go slowly even though it's "soft" aluminum, and back out the tap / remove the swarf often. I bought "Tap Magic" cutting fluid from Amazon but there are many others.
My first Pass clone F5, was my baptism with drill and tap. Carefully, I did the drilling with a hand held drill. Used one of those T-handle things and cutting fluid to cut the threads. Like you said, take your time and clean often. As soon as you feel any resistance stop, back out and clean. Very easy to break a tap off.
No biggie, I was all in a wad for nothing. Biggest problem is those darn aluminum curley ques.....
Russellc
It is small and compact which is nice.....and cheap.
I have considered the "cheap" Bosch "DIY version":
PBD 40 Sojleboremaskine | Bosch DIY
It has a laser pointer for precise drilling where the mark is. I have struggled with this when using a drill press. By hand the drill bit will center itself in the punch mark.....if it is deep enough.....
I have considered the "cheap" Bosch "DIY version":
PBD 40 Sojleboremaskine | Bosch DIY
It has a laser pointer for precise drilling where the mark is. I have struggled with this when using a drill press. By hand the drill bit will center itself in the punch mark.....if it is deep enough.....
- Home
- Amplifiers
- Pass Labs
- The diyAudio First Watt M2x