Sorry, I meant 0.2 mV.
About the voltage issue. I was a little scared to pop it in at first because of the voltage limit but figured what the heck because I had it lying around and knew I really liked it from other projects. It has survived over 50 hours so far. I've kept on eye on the case temperature and don't see it getting very hot at all.
About the voltage issue. I was a little scared to pop it in at first because of the voltage limit but figured what the heck because I had it lying around and knew I really liked it from other projects. It has survived over 50 hours so far. I've kept on eye on the case temperature and don't see it getting very hot at all.
I also tried op amp rolling with LM833, MUSES 8920D, AD823 and LME49990.
Listening with 2 headphones: SONY MDR CD900ST and Philips SHP 9500.
Source: iMac with BitPerfect and Schiit Modi 2 Uber DAC.
LM833:
Balanced treble, mid and bass. Bass is punch and assertive. Maybe not sound detail as other op amp but good enough to enjoy the music for me. If you don’t have idea what to use, LM833 definitely worth to try.
MUSES 8920D:
Sounds a little fat and muddy to me. Everything seems bigger and blurry to my ear. I even feel slight echo makes me thought about karaoke. Not my cup of tea.
AD823:
Very detailed sound. Treble is a little bit too sharp to my ear. Bass seems not as punching as LM833. Not a bed choice but I prefer LM833 over AD823.
LME49990:
Sounds balance, detailed and more silent background. Like improved LM833 with more clean and detailed sound quality. My favorite and my final choice op amp for WHAMMY headphone amp.
Attachments
Last edited:
I have a pair of AD8620s in my Arcam 5 CD player @15v.... they have survived for the last 5 years, and sound fabulous.0.2V offset is quite a lot, are you sure that's not a typo?
AD8620 is a great sounding opamp, but just remember that it's only rated for +/-13V supplies
Great observations! Thanks for posting them.
What Mosfet are you using?
I use FQP3N30 / FQP3P20.
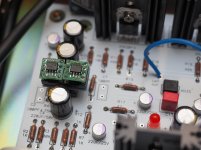
What adapters are you using for the opamps? It’s nice to see they can all fit between the caps.
I bought these adapters online in Taiwan.
The SOIC to DIP8 is less then USD$ 1. The foot print is just slightly bigger than a DIP8 IC.
WHAMMY jr
I've been following the thread for this design with quite a bit of interest. I'm also in the process of building a stepped attenuator for volume control and this seemed to be a fine vehicle to use to test it out. I was also interested in making it a bit smaller. I made the following changes to the design.
Changed the supply voltage for the output MOSFETs to use the unregulated rails. This allows the regulators to be quite a bit smaller and you don't need to heatsink them. The +/- regulated voltage is used on the resistor network driving the gates and for the op amp rails.
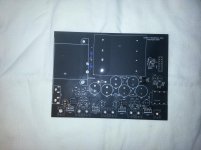
I chose to use surface mount parts where it's reasonable to do so to save space.
All of the input and output connectors are board mounted so there isn't any wiring to do.
The power transformer is a Hammond low profile 229 series unit.
There is an added DC/DC converter circuit to provide 3.3V for the attenuator.
The resulting schematic is attached.
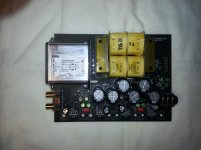
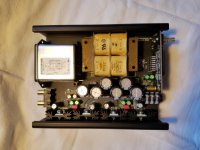
When I first turned the board on I had ground loop noise issues. So I hand modified the board a bit to pick a virtual star ground point at the power supply output and reroute the output ground, the power input module common, and the low level stuff to that point. It quieted things down quite a bit.
Pictures of the board with the surface mount components in place before and after the ground changes are attached.
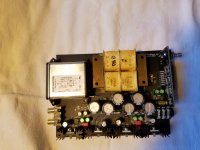
The next picture is of the board with most of the through hole parts loaded.
The last two pictures are of the board fully populated and in the chassis.
The board dimensions are 120mm by 160mm and it fits into the same sized Hammond 1455 series box. That's about half the size of the original WHAMMY.
I did run into an oscillation issue. The first version of the design had some 220pF caps in parallel with the 4.64K feedback resistors. Seemed to be the right thing to do to limit the bandwidth. Both channels oscillated at about 16 MHz, 500mV amplitude. I ran a circuit simulation and discovered some gain peaking well above 1 MHz. The solution turned out to be removal of the 220pF caps. Thanks to Wayne and Jim for suggestions on where to look.
I'm still working on the control firmware for the stepped attenuator so I haven't put a signal through it. It is quiet with no signal input. DC offset is a bit more than 1mV left channel and less than 2mV right channel.
I've been following the thread for this design with quite a bit of interest. I'm also in the process of building a stepped attenuator for volume control and this seemed to be a fine vehicle to use to test it out. I was also interested in making it a bit smaller. I made the following changes to the design.
Changed the supply voltage for the output MOSFETs to use the unregulated rails. This allows the regulators to be quite a bit smaller and you don't need to heatsink them. The +/- regulated voltage is used on the resistor network driving the gates and for the op amp rails.
I chose to use surface mount parts where it's reasonable to do so to save space.
All of the input and output connectors are board mounted so there isn't any wiring to do.
The power transformer is a Hammond low profile 229 series unit.
There is an added DC/DC converter circuit to provide 3.3V for the attenuator.
The resulting schematic is attached.
When I first turned the board on I had ground loop noise issues. So I hand modified the board a bit to pick a virtual star ground point at the power supply output and reroute the output ground, the power input module common, and the low level stuff to that point. It quieted things down quite a bit.
Pictures of the board with the surface mount components in place before and after the ground changes are attached.
The next picture is of the board with most of the through hole parts loaded.
The last two pictures are of the board fully populated and in the chassis.
The board dimensions are 120mm by 160mm and it fits into the same sized Hammond 1455 series box. That's about half the size of the original WHAMMY.
I did run into an oscillation issue. The first version of the design had some 220pF caps in parallel with the 4.64K feedback resistors. Seemed to be the right thing to do to limit the bandwidth. Both channels oscillated at about 16 MHz, 500mV amplitude. I ran a circuit simulation and discovered some gain peaking well above 1 MHz. The solution turned out to be removal of the 220pF caps. Thanks to Wayne and Jim for suggestions on where to look.
I'm still working on the control firmware for the stepped attenuator so I haven't put a signal through it. It is quiet with no signal input. DC offset is a bit more than 1mV left channel and less than 2mV right channel.
Attachments
-
whammyJr SchematicRev1_1.pdf93.9 KB · Views: 173
-
 surface mount populated.jpg662.3 KB · Views: 1,210
 -
 surface mount populated post ground update.jpg822 KB · Views: 1,176
 -
 populated no output transistors.jpg701.7 KB · Views: 1,159
 -
 fully populated post ground modification.jpg690.5 KB · Views: 1,156
 -
 populated in chassis.jpg670.1 KB · Views: 517
I was taking a look at the Burson V6 discreet op amps interestingly there were a few pics of Whammy builds on their page with them installed combined with some nice output caps.
Would love to get a bit of feed back on how the Burson Vivid and Classic compare in the Whammy if any of you guys who have had the opportunity to compare?
4 DIY Whammy headphone amplifiers (diyaudio.com forum) with Burson V6 Opamp – Burson Audio
Would love to get a bit of feed back on how the Burson Vivid and Classic compare in the Whammy if any of you guys who have had the opportunity to compare?
4 DIY Whammy headphone amplifiers (diyaudio.com forum) with Burson V6 Opamp – Burson Audio
It is our group. To register for warranty, one needed to do a review and to upload some photos.
I compared both classic and vivid V6; I personally favoured the classic one, the vocal came out a bit more and classical is more beautifully rendered. The vivid fits more the modern pops and rocks. My friend also felt about the same.
Yes it is worth the high price, equally good or better than Muses03.
For the boutique capacitors, in general speaking, the more you pay for them, the better they sound. one used a pair of white Evo oil (HKD$300/each) and they sounded a bit better than my vintage Sprague oil capacitors with more clarity. Not much surprise.
Then came the HKD$699/each black color gold/silver oil caps. He love them. I listened to them and wow, all frequencies were there with super clarity, super 3D, breath-taking and very engaging; but heavy bass is something I am not too fond of.
The HKD$1,100/each Jensen paper tube copper foil oil caps was his favourite. I haven't had a chance to borrow them yet. My friend said those were the ones he loved the most: bass is just right, everything is simply natural, neutral, and vocal is very very very......realistic and natural; you can listen to the music all day long without worrying about hearing fatigue. He wondered if the paper tube has anything to do with the SQ-no metal, no interference?
I am fine with my little budget vintage sprague oil capacitors. They are warm and bass is good; I guess it is what others say about "old day SQ" vs "modern day SQ" using oil caps-super crisp and clean sound for the modern oil caps.
I hate this forum, too many ideas to kill my time with.
So I ordered an ACA kit and as I see it, I might just need a preamp to go with it. I might just need a preamp anyways
Would one of the more knowledgeable people give me some advice to help me choose between a few interesting preamp options:
1.) Whammy as preamp
2.) BA3 Gain Stage as preamp
3.) I like the design of project 88 from Rod Elliotts website
I intend to use the preamp to be with the ACA and later with an M2 (too many ideas, as I said before). I understand that the ACA as well as the M2 have a "sound" of their own instead of being perfectly linear. I would think that it thus makes sense to use a rather linear pre as not to get to many "sounding" components. Please correct me if I'm wrong with this assumption.
In any case I'd like to have a balance control as well as a selector switch. Can these featured be added to all of the above?
Can't wait to hear your thoughts!
Mixi - there's no real wrong answer to your question. Any of the circuits you mention can be used as a preamp, and adding source selection is easy. If you choose the BA-3 or Whammy you will have enough output swing to drive an F4 or MoFo. If you choose the Whammy, you will also have an incredible headphone amp.
Although I already have more than enough projects lined up, I think I'll have to buy a whammy board. I just love the design with the onboard power supply. What about adding balance control?
Rod Elliott mentions this balance control on his website. Will this work for any amp?
Rod Elliott mentions this balance control on his website. Will this work for any amp?
An externally hosted image should be here but it was not working when we last tested it.
Hi Wayne thank you for making the Whammy available to the diy community its been a fun project. I have been enjoying listening to my Senheiser hd800 very nice indeed.
The enclosure from Aliexpress allows a little extra space in front of the pcb which is perfect for rolling a few different capacitors that will not fit on the board, my pot has been mounted off the pcb because of this and at a spacing to suit the caps I have to experiment with.
Cheers
Jamie

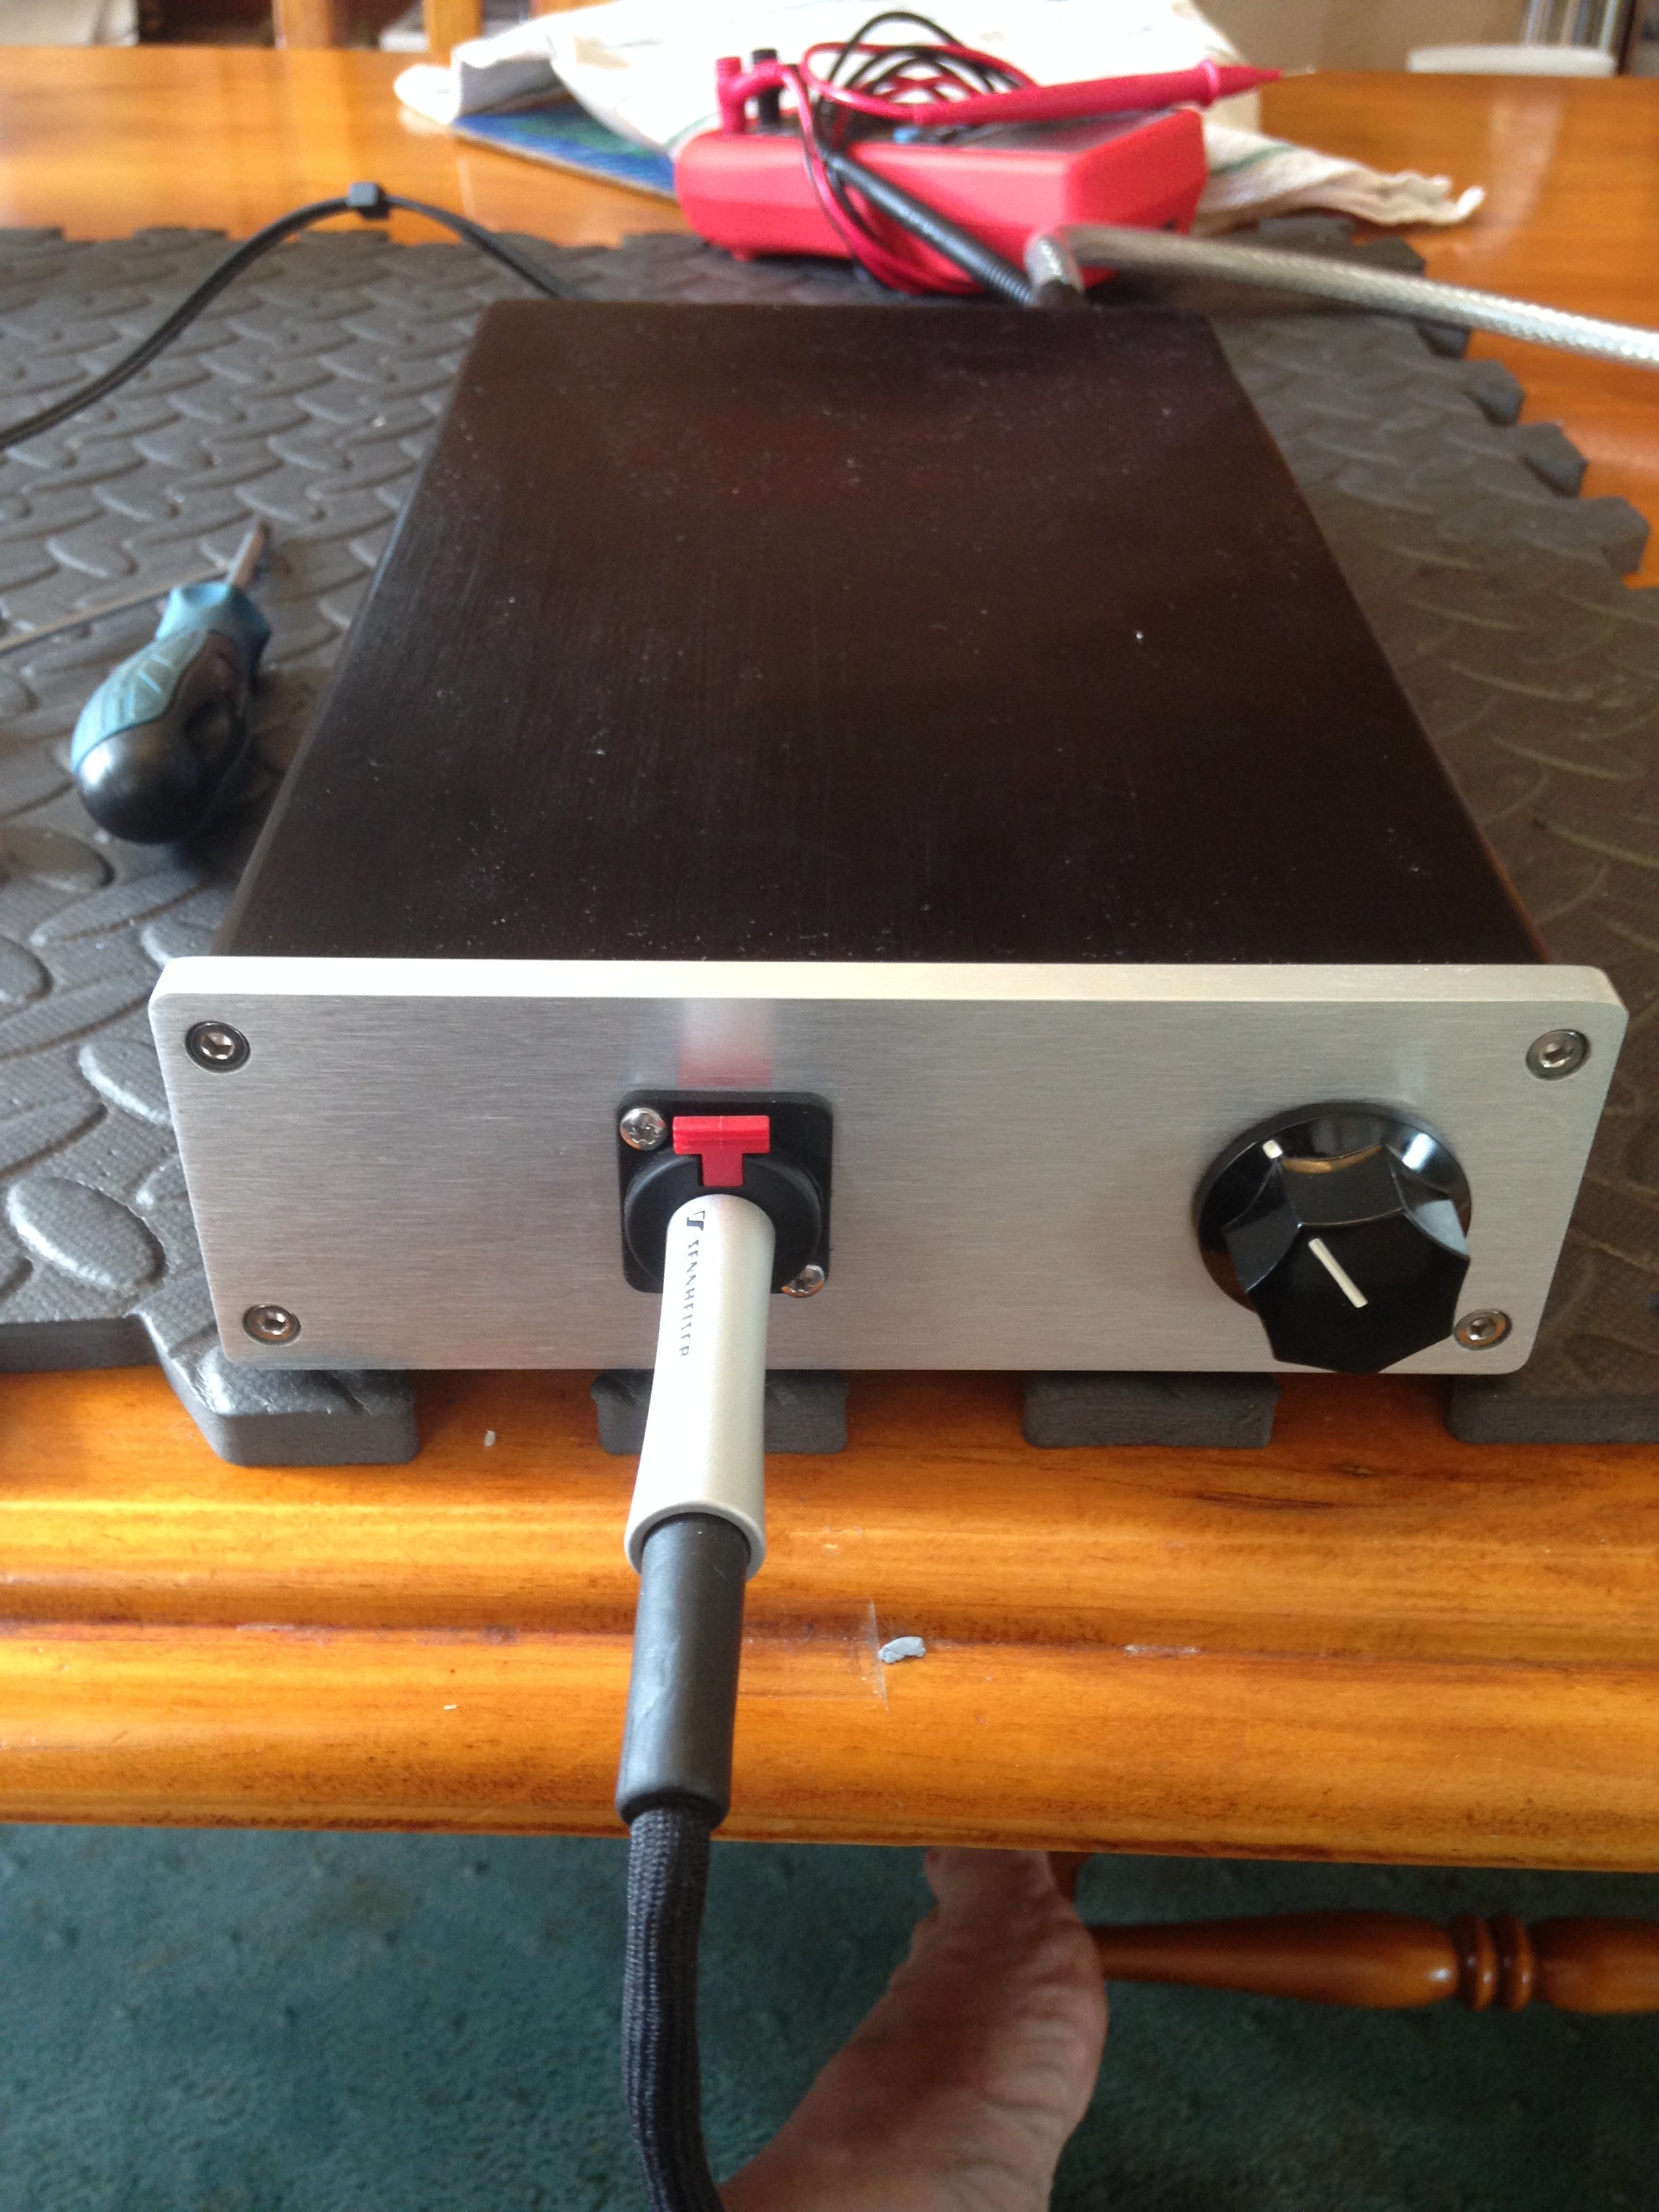
The enclosure from Aliexpress allows a little extra space in front of the pcb which is perfect for rolling a few different capacitors that will not fit on the board, my pot has been mounted off the pcb because of this and at a spacing to suit the caps I have to experiment with.
Cheers
Jamie
Last edited:
- Home
- Amplifiers
- Pass Labs
- "WHAMMY" Pass DIY headphone amp guide