Whammy - which opamp?
Hello Murdoc,
I came back to the BB OPA 2604. In my opinion best all around performance.
Good bass and also in the mids / highs very good.
OPA 2134 also very nice. For me similar as good as the OPA 2604.
LME 49720 not my preferred one
AD817 single opamp / can't be used on the official Whammy-pcb!!!!
less bass than the others above, more mids and highs, sounds very detailed / analytic to me.
AD797 single opamp! not for use in the official WHAMMY!
I also used a LT opamp. But I have to check my partsbox which one it was.
Very important: check the pinouts of the opamps in the datasheets! Different pinout could become a disaster.
And it is many weeks back. Difficult to remember all the differences and to
describe them in words. Sorry!
Greets Dirk
I have built mine with the regs on red leds for + - 16.8 Volts. More voltage doesn't really gain much except heat in the outputs. The regulators don't do much work and then the Op Amp has good PSRR and mostly controls the whole thing.
The amp chip probably has the most effect as people have found. Good to see more successful builds.
The amp chip probably has the most effect as people have found. Good to see more successful builds.
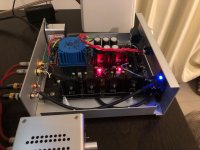
Hello labjr,
I tried different voltages on my WHAMMY-prototyp before the official pcb
came out. I have built a regulated PSU very similar to Waynes design.
I used the 'oldtimers' LM317 / LM337 to make the voltage adjustable. You can
see the blue trimmers on the photo.
My opinion is: it was very difficult for me to hear a difference in the sound
depending on the rail voltage. I tried between +-15 to +- 17.8 volts (depending on the opamp). But i am pretty sure you can measure a difference.
But I could hear a big difference in using different opamps at the inputstage.
Every opamp had its own 'character'.
And I am a friend of high rail voltages.
But that is my experience. Yours can be different.
My opinion is: build the WHAMMY and try it. You will like it.
And try different opamps....
Greetings from Dirk
I'm more curious about lowering the noise floor than using LM117/317 or raising the voltage.
Using 3-pin regulators off-piste: part 1
I'm more curious about lowering the noise floor than using LM117/317 or raising the voltage.
What noise floor? It's not PSU noise, the filtering on the stock circuit is incredibly good.
EDIT: Looks like Wayne already answered that.
")
Here is the stock noise floor generally under one millionth of a volt. I cant even hear the 60 Hz as it was probably from my variac.
Thanks!
AD817 single opamp / can't be used on the official Whammy-pcb!!!!
less bass than the others above, more mids and highs, sounds very detailed / analytic to me.
AD797 single opamp! not for use in the official WHAMMY!
Single op-amps can be used in the WHAMMY with the appropriate adapter. Most DIP or SOIC adapters can easily be purchased from eBay.
Some of the best sounding op-amps are only available as singles.
Being notorious for oscillating, I wouldn't even consider using the AD797 for the WHAMMY or any other HA. It's happier in higher gain, low noise applications.
Even then PCB layout is crucial to getting the most from it.
Question to post #867
Hello Mercedes63,
I did not try the newer OPAMPSs in SOIC. But I ordered some adapter pcbs (SOIC - DIP8).
You wrote, that some of the best OPAMPs are singles.
Do you refer to the OPA627 / 637?
Can you give some advice which OPAMPs you prefer (singles and duals)?
Only one or two. Testing will go on.
Sorry for the late response. Worked the whole weekend.
Best regards
Dirk
I've just ordered the PCB, and all the parts from various sources. Hopefully, it'll arrive before Febuary. First build that isn't just soldering bits on marked locations, so I hope nothing goes wrong.
One question: The BOM seems to indicate two 0.1uF caps for each of the optocouplers. There is another one from RCA jack ground to safety earth. Is it not in the BOM?
One question: The BOM seems to indicate two 0.1uF caps for each of the optocouplers. There is another one from RCA jack ground to safety earth. Is it not in the BOM?
@HatIsMyFriend
Correct. It is not in the BOM.
Thanks! Will salvage an extra from an old project I don't use anymore, then.
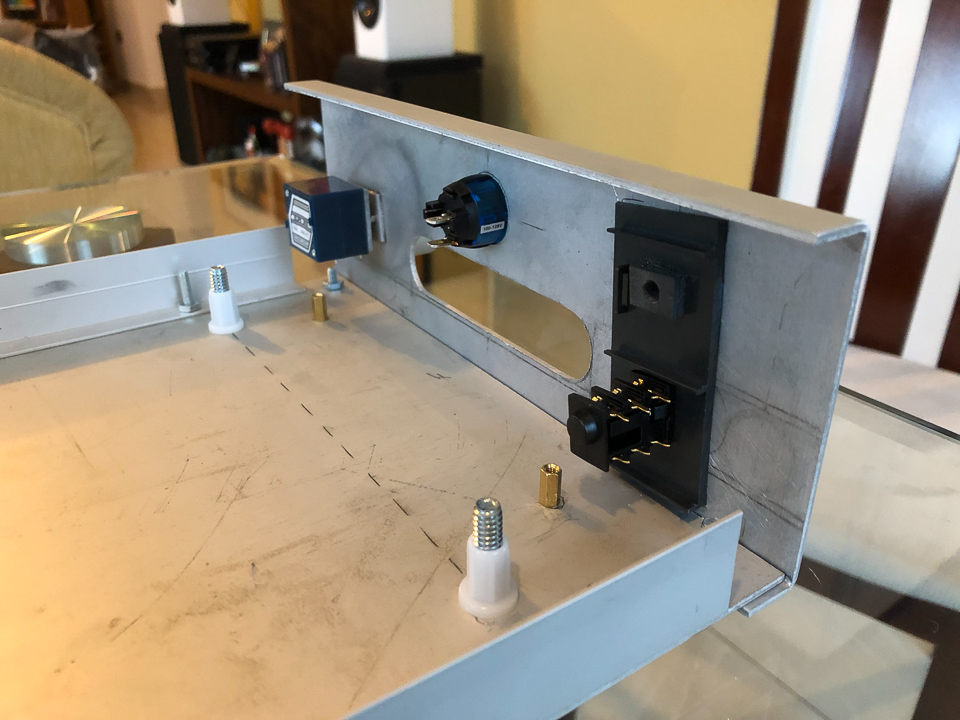
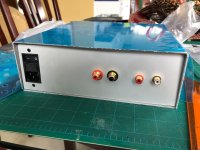
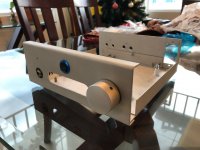
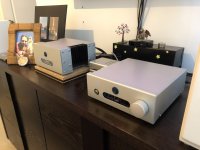
Well, I finally have my WHAMMY 99% finished (final glass window on the front panel still missing, waiting for 2mm glass).
It sounds fantastic both as a Headphone AMP and a PRE for my ACA. Thanks a lot Wayne for a fantastic design, clever layout and beautiful sound.
This was a fun project!!! It was easy to build, the parts Kit from the store is EXCELLENT!. I did replace a few things I had here, but it was a hard choice. Parts from the kit are really all first grade! Thanks DIY Audio Store. Obviously, doing anything without 6L6s guides for guys like me would be impossible, so a big thanks for all the effort you put into making them all really proof and tight so that there is little to guess from.
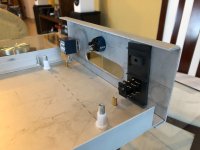
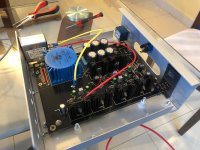
This time everything went a bit smoother, specially because the lack of large external heatsinks made the fabrication of the chassis much simpler! I had also learned a bit, and had found a nice metalshop that can cut and bend aluminum. So this time around the chassis also looks a bit less 'mechanic' and a bit more stylized.
Here are some pictures:


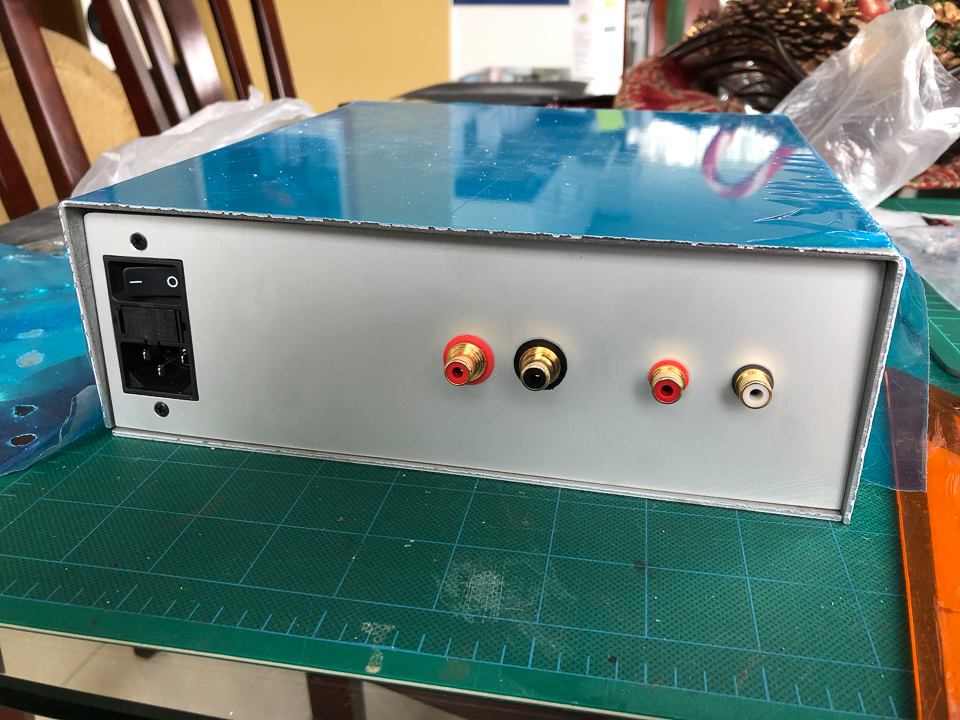


Here are some thoughts and my sounding impressions:
I think that mostly covers the experience. I can't emphasize enough how pleased I am with the sound of this amp. My Sennheisers HD600 which were bought for this very purpose sing beautifully with the WHAMMY.
But my TV setup also sounds great with the WHAMMY serving as a PRE for the ACA. It has replaced the Schiit Magni I had there and I think it sounds much fuller. Still, the DAC is the Schiit Modi 3, so if at one point that gets into a better DAC and can only think that everything will sound better.
I hooked it for testing to my NuPrime DAC-10 and it really was something else!
Thanks again for the great design, all the help, and this great community where we can come and share this achievements when not a lot of people care much about getting into that much detail!
Best regards,
Rafa.
It sounds fantastic both as a Headphone AMP and a PRE for my ACA. Thanks a lot Wayne for a fantastic design, clever layout and beautiful sound.
This was a fun project!!! It was easy to build, the parts Kit from the store is EXCELLENT!. I did replace a few things I had here, but it was a hard choice. Parts from the kit are really all first grade! Thanks DIY Audio Store. Obviously, doing anything without 6L6s guides for guys like me would be impossible, so a big thanks for all the effort you put into making them all really proof and tight so that there is little to guess from.
This time everything went a bit smoother, specially because the lack of large external heatsinks made the fabrication of the chassis much simpler! I had also learned a bit, and had found a nice metalshop that can cut and bend aluminum. So this time around the chassis also looks a bit less 'mechanic' and a bit more stylized.
Here are some pictures:
Here are some thoughts and my sounding impressions:
- Making this into a PRE with RCA output was really a no-brainer... I'm really happy with the small mod which makes for a much more versatile item in my setup. I regretfully missed Wayne's post about the 20 ~ 100 Ohm series resistors with the RCAs... I'll eventually get to putting them in, but given all the care I went into having all great components in the audio signal to put the worst possible resistor available to mankind (only thing I can source locally) in the final point where all the music goes through, I'm not really happy. So I'll wait till I get some really good resistors for that.
- I tried some different OpAmps: An Analog Devices AD823ANZ which is the most expensive part of my BOM and I didn't quite like how 'raspy' it is. I tried a Ti LM833 which, at 1/10th of the cost sounds much better. Then I placed a Ti OPA2134PA which sounds just fantastic! The best of the three. Stupidly, I have not yet tried the RC4580 which came with the parts KIT and is specifically listed as best for 'headphone amplifiers'. So I'll probably take some time today to try that.
- When soldering the headphone jack's legs, I applied a bit too much heat and the plastic bent a bit, screwing up the switching system... I only realized that when heaphones sounded great, but rear RCAs only had one channel working. That became a bit of a headache, but I think I managed to slighted push, bend an reset things to make a good on/off switching on the tip element that got bent.
- I first tried to solder the input RCAs ground, the CAP and the chassis earth all in the same 'go' to avoid star connector on top of star connectors for chassis ground, but that was a disaster and I burnt myself with the soldering iron trying to keep everything in place. I ended up doing individual connections. I guess someone with more experience will have no issue, for me it was just a bit over my skill level to do it all in one flight.
- My chassis required the pot to be installed off the PCB, so I had to solder small wires from the PCB to the Pot. Again, not the best solution and they broke easily, got some cold solderings I had to redo. Not my best work either.
- I thought it was against my logic to have the input RCAs ground capped to chassis ground to filter high frequencies and prevent all sorts of issues, yet to have the headphone jack's ground (and the PCBs ground with it) directly coupled to the chassis. Either I really don't get something, it really is not that important, or it was something that could affect the outcome... so I isolated the jack from the chassis. Now, every part of the PCB audio ground has a 0.1uf cap to chassis earth, so I'm happy with that.
- The Pot and the knob had a 3mm gap between my front plate and the back of the knob. Apparently, everything is better suited for a 4mm and thicker front element. Mine had 2mm... so I ended up making a second plate in that area doubling the front element's width. That yielded a precise a very stylish 1mm gap which I'm much more happy with.
I think that mostly covers the experience. I can't emphasize enough how pleased I am with the sound of this amp. My Sennheisers HD600 which were bought for this very purpose sing beautifully with the WHAMMY.
But my TV setup also sounds great with the WHAMMY serving as a PRE for the ACA. It has replaced the Schiit Magni I had there and I think it sounds much fuller. Still, the DAC is the Schiit Modi 3, so if at one point that gets into a better DAC and can only think that everything will sound better.
I hooked it for testing to my NuPrime DAC-10 and it really was something else!
Thanks again for the great design, all the help, and this great community where we can come and share this achievements when not a lot of people care much about getting into that much detail!
Best regards,
Rafa.
Attachments
Hello Whammy Experts, I completed building my Whammy and it’s working good and now I want to try a different OP Amp, thanks to 6L6 for the detailed instructions. The power supply was configured with LED per 6L6 instructions it was option 2 so the question I have is to lower the rail voltage to +15 and -15 Volts do I simply short R9 and R13 and leave D5 and D6 in the circuit or do I need to remove D5 and D6 and short R9 and R13?
Thanks!!
Thanks!!
- Home
- Amplifiers
- Pass Labs
- "WHAMMY" Pass DIY headphone amp guide