Hi bajjisw, how was your WHAMMY configured with Burson V6 Classic. I asked because I was trying the Burson V6 classic in my Whammy and it did no work. After I installed the V6 Classic and turned it on all I heard was static. So I turned it off then installed back the Muses 02 and now the when I have both left and right channel plug in at the input the sound does not sound correct. When I unplug one of the channel it works. Can you please tell me what did I miss?
Thanks for your help
Thanks for your help
Hi bajjisw, how was your WHAMMY configured with Burson V6 Classic. I asked because I was trying the Burson V6 classic in my Whammy and it did no work. After I installed the V6 Classic and turned it on all I heard was static. So I turned it off then installed back the Muses 02 and now the when I have both left and right channel plug in at the input the sound does not sound correct. When I unplug one of the channel it works. Can you please tell me what did I miss?
Thanks for your help
My version has straight 15V regulators. No LEDs or voltage dividers. I have the input capacitors C1 and C5. I also skipped C2 and C7. Others as specified.
Both V6 classic and vivid worked without other changes in this configuration. One thing I double checked at first is the opamp orientation. Pin 1 is on the side with the little notch down the side.
When was the last time your whammy was ok? What is your configuration? Was Muses 02 your original ? What is your source ? Does the music sound the same with only left or only right input?
I dont know what to suggest other than conventional debug with good pictures. Check common issues like insecure connections and grounding for both channels.
@2 picoDumbs thanks it looks and felt it was in there although when I inserted the Burson it was a tight fit I have to move both of the caps. I might have broken the Cap connection. I will take it apart and check the solder connection.
@bajjisw—
When was the last time your whammy was ok? ---It was working up until I tried to V6. I’ve been using it for a year now.
What is your configuration? – No resistor on R9 and R13
Was Muses 02 your original ? – No it was not I bought the kit at the DIY store and used the stuck OP amp then upgrade it to Muses 2
What is your source ? – For testing I used my IPod
Does the music sound the same with only left or only right input?--Yes
See pictures it looks correct
Attachments

@2 picoDumbs thanks it looks and felt it was in there although when I inserted the Burson it was a tight fit I have to move both of the caps. I might have broken the Cap connection. I will take it apart and check the solder connection.
@bajjisw—
When was the last time your whammy was ok? ---It was working up until I tried to V6. I’ve been using it for a year now.
What is your configuration? – No resistor on R9 and R13
Was Muses 02 your original ? – No it was not I bought the kit at the DIY store and used the stuck OP amp then upgrade it to Muses 2
What is your source ? – For testing I used my IPod
Does the music sound the same with only left or only right input?--Yes
See pictures it looks correct
Thanks for the pictures and the responses. Yes , check the caps next to the opamp socket. If that's good,
Check the voltage at the opamp without source and then with L only, R only and both connected. Pins 4 and 8 wrt ground.
Burson OpAmps
Burson was kind enough to provide me with their Classic and Vivid OpAmps. I have never tried rolling OpAmps in the WHAMMY prior, but having seen a number of posts, I was curious. I’ll attempt to keep things brief, but since I am describing a preference vs. any measurements, I feel like I should at least try to provide something of use to the community and to Burson.
Summary
I like the Classic > Vivid > TI RC4580 (from the kit).
Why?
I felt that I got “more detail” using both Burson Op Amps than the TI part. I felt like the bass extension (I have no idea why) in the Vivid was best, but the smoother character from the Classic won out for a permanently installed device.
What did I use to make the conclusion, and is my conclusion worth bothering to read?
I used a standard built WHAMMY kit with the LED reference. I’ve enjoyed it quite a bit even with the TI Op Amp in the kit. I was fortunate to have a couple friends build them identically to mine from kits also, so I had a reference back to the ‘original’, if needed or to use instead of mine. They were smart enough to install the socket on theirs, I had to desolder my OpAmp, install a socket, and get another TI Op Amp b/c I destroyed the first one during removal (intentionally to reduce risk of damaging the board). Volume matching was done by ear.
I used Sennheiser HD820 and Mezze Classic HPs.
I used a variety of music over the course of a few weeks with a bit of back to back comparison one day, but mostly it was swapping in a part and giving it a listen over at least a few days. Listening “sessions” were between a few minutes (when trying to more closely and directly compare OpAmps) and hours to just see what I enjoyed over time. My sources and chain are likely irrelevant, so no need to bother. No listening was blind, sorry.
Conclusion - Do I think it’s ‘worth it’? Would I buy one or both?
Ultimately, yes. One caveat. OpAmp rolling is not my passion. I tried tube rolling with little to no success re: value for total amount spent. The caveat is that if I (or you with similar values) could have a line of parts available to choose from and return all the ones you don’t want/like at little to no cost, then I think it’s worth it. The value from the current retail price of the Burson OpAmp is worth it to me. If someone had a booth at a show where I could listen to different OpAmps in my own device or provided them for free on trial to pick one to buy, sure. Would I purchase (myself) a number of OpAmps and go to the time and expense of trying to pick the ‘best’ when some can cost quite a bit of money (relatively speaking), definitely no. So it doesn't go to waste, one of my buddies will be taking the Vivid. We can always swap back and forth, but I doubt we will.
Thanks go to Burson for offering me an opportunity to try out their OpAmps. I am thrilled with having taken the time to see if I could hear a difference reliably and make a choice, even if it’s just for fun.
As always, YMMV.
Last edited:
Burson Classic
I agree with your findings and will not be looking for anything other than the Classic to use in my Whammy.
Although the Whammy design already has pretty good power supply caps right at the opamp location, you may want to check out the Burson MKP cap modification, which is a polyester 0.1 cap across the + and - supply rails:
Burson Supreme Sound (SS) Opamp 101 Part 1 (MKP cap tweak) – Burson Audio
Here is how I did it the easy way in post #2911:
"WHAMMY" Pass DIY headphone amp guide
If you have friends on a limited budget that want to get very close to the sound of the Burson Classic, another very large step up from the RC4580 is the OPA1612, which I prefer to the sound of the Vivid. It's what I had settled on before trying the Classic.
Unfortunately, this excellent opamp is only available in a surface mount device package, so an SOIC-8 to DIP-8 adapter board and some fine soldering skills are required. Here is how I did it in post #2009:
"WHAMMY" Pass DIY headphone amp guide
Can the Whammy be built with an O Core transformer and can it be made DC powered? Would an O Core Transformer have any affect on sound quality?
Don't worry about this type of thing.
The actual transformer specs are going to make the biggest difference.
Regarding getting op-amps to fit, in my latest Whammy build I used Nichicon FG caps throughout (with a couple of Silmics at the 22uF spots). This makes the fit around the DIP very tight. So I've stacked up five (!) DIP sockets, which brings their height to just below the caps, making it easy to insert other op-amps. Of course, I've had to build the chassis extra-tall....
Pix later.
Pix later.
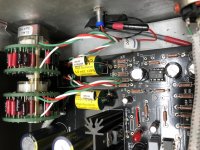
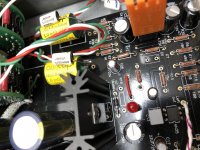
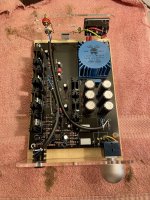
A few folks have asked me how to managed to squeeze the Burson dual OpAmps (either Vivid or Classic) or the SparkOS dual-discrete, so I wanted to post a picture showing folks clearly how I got it to fit. Basically you have to leave the leads of C2 and C3 a little longer and shift them over. It also helps if you use a DIP8 "riser" on which to mount the opamp as the extra height is advantageous too.
Happy Whammying!
--Tom
Happy Whammying!
--Tom
Attachments
Hi Everyone,
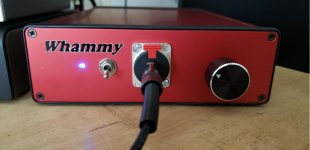
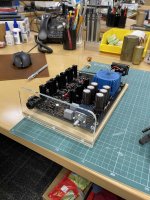
I got my Whammy PCB fired up tonight on a temporary acrylic/plywood test enclosure.
All is well except I noticed some pretty serious buzzing, which gets louder with increased volume pot position.
The volume pot is particularly sensitive to touch and picks up a lot of noise.
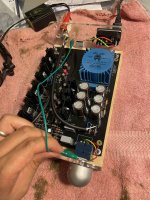
As an experiment I used a clip lead to ground the body of the pot (see last picture), this seems to fix the issue and it is fairly quiet, only with a slight buzz with the volume turned right up.
Is it normal to have to ground the pot, am I missing something? Should this amp be quieter than what I am seeing?
I have planned to build a wooden chassis where the pot will be mounted directly in the wood, I may have to devise a plan to allow for it to be grounded.
Any help would be greatly appreciated!
Cheers,
Jeremy
EDIT: I just did some digging through the thread and it looks like this is a fairly normal issue. I’m an amateur so this is a good learning experience!
I guess I will need to sort out a grounding tab for my pot.
I got my Whammy PCB fired up tonight on a temporary acrylic/plywood test enclosure.
All is well except I noticed some pretty serious buzzing, which gets louder with increased volume pot position.
The volume pot is particularly sensitive to touch and picks up a lot of noise.
As an experiment I used a clip lead to ground the body of the pot (see last picture), this seems to fix the issue and it is fairly quiet, only with a slight buzz with the volume turned right up.
Is it normal to have to ground the pot, am I missing something? Should this amp be quieter than what I am seeing?
I have planned to build a wooden chassis where the pot will be mounted directly in the wood, I may have to devise a plan to allow for it to be grounded.
Any help would be greatly appreciated!
Cheers,
Jeremy
EDIT: I just did some digging through the thread and it looks like this is a fairly normal issue. I’m an amateur so this is a good learning experience!
I guess I will need to sort out a grounding tab for my pot.
Attachments
Last edited:
Hi Everyone,
I got my Whammy PCB fired up tonight on a temporary acrylic/plywood test enclosure.
All is well except I noticed some pretty serious buzzing, which gets louder with increased volume pot position.
The volume pot is particularly sensitive to touch and picks up a lot of noise.
As an experiment I used a clip lead to ground the body of the pot (see last picture), this seems to fix the issue and it is fairly quiet, only with a slight buzz with the volume turned right up.
Is it normal to have to ground the pot, am I missing something? Should this amp be quieter than what I am seeing?
I have planned to build a wooden chassis where the pot will be mounted directly in the wood, I may have to devise a plan to allow for it to be grounded.
Any help would be greatly appreciated!
Cheers,
Jeremy
EDIT: I just did some digging through the thread and it looks like this is a fairly normal issue. I’m an amateur so this is a good learning experience!
I guess I will need to sort out a grounding tab for my pot.
This is pretty common and has happen to me when I built my first Whammy; the pot's outer shell still isn't grounded properly and/or you could also have the RCAs at a different ground potential too. Check that the negative side is connected to the same return point that the pot is. The fact that you said it goes away by taking a test lead/clip and connecting it to your board's return point, as well as that you hear the noise go away when you touch the pot itself (thereby grounding it) proves that the shell isn't returning right. In my case, while I had the pot mounted into the face plate with solid contact, the face plate wasn't actually contacting the sides because the anodizing on all sides of the case panels prevented that. This is why one of my first steps when building anything now is to sand off the anodizing on the mating surfaces of the chassis and then use my DVM to prove I have solid continuity.
With that said, IMHO the most straight-forward solution to your problem is to put your project into a chassis.
")
I agree with your findings and will not be looking for anything other than the Classic to use in my Whammy.
Although the Whammy design already has pretty good power supply caps right at the opamp location, you may want to check out the Burson MKP cap modification, which is a polyester 0.1 cap across the + and - supply rails:
Burson Supreme Sound (SS) Opamp 101 Part 1 (MKP cap tweak) – Burson Audio
Here is how I did it the easy way in post #2911:
"WHAMMY" Pass DIY headphone amp guide
If you have friends on a limited budget that want to get very close to the sound of the Burson Classic, another very large step up from the RC4580 is the OPA1612, which I prefer to the sound of the Vivid. It's what I had settled on before trying the Classic.
Unfortunately, this excellent opamp is only available in a surface mount device package, so an SOIC-8 to DIP-8 adapter board and some fine soldering skills are required. Here is how I did it in post #2009:
"WHAMMY" Pass DIY headphone amp guide
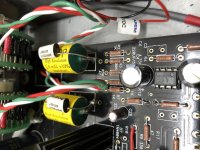
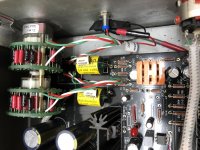
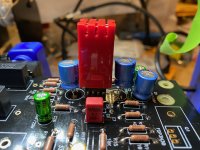
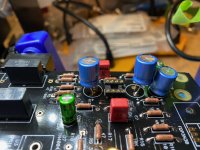
I wanted to confirm the need for the bypass cap mod for the Bursons. I started using the Classic in my second Whammy about a month back (when I was doing a review). Unit sounded fantastic, and I was using it all day long for conf calls. However, about 2 weeks ago I started noticing a faint whining sound at the upper register of my hearing. When I read this post yesterday it got me thinking: what if what I am experiencing is what the Burson data sheet recommends, "After installing the SS Opamp please allow for at least 100 hours or burn in time before carrying out the following steps." I was roughly at about 100 hours of use and viola, the noise appeared! I have no idea why it takes this long for this to manifest itself, so I am hoping someone else can shed some more technical light on this.
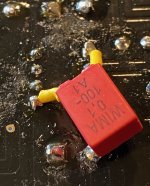
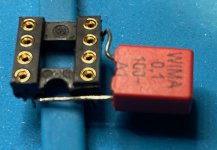
To prove this out, yesterday I built myself a DIP8 adaptor with a .1uf@100V Wima (see pictures). I did some A-B testing with the Burson Vivid I am reviewing now, as well as the Classic that I'd been using. The noise is gone. I tried the SparkOS dual and noticed nothing detrimental, although the SparkOS in my first one that also gets roughly daily use over the past 9 months or so has never exhibited this noise.
And what is interesting is that I noticed the very top end become clearer and was less fatiguing after listening for 30 minutes. I wonder if this is what some have described as "listening fatigue" when listening to the Vivid?
In any event, I am building a third Whammy now and have just soldered the bypass cap right to the underside of the bound-mounted DIP8 this time (see picture). As you can see on the board-mounted version I took the time to add heatshrink tube to the leads to prevent shorts, as the V+ (pin 8) gets precariously close to pin 8. This is also why I added some clear silicone sealant to the DIP8 version as the lead the winds around the base can easily be accidentally shorted and no one wants to let the smoke out.
--Tom
Attachments
- Home
- Amplifiers
- Pass Labs
- "WHAMMY" Pass DIY headphone amp guide