Well it's been a little over 7 months since I started listening to these amps. Other than adjusting the bias I have not made any other changes or adjustments. While I have been playing these amps I have finished my SP10 turntable build, introduced a McIntosh C2300 preamp, upgraded all cables, including power cords, to Transparent Ultra or Super, and upgraded to a Koetsu Urushi cart. During this time I can hear improvements at each step, and I think some of the improvement are the amps breaking in. In my last couple of posts I detailed some of the new chassis "dress up" I have been working on.
So besides the amp dress I have made a list of some items to change out/modify.
Larger fan (lower speed, less noise I hope)
Change signal path wire to Neotech LE-20AWG
Remove power switch and add 5VDC relay to allow Pre to power up
Change binding posts to Cardas billet copper posts, rhodium over silver plate
Change RCA input jacks to Furutech RCA rhodium-plated copper conductor
Add power on LED to front panel
Clean up control wiring
I'm hoping to improve the overall sound, make more user friendly, and beautiful!
Now that my SST-70 amps are basically done and playing I have pulled out the F5's and started work. I have test fit the amps into the new case covers and already mounted all the jacks, IEC input and installed the new Noctua 140mm fans. I will be changing the signal wiring even between the F5 boards. This will require extra time to disassemble but I used stranded wire here and I understand that is a no no. The larger fan should allow me to increase the bias and at the same time reduce and hopefully eliminate fan noise.
The SST-70 amps I just completed have some better sound qualities than these F5's. The sound stage is the most obvious difference shortfall.
All the jacks and internal wiring will be exactly the same on both pairs of amps to eliminate that variable.
If anyone has any suggestions let me know.
Thanks in advance.
I've completed my appearance dress-up and input/output connector and wire upgrade. After listening for about 4 hours I can hear an improvement! As I upgraded some of the caps in my preamp while these were on the bench I could be hearing some of that also.
In comparing to my KT-150 fitted SST-70 monoblocks the F5 sounds more powerful and in listening to various music in digital and analog the overall presentation is more consistent. On good recordings I think the SST-70 has an advantage. On the F5 I feel like I'm missing a little of the detail the SST-70 brings, but then poorer recordings don't stand out as being so poor.
I need to close up some gaps between the aluminum chassis and the exterior to keep the airflow better directed to the heat sinks. As a first step to control temps. At 350 mV the heat sink temp at the diodes is at 55c. I have the fan running at the minimal speed of of 850rpms, absolutely no sound at this speed, even 6" away. If closing up some gaps doesn't work I'll need to change the resistor to the fan to allow more speed.
Other than looking nicer in my living room the best improvement is adding the power on/off control via my pre. So nice to have everything come on at once with a touch of the "on" button of the pre's remote!
Next up, to take on adjusting P3.
Anyway, here are some pics;
The sandblasted glass top is removable for access
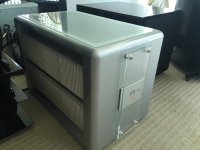
Interior
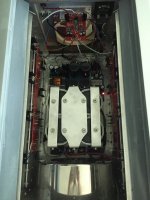
Shot into mirror
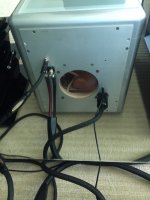
Still need to paint the nylon standoff's and washers silver
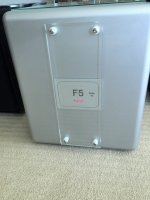
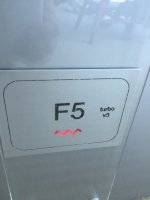
The engraving on the logo plate is filled with a black fingernail polish with gold flakes to match the finish on my Koetsu Urushi Black cart.
Sent from my iPad using Tapatalk
In comparing to my KT-150 fitted SST-70 monoblocks the F5 sounds more powerful and in listening to various music in digital and analog the overall presentation is more consistent. On good recordings I think the SST-70 has an advantage. On the F5 I feel like I'm missing a little of the detail the SST-70 brings, but then poorer recordings don't stand out as being so poor.
I need to close up some gaps between the aluminum chassis and the exterior to keep the airflow better directed to the heat sinks. As a first step to control temps. At 350 mV the heat sink temp at the diodes is at 55c. I have the fan running at the minimal speed of of 850rpms, absolutely no sound at this speed, even 6" away. If closing up some gaps doesn't work I'll need to change the resistor to the fan to allow more speed.
Other than looking nicer in my living room the best improvement is adding the power on/off control via my pre. So nice to have everything come on at once with a touch of the "on" button of the pre's remote!
Next up, to take on adjusting P3.
Anyway, here are some pics;
The sandblasted glass top is removable for access

Interior

Shot into mirror

Still need to paint the nylon standoff's and washers silver

The engraving on the logo plate is filled with a black fingernail polish with gold flakes to match the finish on my Koetsu Urushi Black cart.

Sent from my iPad using Tapatalk
Last edited:
I've completed my appearance dress-up and input/output connector and wire upgrade. After listening for about 4 hours I can hear an improvement! As I upgraded some of the caps in my preamp while these were on the bench I could be hearing some of that also.
In comparing to my KT-150 fitted SST-70 monoblocks the F5 sounds more powerful and in listening to various music in digital and analog the overall presentation is more consistent. On good recordings I think the SST-70 has an advantage. On the F5 I feel like I'm missing a little of the detail the SST-70 brings, but then poorer recordings don't stand out as being so poor.
I need to close up some gaps between the aluminum chassis and the exterior to keep the airflow better directed to the heat sinks. As a first step to control temps. At 350 mV the heat sink temp at the diodes is at 55c. I have the fan running at the minimal speed of of 850rpms, absolutely no sound at this speed, even 6" away. If closing up some gaps doesn't work I'll need to change the resistor to the fan to allow more speed.
Other than looking nicer in my living room the best improvement is adding the power on/off control via my pre. So nice to have everything come on at once with a touch of the "on" button of the pre's remote!
Next up, to take on adjusting P3.
Anyway, here are some pics;
The sandblasted glass top is removable for access
View attachment 497750
Interior
View attachment 497751
Shot into mirror
View attachment 497752
Still need to paint the nylon standoff's and washers silver
View attachment 497753
The engraving on the logo plate is filled with a black fingernail polish with gold flakes to match the finish on my Koetsu Urushi Black cart.
View attachment 497754
Sent from my iPad using Tapatalk
Very nice looking amps. I have not built the Turbo F-5, But several have mentioned adding an additional healthy dose of power supply capacitance really woke their T F-5 amps up. You might inquire along those lines and see if any of those builders come forward. Or you could scan the thread and find it I'm sure. Some of it wasnt that long ago.
Russellc
Thanks for the compliment and commenting.
Unless you read this whole thread I would assume that you can't see in the latest pics, but I have 4ea 82,000uF Rifa caps and 8ea 15,000uF Mundorf caps per monoblock. That's almost a million uF per channel. This following a 1.5k custom Toridy transformer per monoblock.
You think I need more😟
Thanks for the compliment and commenting.
Unless you read this whole thread I would assume that you can't see in the latest pics, but I have 4ea 82,000uF Rifa caps and 8ea 15,000uF Mundorf caps per monoblock. That's almost a million uF per channel. This following a 1.5k custom Toridy transformer per monoblock.
You think I need more��
Likely not!
Russellc
2nd Life
I had every intention of rebuilding this pair of amps and include in my console project. But wanting to try something new I built the Babelfish J for the console. That project is going well, sounding great, and breaking in now. Testing later this week.
For the past couple of years I have enjoyed listening to these F5’s, but was never happy with the chassis.
Then when I built the pair of speakers for the Audio Nirvana drivers I got the bright idea to build matching cabinets to house the F5’s. This time a normal sized build.
Here is a pic of the cabinets, they are one layer of Medex on the outside, and shop MDF with black liner for the inside. Laminated together, and after much prep, shot with two coats of single stage Nason automotive paint.
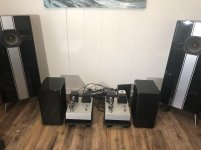
All the replacement parts are in hand, new power supply boards (each rail gets a pair of 33,000uF and a pair of Mundorf 22,000 caps), transformer (Anteck 800va, 25v), soft start, and my usual rhodium over copper binding posts and IEC input. I’m going to try CLC this time, 3.300 14 gauge. Took a bit of time fabricating the aluminum bits, drilling tapping. Then stripping all the old wiring off the boards. Now everything is ready for assembly and final wiring.
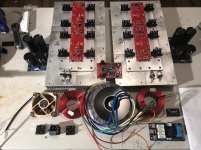
I’m using 1” aluminum angle to picture frame each side opening to attach the heatsinks two. One side is bolted on, the other side is set up to slide up and out for access. Total heatsink size is just a smidge larger than the store chassis, but since I take a hit on being vertical I’m also installing a fan. Half speed is virtually silent and should be enough.
It’s a little tight inside, going to have to strategically plan wiring and bolting in all the parts.
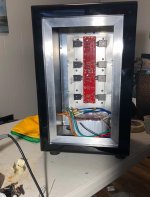
Side shot
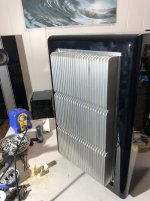
Completed outside. I have matching, scaled, racing strips to match the speaker cabinets, waiting till done to decide if I like with or without.
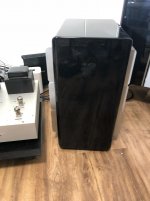
I had every intention of rebuilding this pair of amps and include in my console project. But wanting to try something new I built the Babelfish J for the console. That project is going well, sounding great, and breaking in now. Testing later this week.
For the past couple of years I have enjoyed listening to these F5’s, but was never happy with the chassis.
Then when I built the pair of speakers for the Audio Nirvana drivers I got the bright idea to build matching cabinets to house the F5’s. This time a normal sized build.
Here is a pic of the cabinets, they are one layer of Medex on the outside, and shop MDF with black liner for the inside. Laminated together, and after much prep, shot with two coats of single stage Nason automotive paint.

All the replacement parts are in hand, new power supply boards (each rail gets a pair of 33,000uF and a pair of Mundorf 22,000 caps), transformer (Anteck 800va, 25v), soft start, and my usual rhodium over copper binding posts and IEC input. I’m going to try CLC this time, 3.300 14 gauge. Took a bit of time fabricating the aluminum bits, drilling tapping. Then stripping all the old wiring off the boards. Now everything is ready for assembly and final wiring.

I’m using 1” aluminum angle to picture frame each side opening to attach the heatsinks two. One side is bolted on, the other side is set up to slide up and out for access. Total heatsink size is just a smidge larger than the store chassis, but since I take a hit on being vertical I’m also installing a fan. Half speed is virtually silent and should be enough.
It’s a little tight inside, going to have to strategically plan wiring and bolting in all the parts.

Side shot

Completed outside. I have matching, scaled, racing strips to match the speaker cabinets, waiting till done to decide if I like with or without.

Some other projects taking most of my spare time, but here and there continuing the work on the “new” F5’s.
I’m determined this time to spend time learning how, and to what affect, adjusting P3. So for fun I’ve mounted the FE board to the outside for easy adjustment. I’ll work out an easily removed protective cover.
I’m tying out a little simpler way to power the amp off/on with a source supplied 5-12v trigger. Looks to be working on my first couple tests.
As mentioned earlier, this time I’m trying out CLC and a “stock” power supply. The transformers are Antek and since their rating is sometimes greater than the results, I ordered 25v instead of 24v. Without any connections the transformer put out 25.5v. Unloaded power to the FE board is 34.5v.
Anyone see any issues so far?
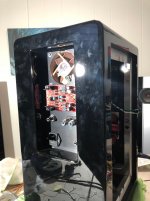
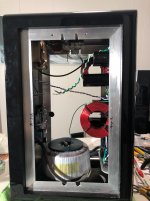
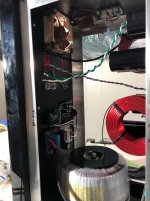
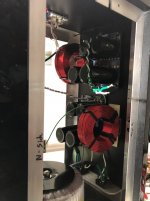
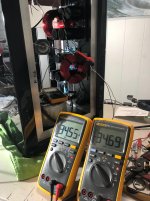


First Channel Running
Yesterday morning I completed the first mono block.
I had already checked the power supply to the FE board along with the pre-amp based trigger on/off system.
As per protocol I had zero’d out TP1 & 2 and centered TP3. Power up was pretty straight forward, doing the dance between TP1 and TP2 watching the meter on the binding posts.
Decided to run up close to 0.350v. Halfway between FAB and Fraidy Cat!
I used 2 short set’s of clippy leads connected to the output boards test point, one set for each N and P boards, dropped through the bottom vent holes, for testing. Really easy to adjust from the back panel without having to open anything up.
Voltage at the FE board, at operating temp, is 30.5 vdc. Seems like a little bigger drop than I had expected?
My little work room has no AC, outside temp is 27 degrees Celsius, inside temp is 28 degrees Celsius and the heatsink, measured at the base of the fins at the hottest point, measures 58 degrees Celsius.
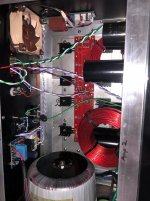
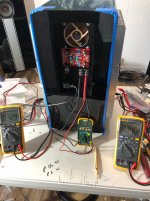
Sounds good so far, no unwanted noises!
Comments welcome!
Yesterday morning I completed the first mono block.
I had already checked the power supply to the FE board along with the pre-amp based trigger on/off system.
As per protocol I had zero’d out TP1 & 2 and centered TP3. Power up was pretty straight forward, doing the dance between TP1 and TP2 watching the meter on the binding posts.
Decided to run up close to 0.350v. Halfway between FAB and Fraidy Cat!
I used 2 short set’s of clippy leads connected to the output boards test point, one set for each N and P boards, dropped through the bottom vent holes, for testing. Really easy to adjust from the back panel without having to open anything up.
Voltage at the FE board, at operating temp, is 30.5 vdc. Seems like a little bigger drop than I had expected?
My little work room has no AC, outside temp is 27 degrees Celsius, inside temp is 28 degrees Celsius and the heatsink, measured at the base of the fins at the hottest point, measures 58 degrees Celsius.


Sounds good so far, no unwanted noises!
Comments welcome!
I've completed my appearance dress-up and input/output connector and wire upgrade. After listening for about 4 hours I can hear an improvement! As I upgraded some of the caps in my preamp while these were on the bench I could be hearing some of that also.
In comparing to my KT-150 fitted SST-70 monoblocks the F5 sounds more powerful and in listening to various music in digital and analog the overall presentation is more consistent. On good recordings I think the SST-70 has an advantage. On the F5 I feel like I'm missing a little of the detail the SST-70 brings, but then poorer recordings don't stand out as being so poor.
I need to close up some gaps between the aluminum chassis and the exterior to keep the airflow better directed to the heat sinks. As a first step to control temps. At 350 mV the heat sink temp at the diodes is at 55c. I have the fan running at the minimal speed of of 850rpms, absolutely no sound at this speed, even 6" away. If closing up some gaps doesn't work I'll need to change the resistor to the fan to allow more speed.
Other than looking nicer in my living room the best improvement is adding the power on/off control via my pre. So nice to have everything come on at once with a touch of the "on" button of the pre's remote!
Next up, to take on adjusting P3.
I hate to say it and I can't back it up, so please don't flame me on this one.
Are you using relatively generic resistors?
My first build I experienced less detail until I swapped out some resistors strategically. In signal path I swapped in Vishay nudes, In other areas I used Caddock resistors, the power ones I used the fukusima's and the rest I used PRP resistors. For some reason it really brought out a lot more detail.
I also did something similar to your build re Capacitance and big toroid.
10x 47K uF per mono and 1.5 kVA toroid per.
First though adjusting P3 may give you more detail, you may be running mostly 2nd order harmonics, adjusting so that you get more 3rd order may bring the detail up.
Wow! Thanks!Looks absolutely wonderful!
So you think all my voltages, temps, etc are all in range?
Thanks. Yes, Sissy compared to my Babelfish build!Sissy!

I hate to say it and I can't back it up, so please don't flame me on this one.
Are you using relatively generic resistors?
My first build I experienced less detail until I swapped out some resistors strategically. In signal path I swapped in Vishay nudes, In other areas I used Caddock resistors, the power ones I used the fukusima's and the rest I used PRP resistors. For some reason it really brought out a lot more detail.
I also did something similar to your build re Capacitance and big toroid.
10x 47K uF per mono and 1.5 kVA toroid per.
First though adjusting P3 may give you more detail, you may be running mostly 2nd order harmonics, adjusting so that you get more 3rd order may bring the detail up.
Dazed, thanks much for commenting.
I should have maybe started a new thread to keep from confusion. But starting on the previous page is my ramblings about rebuilding my original F5 v3 turbo’s.
I originally built just behind your build back a few years ago. Built with a large power supply and capacitance. Then I decided to build a console/furniture with built in amps. (Aloha F5 v3 part 2, console build) I was going to use the F5’s in a new chassis to fit the console, but ended up just using the F5’s power supplies and new amp design by Zenmod (About possible Babelfish J interest).
In my original F5’s I used good resistors and nudes in the same places as yours. So since I had good working amp boards I decided to build them back, but this time with a normal sized power supply. I did up the capacitance some from “stock” and went CLC as you can see in some of my last posts.
I’m happier with the overall looks of these “new” F5’s and they were built to match my speaker project (Damped enclosure 8” full range build). Opinions on sound and adjusting P3 to follow.
I spent the time needed this weekend to mostly finish the second amp. In my first build, because of the higher power, resistors R25 and R26 were 12k, I need to order some better resistors in 10k for these positions, but to fire them up I used what I had laying around.
Power up was as easy as the first one, voltages really close to the same.
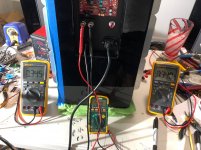
After letting it run for an hour to make sure everything was stable I swapped out the tube amp and played some music!
So far everything running as expected.
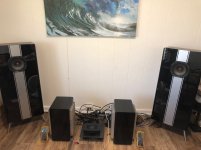
So my work room system is the two full range speakers I built, these F5’s, and the Bluesound Node 2.
I’ve mentioned before how much I like the Node 2. For $500 and a subscription to a streaming service (I use Tidal) you can listen to almost every recorded song, playlists, etc.
The amps I build do not have any power on switches. Both my Mac pre and this Node 2 have output triggers. So I use a simple Crydom solid state relay, that takes 5-15 trigger voltage to start the amps up.
The phone app for the Node 2 has pause, play, volume and other controls. So to play this system is as easy as opening up the app, pushing play, and everything comes on. After 15 minutes of pushing the pause button the trigger releases and shuts down the amps.
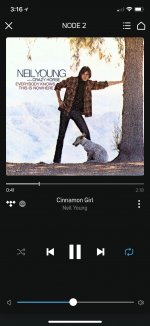
At less than 50% on the volume slider I’m getting almost 90db’s
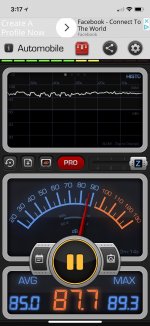
My 1969 230 Mercedes project car should be back this week from painting, so I’ll be done with Audio for a bit while I assemble the car. But enjoying the music!
Power up was as easy as the first one, voltages really close to the same.

After letting it run for an hour to make sure everything was stable I swapped out the tube amp and played some music!
So far everything running as expected.

So my work room system is the two full range speakers I built, these F5’s, and the Bluesound Node 2.
I’ve mentioned before how much I like the Node 2. For $500 and a subscription to a streaming service (I use Tidal) you can listen to almost every recorded song, playlists, etc.
The amps I build do not have any power on switches. Both my Mac pre and this Node 2 have output triggers. So I use a simple Crydom solid state relay, that takes 5-15 trigger voltage to start the amps up.
The phone app for the Node 2 has pause, play, volume and other controls. So to play this system is as easy as opening up the app, pushing play, and everything comes on. After 15 minutes of pushing the pause button the trigger releases and shuts down the amps.

At less than 50% on the volume slider I’m getting almost 90db’s

My 1969 230 Mercedes project car should be back this week from painting, so I’ll be done with Audio for a bit while I assemble the car. But enjoying the music!
- Status
- This old topic is closed. If you want to reopen this topic, contact a moderator using the "Report Post" button.
- Home
- Amplifiers
- Pass Labs
- Aloha F5 v3 Monoblock build