Maybe my wording was not so clear . Yes they are like potato chips I want more I’m looking at the Alpha J, WAMMY is on my bucket list the F5 the Zan and the list doesn’t stop there.Thermal Alchemy, you are saying that this Amp burning business is like eating potato chips, you just keep on wanting more and more. 4 amps, one per driver!
Not 4 amps into one driver, making a new speaker cabinet with three or four drivers amd having one amp for each driver in the speaker cabinet. Though the subs may have their own cabinet and get placed elsewhere depending on design.
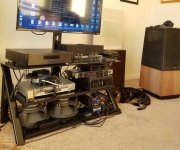
Multiple Amps
For those pondering the step to active crossovers and amps for each driver. Well worth it.
Unbalanced ACA gives the rich harmonics. And that feeds the in wall speakers.
Balanced gives the AMT's pristine high frequency response.
Emotiva has plenty of current to run the woofers when they need it but is mostly loafing. L pads are on its output so it has to do some work.
Awesome audio - and Awesome Amps!
Attachments

For those pondering the step to active crossovers and amps for each driver. Well worth it.
Unbalanced ACA gives the rich harmonics. And that feeds the in wall speakers.
Balanced gives the AMT's pristine high frequency response.
Emotiva has plenty of current to run the woofers when they need it but is mostly loafing. L pads are on its output so it has to do some work.
Awesome audio - and Awesome Amps!
Yep that’s about exactly what I’m going for . 👍 thanks for the little graphic I’ve been trying to find more and more information on set up like this I have to build some more amps some preamps I would like to build my own DAC and phono stage and if I feel real wild I’m even thinking of building my own turntable I believe I have just about enough experience and knowledge of DC motors sensors for tracking perform on my own metalwork, wood work or stonework my own brasing or welding, Metal casting and machining .
Special thanks to Nelson Pass for releasing his years of knowledge experience to us to gotten addicted to this hobby and 6L6 and all the other superior intellect out there who are the gurus of stereo equipment, who we inspire to learn from .
Thank you Molly for the visual and the explanation by answering one question of course we all know that leads to 10 more questions.
I think I’m grasping the basic concepts here in one of three ways you can perform the desired outcome correct me if I’m wrong in my understanding. 1: you can change the signal path capacitors for your low pass and your hi Pass inside to amplifier. 2: You can change the frequency’s to your speakers through crossovers from my reading and other peoples comments has its pluses and minuses and kind a complex and complicated for newcomers. 3: LXmini , after attending my first Burning AMP event this year and hearing about that LXmini seems like a easier and more convenient way of experimentation if you want to bi-AMP or try-amp or even quad-AMP?.
I love my hi efficiency full range speaker horn loaded i’ve built specifically for this ACA. But now that repressed locked away teenager in me would like to build an experiment with three or four amplifiers one for each driver in a cabinet.
So what I’m getting at with LXmini be a good starting point for newbie to experiment easily with multiple amplifiers to a speaker cabinet. Then after gaining that knowledge possibly taking it a step further and finding the corrections of capacitors resistors and chokes and bring that knowledge to transfer it to your specific amplifiers internally and eliminating the LXmini ?.
The ACA is one design where I wouldn't really recommend altering time constants to achieve a customised frequency response. The speaker coupling cap isn't suitable to be changed in value to raise the LF cut off point.
The input coupling cap could be lowered in value in theory to limit LF response, however in practice this wouldn't be a recommended method because of the unpredictable and variable response that it could cause. That is so because of the way the input coupling cap connects internally in the design and how it connects to a point that itself is not fixed or constant but is itself dependent on both the feedback from the main output at one end of the cap and dependent on the signal (which again is slightly variable and load dependent) seen at the other end of the cap.
This all means that the ACA is best kept as a 'flat' response gain block and that any desired filtering is done before the ACA.
Heatsinks. To start with just get the size of the sinks provided in the ACA kit including fin size and number (you can do a visual estimate here) as a baseline. I think the diyaudio store gives sizes for the enclosure which allows your to calculate the size of the fins. The fins are 40 mm deep if I recall correctly. If you want better cooling just get larger sinks. Then it is just a matter of checking out the heatsinks available in any number of online places, including eBay. Remember you will have to tap and thread the sinks to fit the boards to them.
is it recommended to clean the ACA boards before soldering?
also, can anyone recommend a good flux remover? i recently had one of those flux remover pens but it just created an ugly mess..... according to the manufacturer the flux is "halogen activated natural resin (colophony)" and it's labelled as "no clean".
also, can anyone recommend a good flux remover? i recently had one of those flux remover pens but it just created an ugly mess..... according to the manufacturer the flux is "halogen activated natural resin (colophony)" and it's labelled as "no clean".
About the cheapest alternative without paying for brand-name or special spray bottle. Go to your local drugstore at least here in United States you can get some 99% isopropyl alcohol usually anywhere between $.99 and $1.50 or a whole quartis it recommended to clean the ACA boards before soldering?
also, can anyone recommend a good flux remover? i recently had one of those flux remover pens but it just created an ugly mess..... according to the manufacturer the flux is "halogen activated natural resin (colophony)" and it's labelled as "no clean".
also, can anyone recommend a good flux remover?
I recently saw this Instructable to clean PCB's, but it was down in the comments that I found the advice that worked best for me:
"When cleaning up flux on a PCB with Isopropyl alcohol if as a final step, you lay a Kimwipe or your toilet paper over the area you're cleaning and brush the alcohol through the wipe onto the board. The flux residue will float onto the wipe. Then I use a dry wipe to mop up any wet spots Leaving the board dry and the sticky flux gone with less use of materials."
Thanks, I have no problem drilling,a and tapping the heatsinks...I was just having trouble finding big enough heatsinks.Heatsinks. To start with just get the size of the sinks provided in the ACA kit including fin size and number (you can do a visual estimate here) as a baseline. I think the diyaudio store gives sizes for the enclosure which allows your to calculate the size of the fins. The fins are 40 mm deep if I recall correctly. If you want better cooling just get larger sinks. Then it is just a matter of checking out the heatsinks available in any number of online places, including eBay. Remember you will have to tap and thread the sinks to fit the boards to them.
My other option for a case is to make my own, but I am having trouble finding heatsinks in Mexico, plus I do not know what size would be a good heat sink to use. I would love to make a case out of wood with a metal bottom, and heat sinks.
Maybe have a look at the heatsinks in the DiyAudio Store. It at least gives the specification of the ones used in the ACA chassis. 40mm Heatsinks – diyAudio Store
The ACA one is 200mm x 80mm with 40mm fins and dissipates at 0.67 degrees C per Watt.
Remember that the ACA runs in Class A. Each amplifier channel dissipates 36 Watts to/from the heat sink (72W for the stereo pair) so they do get Hot, that's normal. And a good reason not to use wood in the construction...
IPA cleaner (spray)
is a standard for cleaning of electronic equipment and removal of flux residues.
( isopropanol reinigungslösung in spraydosen)
Danke!
Thnaks for the quick replies! I guess I'll get something like this:
Isopropanol 99,9% Isopropylalkohol 2-Propanol IPA Reinigungsmittel inkl. Ausgiesser - 1.000ml Isopropyl inkl. Praktischem Flaschenausgiesser fur Kuche Haushalt & Industrie: Amazon.de: Kuche & Haushalt
More expensive than it should be I guess but it has a seal that says "lab tested" and even shows a picture of a PCB .... that's gotta be worth something

So FINALLY after weeks of waiting I received my ACA kit. The diyAudio Store Team was super helpful (thanks!!) but it seems DHL had quite a hard time figuring out where Austria is
I can't wait to build this thing. Now I just had closer look at the build guide and have a few questions.
I have the "back panel power switch" version. Am I right in assuming that I could use the ACA V1.6 as a mono block by externally bridging it the way it's described as option 2, step 46 in the V1.5 build guide?
Also if I don't plan on using the ACA with an XLR input in the near future (as I don't have any XLR sources or pre amps), could I just leave the XLR plug and wiring out?
Thanks!
- Home
- Amplifiers
- Pass Labs
- Amp Camp Amp - ACA