Can we put the SMPS power supply like the meanwell LRS 100-24 directly inside aca cabinet (diy case to be build afterwards) ie amp and smps in same case.
By doing so we can get the mains supply lines to the amp cabinet and connect it to both, 1. the SMPS for ACA and
2. and in parallel to a small transformer which will power the preamp in the same case
3. in parallel to another small 5v transformer which will power the digital side ie ardunio which will provide option for remote control and small lcd screen.
OR can we use the usual external SMPS supply, and use dc-dc converters for preamp and ardunio side with all the ardunio and related parts, + preamp + aca amp + dc-dc converters for each part (preamp , ardunio) , in same cabinet.
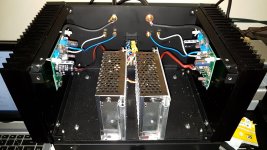
This works fine for me. My intention was to use a linear PSU, but the transformer I ordered ended up being to big, so I used this two 24V 5A SMPS, each powering one channel.
Thought about putting the preamp inside too. It would share the same PSU as I am using the B1, but with all the input RCAs it would need a larger chassis, so I decided against it.
Attachments
Yes, aim for approximately half supply voltage. To get the last degree of symmetry would need a scope and suitable dummy load.
I have all those tools.
But honestly, I don't see myself ever pushing it anywhere it's limits so I'll be happy with 1/2 rail
")
Oh and many thanks for the previous explanation, much appreciated.

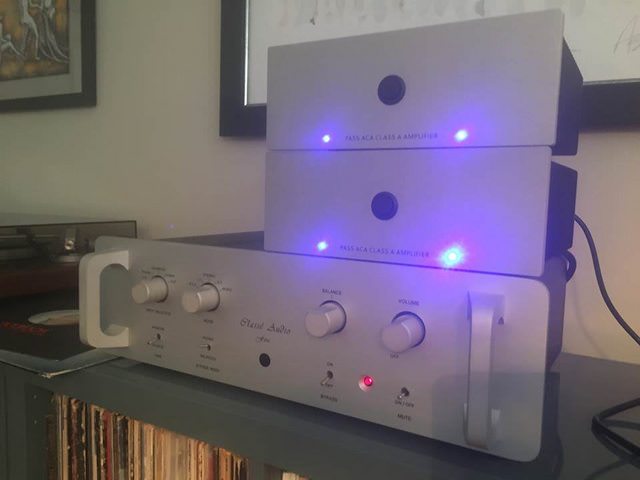
The ACA amps - running XLR connected, bridged monoblocks - have now been my main amps for the past few weeks. My tube obsessed friend came over and we played a few cuts. His impressions: it was one of the most neutral SS amps he's ever heard. It doesn't "sound" like solid-state, nor does it sound like tubes. He noted some deficiencies in bass control, which isn't surprising given the bridged connection with 86dB Wharfedale speakers and their 6-ohm impedance. He also like the depth of the soundstage and the detail. He's definitely what you call a subjectivist listener and a tube roller, so take his opinion as you will.
The 90s-era Classe Five preamplifier does a good job driving them - very happy there.
The 90s-era Classe Five preamplifier does a good job driving them - very happy there.
Last edited:
Got to head off and snooze a bit but I just thought I'd put in a thank you to M'sieur Pass, the diyA crew, 6L6 and all the forum members who've chipped in with good advice.
Got the first amp built and no smoke. The second will follow. Should be a bit quicker with a 1:1 scale model to work off.
Have just had a quick listen as a single unit, stereo amp and it doesn't disappoint. I should sleep well with those sweet tunes in my head to serenade me to sleep.
Something tells me that this won't be the last build I do but I won't be in a rush for the next round. Time to savour the ACA for a while I'd think..
Hello everybody, I just got my ACA 1.6 and while preparing to start the build took care of reading all the comments in the thread since version 1.6 came out. I am not an expert in anything electronic but love music.
Anyway, there has been some discussion about DAC's and preamps to be used and about finding these with balanced outputs. Reading the comments it looks like ACA prefers an input of 4v RMS to an input of 2v RMS. I looked around and found something that at least from the specs may solve the problem of finding a suitable 4v RMS XLR balanced input directly out of the analog stage of a DAC, no preamp needed. This is the GUNGNIR DAC from Schiit audio. It retails for $849 (multibit upgrade is more). It has 2 balanced XLR outputs and 4 single-ended RCA outputs, an output impedance of 75 ohms. My DAC needs to be upgraded so I plan to look into this option. I have not had any experience with this DAC so far, I am only reporting the specs which look promising for the ACA, at least to me they do.
Anyway, there has been some discussion about DAC's and preamps to be used and about finding these with balanced outputs. Reading the comments it looks like ACA prefers an input of 4v RMS to an input of 2v RMS. I looked around and found something that at least from the specs may solve the problem of finding a suitable 4v RMS XLR balanced input directly out of the analog stage of a DAC, no preamp needed. This is the GUNGNIR DAC from Schiit audio. It retails for $849 (multibit upgrade is more). It has 2 balanced XLR outputs and 4 single-ended RCA outputs, an output impedance of 75 ohms. My DAC needs to be upgraded so I plan to look into this option. I have not had any experience with this DAC so far, I am only reporting the specs which look promising for the ACA, at least to me they do.
I have been thinking about the ACA, its case and the very hot heatsinks that are part of it. I have not been building amps, that is for sure, but I have built computers, desktop units primarily (with an occasional redoing of a laptop which is a near nightmare to do), since the 90's and fail to see why anything electrical that gets pretty hot cannot be cooled down to some degree.
So, let me talk about my ideas to make the rig a bit cooler. To increase cooling passively, the case (which is a Mini Dissipante 2U unit 200X300 mm) can be fitted with a pre-drilled bottom and top plates. They are sold at the diyaudio store under "We also recommend, chassis baseplate unit." Of course, I have to confirm that the sizes of the baseplates and top plates I received are the same and the screw holes are in the same place. Once this is done, the bottom and top plates that come with your case can be replaced with the pre-drilled ones. These are, I believe, pre-tapped to accept screws in the holes. All you really have to do is to decide which holes you want to keep as pre-tapped holes, and basically drill out the rest of the screw threads in the other holes to enlarge them and allow free air circulation. The legs of the unit can be replaced with taller legs to allow for freer passive air flow by convection from the bottom. Assuming you can also replace the top plate with a pre-drilled one, you can significantly increase the level of air circulation within the unit in a purely passive manner.
But why stay there, you can buy computer case fans which are silent and install them on the top of the units to extract hot air from them. A number of these fans come with USB connectors for external use. So all you need is to choose your fans for airflow, size and silent operation, install them and hook them up to an external USB hub that connects to AC. Make sure the top plates' pre-drilled holes left unused are also enlarged to facilitate the air flow. I honestly have no idea how much heat can be dissipated that way but it may be significant.
If you go passive the air convection through the units happens without additional noise. If you use fans you can expect background noise in the 28 dB level which may or may not be acceptable to you personally. Again this is nothing that I have already done with an amplifier but I have done it many times with computers. I think this is entirely feasible to do with the pre-drilled plates. The plates are 3 mm aluminum so drilling them is not impossible to do at home.
Hope you like this small contribution to possible amp cooling solutions from the PC world.
My apologies, I did not realize the top plates are perforated already. This is both good and bad, good because you do not need to get the pre-drilled bottom plate and place it on the top after enlarging the holes. Bad because you have to tap the holes to take the fan screws in the appropriate places.
Power supply is 24 volts. How did you manage to convert it to 36? You must be making electricity...
I wondered the same thing. I have used two different multimeters.
May be you killed the jfet.
When you now connect 24 volt supply, can you bias it to 12 volts?
If you can, you are in luck. If not, you exceeded volts on little jfet.
Things seem to be OK. I'm letting it sit for a while and then I'll bias it again. But everyone in my house has now gone to bed..... won't be able to play it until tomorrow.
Keeping my fingers crossed!
Good luck!
AND ..... the amp seems to be working just A-OK!


- Home
- Amplifiers
- Pass Labs
- Amp Camp Amp - ACA