hey all
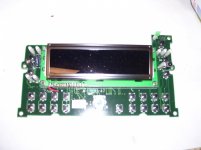
i have the creative soundworks 740 cd radio , the display has gone dim on one side only
ive broken it down so far in the hopes i can fix it
a,would this screen be custom to the unit or likley i can source a replacement ?
b, are there any replacable parts inside the black screen ?
any help apreciated
i have the creative soundworks 740 cd radio , the display has gone dim on one side only
ive broken it down so far in the hopes i can fix it
a,would this screen be custom to the unit or likley i can source a replacement ?
b, are there any replacable parts inside the black screen ?
An externally hosted image should be here but it was not working when we last tested it.
An externally hosted image should be here but it was not working when we last tested it.
any help apreciated
heres some pics
anyone recognise any of the numbers ?
anyone recognise any of the numbers ?
An externally hosted image should be here but it was not working when we last tested it.
An externally hosted image should be here but it was not working when we last tested it.
An externally hosted image should be here but it was not working when we last tested it.
An externally hosted image should be here but it was not working when we last tested it.
An externally hosted image should be here but it was not working when we last tested it.
Hi steveo3002,
I am currently looking into the same problem ...
Did you manage to get any further?
Your pictures were quite helpful and
I think you were "almost there" ...
Currently I am at the stage where I have
dismantled the LCD display and removed the
backlight.
I managed to do so without removing the
display piggyback from the control pcb unit.
The backlight itself seems to be illuminated
by 4 white LEDs.
Strangely this 4 LEDs seem to be connected in parallel,
which is an absolute "no-go" circuitry-wise, even if they
are current driven!?
No wonder that they died one by one ...
Currently, I am trying to figure out what the best way to
replace them would be (adding a series resistor to each one
of them!?)!
Kind regards
-grzl-
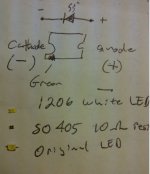
Ok, did it ...
Replaced the 4 LEDs of the backlight by
a quadruple of WTN-1206-450kw white 1206 SMD LEDs,
yesterday.
I put the LEDs on the very corner of the existing soldering pad
with one side, so that enough space was gained to drop in
a 10 Ohm series resistor (0805) between each LED and the other soldering pad to compensate for differences in forward voltage between the LEDs.
(Each LED should receive a current of approx. 30mA of a total current of 120mA @ full display brightness,
so 10 Ohms seemed like a good compromise in terms of voltage drop and power rating of the 0805 resistor)
Verified that the replacement actually worked by connecting the frontpanel pcb without the LCD display reattached
to the rest of the remaining hardware of the CD740.
One can see the LEDs dim if the adjacent LDR is covered ...
Put the plexiglass slab of the backlight and then the LCD display back on and reassembled the whole radio.
Good as new ...
Kind regards
-grzl-
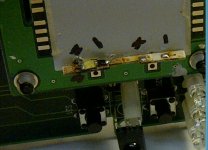
Working on same CD 740 dim display
Hello, I have the same issue. I have the display/control board out of the unit and have unsoldered the pins which connect the display board to the control board. I will be adding picture to this thread to document this detail of the repair. Many thanks to grz1666 for breaking the trail which I am following.
Hello, I have the same issue. I have the display/control board out of the unit and have unsoldered the pins which connect the display board to the control board. I will be adding picture to this thread to document this detail of the repair. Many thanks to grz1666 for breaking the trail which I am following.
Attachments
Frame LCD removed
In this post I have removed the black aluminum frame and LCD by bending the tabs under the piggyback PCB. You do not need to remove the piggyback PCD to do this, although it makes removal of the tabs easier, at the risk of damaging the PCB with de-soldering.
In this post I have removed the black aluminum frame and LCD by bending the tabs under the piggyback PCB. You do not need to remove the piggyback PCD to do this, although it makes removal of the tabs easier, at the risk of damaging the PCB with de-soldering.
Attachments
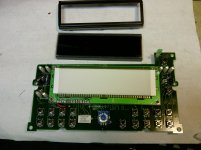
I have now removed the plexiglass cover from the base by using a sharp tool to seperate the plexiglass from the white sticky film underneath. The sides are easy, the ends are tricky because the small vertical PCB's are stuck to the plexiglass also. Take your time or wyou will have more to fix.
Attachments
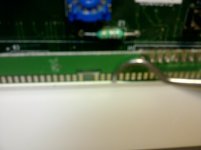

Update, LED replacement
I have received the smt LEDs (1206 white) and smt chip resistors (10 ohm).
Steps:
1. Mark polarity of power coming in, it is opposite for the different ends of the light bar.
2. Use a small wattage iron, alternatively tap each end of the existing LEDs to unsolder and remove.
3. Tin one end of the resistor and the appropriate end of the LED.
4. Double check that you have the polarity correct for the LED.
5. Using tweezers and soldering iron, solder in the LED first, then the chip cap with the pre-tinned ends together.
6. Measure the LED diode characteristics with a meter to ensure that you have good solder connections and correct polarity.
7. Repeat for each of the remaining LEDs.
Attachments

I am currently repairing the display for one of these, I did find replacement displays.
mouser part numbers are:
763-0216SZ-NSW-BBW for a blue background with white characters (manufacturers part # NHD-0216SZ-NSW-BBW)
763-NHD-0216SZFSWFBW for a white background with black characters (manufacturers part # NHD-0216SZ-FSW-FBW)
The same ones are also available at Digikey.
pins 15 and 16 are for the back light so these should just drop in.
Hello diyAudio members,
I'm new to this forum, thank you all for sharing your knowledge. Years ago the display of my Soundworks 740 unit decided to stay dark too and honestly said after a very disappointing support experience here in Austria where actually nobody was willing - or could ? - help I've been close to dumping the whole thing to the trash more than once. Anyway, I did not do so, it's still sitting there and waiting for a second life.
@TheFlinx, could you please provide a little bit more information on replacing the display with one of the mouser parts ?
Thank you in advance,
GF64
Following TheFlinx suggestion I've ordered one of the Newhaven displays (NHD-0216SZ-FSW-FBW) at Digikey. The part came in really fast and I replaced the old, broken one the same day - unfortunately just to discover the Soundworks 740 does not like the change in LCD-controller at all ! While the original LCD-strip PC1602WRT-LWB-F-YB is built around a Hitachi HD44780 controller the Newhaven unit uses a ST7066U by Sitronix. 1:1 compatible by dimensions and instruction set the ST7066U requires a slightly different initialization timing as I've got to know by reading lots of contributions on several other forums meanwhile. For a product like the Soundworks 740 this timing is defined within the units firmware, so it's not possible to adapt it according to what the ST7066U requires without reengineering. For my project this information comes too late but others having to replace a character display while the original part isn't available anymore (PowerTip as I've found out has discontinued this product by the end of 2012) my findings may be helpful. Regarding my Soundworks 740 I'm now right back at the start. I already started to look for HD44780 based 122x44mm 16x2 character displays but as it seems there's limited to no choice in 2020 anymore :-( If somebody on this forum can give me a hint on where to get such a display please drop me a note,thanks in advance !
GF64
GF64
- Status
- This old topic is closed. If you want to reopen this topic, contact a moderator using the "Report Post" button.
- Home
- Design & Build
- Parts
- creative soundworks 740 screen parts /replace