The gap is in the 2 to 3 mm range. When using Joel's wave guides I hot glued some coins, dimes to nickles, for spaces to the back of the guide and put some thin foam an inch or so around the hole to make a seal. You can adjust the effect by how thick the coin is and how big of a ring of foam you use. I ended up using the home made guides I started with as the mdf seems to impart a little less edge to the sound. The Bolser mod makes it where you can toe in the speakers more like you are used to.
I live about 10min from DFW airport. Be sure and bring a couple of cd's that you are familliar with. If you are a musician try to make it by on Wed night or Sunday afternoon when some friends and I get togehter play music.
I live about 10min from DFW airport. Be sure and bring a couple of cd's that you are familliar with. If you are a musician try to make it by on Wed night or Sunday afternoon when some friends and I get togehter play music.
Crossover with Jantzen inductors.
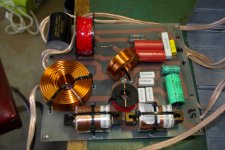
This is latest incarnation of my crossover with Jantzen inductors in the 1.8 and .33mh positions. In series with LF and MF pairs only as I felt the lower series resistance was more beneficial in these locations. They weigh about 2 or 3 kilos now. Lots of copper!
This is latest incarnation of my crossover with Jantzen inductors in the 1.8 and .33mh positions. In series with LF and MF pairs only as I felt the lower series resistance was more beneficial in these locations. They weigh about 2 or 3 kilos now. Lots of copper!
Attachments
irext, still thinking of respinning those boards?
I do plan to redo them but it's fairly time consuming and I want to upgrade some of the components so I wont do a layout until I have all the parts that will comprise the final version. I want all the components to fit perfectly on the pcb. I'll post the layout once it's done in actual size so that anyone with a laser printer and some photo paper should be able to etch their own.
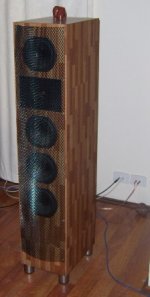
Almost look like electrostatics!Hi all,
Quick pic of the speaker grilles i am using, I have a two year old son..... I cannot count how many times the speakers have been saved now.......
Dan
Hi all,
Quick pic of the speaker grilles i am using, I have a two year old son..... I cannot count how many times the speakers have been saved now.......
Dan
That is a nice use of that material. Looks very modern.
What did you use to attach the mesh to the speaker?
Hi guys,
Yes they look a little like electro staticsi think they sound nicer !
I fix the grilles on with small screws through holes in the mesh, i have been meaning to replace them with black screws to match
_Dan
Sent from my HTC Desire using Tapatalk 2
I cheated with the screws on the waveguide on mine. I removed them and screwed them into a scrap of cardboard. Then I sprayed them with the same mat black paint that I finished the waveguides in. They are almost invisible now and it cost me nothing. I like your veneer. Very interesting and different.
After having heard the Elsinores over a year ago i have finally decided to get building. [With some encouragemet from Irex]
Just trying to get my head around the best way to create the tweeter mounting hole, keeping in mind i will be using Joels wave guide and the one piece front baffle.
My question is, would it be possible to machine the tweeter/waveguide stepped hole as one after the front panel and sub front panel are mated?
Just concerned about alignmet if both panels are machined separately prior to assembly, or would this be the only practical way?
After having heard the Elsinores over a year ago i have finally decided to get building. [With some encouragemet from Irex]
Just trying to get my head around the best way to create the tweeter mounting hole, keeping in mind i will be using Joels wave guide and the one piece front baffle.
My question is, would it be possible to machine the tweeter/waveguide stepped hole as one after the front panel and sub front panel are mated?
Just concerned about alignmet if both panels are machined separately prior to assembly, or would this be the only practical way?
Alignment shouldn't be a problem if all measurements are accurate. I think I would lay the front 18mm panel on top of the 25mm and drill a centre pilot hole through the 18mm into the 25mm piece with a small drill bit first just to make sure they line up afterwards. I used a protractor to mark out and made circular router template guides to do the Tweeter hole and rebate. I had to sit and think about it for a while before a method became clear to me. In the end I was quite happy with the result. Joel will have a method I'm sure, as he was the inventor of the circular wave guide. Trying to do it all in one piece would I think be very difficult, 43mm thick! No router will reach that depth.
After having heard the Elsinores over a year ago i have finally decided to get building. [With some encouragemet from Irex]
Just trying to get my head around the best way to create the tweeter mounting hole, keeping in mind i will be using Joels wave guide and the one piece front baffle.
My question is, would it be possible to machine the tweeter/waveguide stepped hole as one after the front panel and sub front panel are mated?
Just concerned about alignmet if both panels are machined separately prior to assembly, or would this be the only practical way?
The set I'm veneering right now has the tweeter hole left out of subfront so Planning to make all the tweeter/waveguide cuts from above..
Have a couple of ideas but leaning towards using the Whiteside RD5200
spiral bit with 2" cutting length.. Might have to insert a template inside the recess to cut the deep opening..
Not sure about this one but maybe I could use a Flush Trim template Bit and plunge past the template and ride the cut out until through.. First cut the hole undersize with a jig saw so the routing is just trimming or maybe trim bit could be used for clean out as well...
Just concerned about alignmet if both panels are machined separately prior to assembly, or would this be the only practical way?
Alignment should not be a problem as long as you work carefully.
I did mine as two steps. A Jasper jig on the front panel, the same jig (different size of course) on the first subpanel and then a hole saw for the back end of the sub panel. The hole saw can go as deep as you need it to go. See around post #1021 (and probably before that) for pics and a far better explanation of the process I used. Worked just fine.
BTW, I never cut the tweeter hole into the subpanel until the last possible moment when I was able to verify the front panel was machined correctly. In other words, I made sure the front panel was perfect via overlay and then cut the subpanel as the tweeter hole is the most important to get correct.
When I made the rebated hole for the tweeter in the 25mm sub panel I made it so that the tweeter could be moved laterally a few millimeters. This enabled me to first fasten the rectangular waveguide in it's correct position and then reach in from behind the tweeter, through one of the MF driver cutouts and carefully align the tweeter to be absolutely central in the throat of the waveguide. (The cab was lying on it's back on 2 saw horses). I then removed the waveguide and without moving the tweeter (carefully) marked the screw centres for it. Maybe this would work for the circular waveguide?
When I made the rebated hole for the tweeter in the 25mm sub panel I made it so that the tweeter could be moved laterally a few millimeters. This enabled me to first fasten the rectangular waveguide in it's correct position and then reach in from behind the tweeter, through one of the MF driver cutouts and carefully align the tweeter to be absolutely central in the throat of the waveguide. (The cab was lying on it's back on 2 saw horses). I then removed the waveguide and without moving the tweeter (carefully) marked the screw centres for it. Maybe this would work for the circular waveguide?
Joel's waveguides, especially the last version, is designed for the tweeter to mount directly to the back of the waveguide. The waveguide is then mounted to the cabinet. There is no need for the tweeter to be attached to the subpanel directly. The alignment is made when attaching the tweeter to the wave guide.
Even if you have an earlier version of the waveguide, it is far easier, IMHO, to tap the waveguide using "Joel's Jig" and back mount the tweeter directly to the waveguide. The jig is used to ensure correct alignment.
- Home
- Loudspeakers
- Multi-Way
- The "Elsinore Project" Thread