Looking GREAT spoonted!!
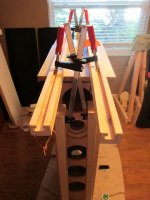
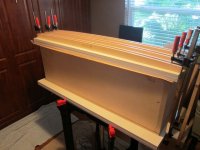
BTW, what method did you use to perform the cutouts on the center brace? They look amazing.
Cheers,
but i screwed up a couple of times at least it is only the braces.
I used a jigsaw first leaving the cut a couple of mm shy of the pencil line, then used a router with a straight edge guide set to the finish size.
Which worked very well except for were i lost the plot with the jigsaw previously and over cut.
Another mistake, another chance to recover...
I never seem to learn. Measure, measure, MEASURE! Test fit, test fit, TEST FIT!!
Oh well. Yet another happy accident.
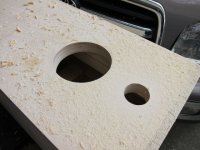
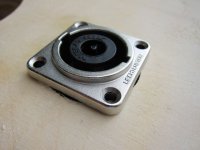
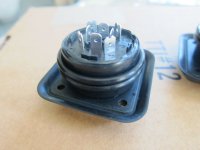
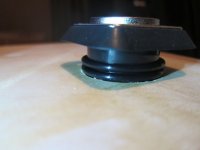
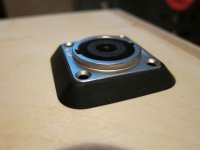
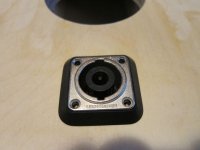
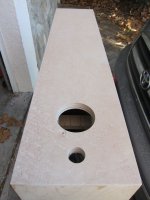
Like others, I am using Neutrik Speakon connectors for wiring up the cabinets. I took a look at the Neutrik documentation and saw 38mm (1.496") and grabbed my 1.5" speedbor bit and went to town. Turns out that was NOT the size of the circular portion of the connector, rather, the ENTIRE connector. Ouch.
In this case, recovery turned out better than the original planned hole. The neutrik has a rubber gasket available for the connector, which, went from optional to required. However, it did nothing for mechanical mounting strength. So, I wrapped about three feet of electrical tape around the circular portion and placed a couple #18 plumbing O-rings over the electrical tape. This gave enough diameter to ensure a snug fit, yet still allow the connector to be pressed into the hole. This worked GREAT. The connector is now guaranteed air tight via O-rings and gaskets while being supported mechanically to the point the screws do little more than align the connector (and prevent unintended pull-out). A bonus is this allows easy servicing of the connector (no need to caulk the connector into the hole).
Once again, I luck out big time. I gotta stop doing that as I am sure my luck will eventually run out. It always does.
I never seem to learn. Measure, measure, MEASURE! Test fit, test fit, TEST FIT!!
Oh well. Yet another happy accident.
Like others, I am using Neutrik Speakon connectors for wiring up the cabinets. I took a look at the Neutrik documentation and saw 38mm (1.496") and grabbed my 1.5" speedbor bit and went to town. Turns out that was NOT the size of the circular portion of the connector, rather, the ENTIRE connector. Ouch.
In this case, recovery turned out better than the original planned hole. The neutrik has a rubber gasket available for the connector, which, went from optional to required. However, it did nothing for mechanical mounting strength. So, I wrapped about three feet of electrical tape around the circular portion and placed a couple #18 plumbing O-rings over the electrical tape. This gave enough diameter to ensure a snug fit, yet still allow the connector to be pressed into the hole. This worked GREAT. The connector is now guaranteed air tight via O-rings and gaskets while being supported mechanically to the point the screws do little more than align the connector (and prevent unintended pull-out). A bonus is this allows easy servicing of the connector (no need to caulk the connector into the hole).
Once again, I luck out big time. I gotta stop doing that as I am sure my luck will eventually run out. It always does.
Attachments
Beautiful, but fussy and highly temperamental!
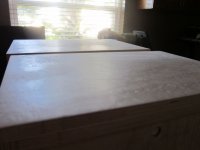
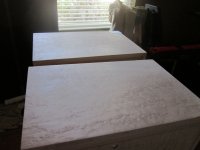
So, I decided on a birds-eye maple veneer as the figure is stunning. Of course as in life, the overhead and maintenance on anything with a beautiful figure makes you question your sanity in putting up with the trouble.
The actual pressing went okay. I used a cold press glue and the bowclamps made yet another appearance. In hindsight, I might have been better off with heatlock glue and using an iron to apply the veneer. At least with this particular species of wood.
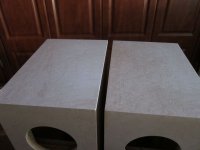
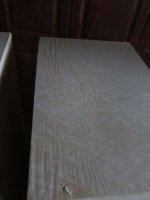
Turns out maple is all about moisture management. The grain absorbs at different rates and can tend to swell and wrinkle if not approached with delicacy. The smallest amount of glue that still sets the piece appears to be the ticket, however, it can be somewhat of a crap-shoot. So, I did not get so lucky this time, at least not with all the pieces. Especially the top pieces which have a distinct, subtle set of wrinkles (more like subtle ripples) on one side where the gain pattern is tightest. You can really only see it in indirect light from certain angles, but, it is there and you can feel it as well.
At this point I need to figure out how to handle the top pieces. I will try a light sanding first to see if I can get them small enough to hide in the finish. Otherwise, I have to decide to leave it as is or try another pressing (after removing the flawed top pieces). I knew I was pressing the luck a bit hard lately.
I tried to photo the problem, but, without luck. Perhaps once light comes up again I can give it another shot. As you can see from the top pieces in the last photo, it is hidden in the figure unless you have the correct viewing angle (the problem is most pronounced in the lower portion of the pieces where the grain is the tightest as it approaches the left hand corner).
So, I decided on a birds-eye maple veneer as the figure is stunning. Of course as in life, the overhead and maintenance on anything with a beautiful figure makes you question your sanity in putting up with the trouble.
The actual pressing went okay. I used a cold press glue and the bowclamps made yet another appearance. In hindsight, I might have been better off with heatlock glue and using an iron to apply the veneer. At least with this particular species of wood.
Turns out maple is all about moisture management. The grain absorbs at different rates and can tend to swell and wrinkle if not approached with delicacy. The smallest amount of glue that still sets the piece appears to be the ticket, however, it can be somewhat of a crap-shoot. So, I did not get so lucky this time, at least not with all the pieces. Especially the top pieces which have a distinct, subtle set of wrinkles (more like subtle ripples) on one side where the gain pattern is tightest. You can really only see it in indirect light from certain angles, but, it is there and you can feel it as well.
At this point I need to figure out how to handle the top pieces. I will try a light sanding first to see if I can get them small enough to hide in the finish. Otherwise, I have to decide to leave it as is or try another pressing (after removing the flawed top pieces). I knew I was pressing the luck a bit hard lately.
I tried to photo the problem, but, without luck. Perhaps once light comes up again I can give it another shot. As you can see from the top pieces in the last photo, it is hidden in the figure unless you have the correct viewing angle (the problem is most pronounced in the lower portion of the pieces where the grain is the tightest as it approaches the left hand corner).
Attachments
subtle set of wrinkles (more like subtle ripples) on one side where the gain pattern is tightest.
Sorry, is it glue pockets?
Sorry, is it glue pockets?
I don't think so, it is far more subtle. Or at least it appears to be that way. I was pretty careful to use a glue roller and get an even application. Perhaps using less overall, but, what I did use was evenly distributed.
I think I needed to use less glue (less moisture) as well as leave it clamped a bit longer (instead of just an hour). Either that or the veneer bit on the corners first prior to allowing the planten to spread the sheet out evenly which caused the expansion to have only a few directions in which it could go; primarily in towards itself. It is possible there is the slightest bowing going on with the top piece (from side to center). That would explain most of the behavior I have seen on all of the large pieces as well as the tops, which, tend to have the gathering towards the middle of the pieces.
Ideally, I should have veneered the individual cut pieces prior to assembly. I just was unsure on how this was all going to come together. So, I punted for assembly first and veneering second.
No worries though. I will see what I can do to repair the situation. Otherwise, well, I will figure something out. That is the beauty of working with wood. There is always some form of recovery.
Beauty returns to the beast...
So, I stepped away for a day or two and contemplated the issues with the veneer. A bit of forensics showed there was indeed an unevenness to the top baltic birch pieces once they were mounted, glued and pressed into place on the rest of the cabinet. The platen I used had no real chance of making an even press. The edges bit first and forced a ripple regardless of the moisture content (which only served to make matters worse). Hence, the error was in the pressing and serves as a lesson to myself to veneer first and assemble second unless you can guarantee a nice flat surface upon which to veneer.
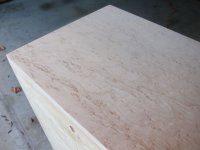
Still, could it really be as bad as it looked? When viewed with indirect light, it looked horrible beyond belief, or was that just a trick of the light making it seem worse than it truly was? Using a straight-edge, the ripple, while certainly there, was no where near as bad as it look on angle. Since the veneer had bonded perfectly, I figured I would attempt to sand down the imperfections. Really, there was nothing to lose at this point.
I started hand sanding with a 220 grit sponge, which, while it looked to be working, would have had me finish the job by next Christmas. I was so afraid of sanding through the veneer, that I was not making any real progress. So, I broke out my corner cat vibration sander, slapped on a 180 grit pad and went at it.
Worked great! I was able to sand down the ripples and still maintain plenty of material to preserve the figure. Even the worst ripples sanded smooth and did not go past the veneer itself. It looks as if it was indeed a bunching of fibers and not true bubbles, which, would have been a whole different set of problems.
In any case, the surfaces are now glass smooth and ready for staining and finishing. Everything is back on track. The stain color has been chosen and is a bit non-traditional for a birds-eye maple veneer, but, I think it will look really nice. For sure, it should look great in the living space where it will rest.
Looks like my luck is still running....
So, I stepped away for a day or two and contemplated the issues with the veneer. A bit of forensics showed there was indeed an unevenness to the top baltic birch pieces once they were mounted, glued and pressed into place on the rest of the cabinet. The platen I used had no real chance of making an even press. The edges bit first and forced a ripple regardless of the moisture content (which only served to make matters worse). Hence, the error was in the pressing and serves as a lesson to myself to veneer first and assemble second unless you can guarantee a nice flat surface upon which to veneer.
Still, could it really be as bad as it looked? When viewed with indirect light, it looked horrible beyond belief, or was that just a trick of the light making it seem worse than it truly was? Using a straight-edge, the ripple, while certainly there, was no where near as bad as it look on angle. Since the veneer had bonded perfectly, I figured I would attempt to sand down the imperfections. Really, there was nothing to lose at this point.
I started hand sanding with a 220 grit sponge, which, while it looked to be working, would have had me finish the job by next Christmas. I was so afraid of sanding through the veneer, that I was not making any real progress. So, I broke out my corner cat vibration sander, slapped on a 180 grit pad and went at it.
Worked great! I was able to sand down the ripples and still maintain plenty of material to preserve the figure. Even the worst ripples sanded smooth and did not go past the veneer itself. It looks as if it was indeed a bunching of fibers and not true bubbles, which, would have been a whole different set of problems.
In any case, the surfaces are now glass smooth and ready for staining and finishing. Everything is back on track. The stain color has been chosen and is a bit non-traditional for a birds-eye maple veneer, but, I think it will look really nice. For sure, it should look great in the living space where it will rest.
Looks like my luck is still running....
Attachments
-
 IMG_3567.jpg95.9 KB · Views: 153
 -
 IMG_3564.jpg118.9 KB · Views: 148
 -
 IMG_3562.jpg105.8 KB · Views: 153
 -
 IMG_3558.jpg121.8 KB · Views: 162
 -
 IMG_3540.jpg116.5 KB · Views: 141
 -
 IMG_3536.jpg127.5 KB · Views: 155
 -
 IMG_3530.jpg116.4 KB · Views: 143
 -
 IMG_3526.jpg118.8 KB · Views: 150
 -
 IMG_3525.jpg117.1 KB · Views: 205
I got 8 pieces of following Peerless 6.5" mid-bass woofer... they are double-magnetized and sound very good. they go down all the way to around 25hz or so...
I was just wondering if they can be used in an Elsinore Projec? any idea?
I used them in a 4-way speaker... two woofers, one 4" mid-range and a dome tweeter... with special crossover... sounded like 10,000$ speakers!
any help would be devastatingly appreciated
I was just wondering if they can be used in an Elsinore Projec? any idea?
I used them in a 4-way speaker... two woofers, one 4" mid-range and a dome tweeter... with special crossover... sounded like 10,000$ speakers!
any help would be devastatingly appreciated
An externally hosted image should be here but it was not working when we last tested it.
An externally hosted image should be here but it was not working when we last tested it.
These would most likely not work as "drop in" replacements for the woofers used in the Elsinore speakers. You could make "Elsinore like" speakers, but, could you please start a new thread? I think some of us would be happy to try to help you if you did that. In the new thread we will have some questions for you.I got 8 pieces of following Peerless 6.5" mid-bass woofer... ...I was just wondering if they can be used in an Elsinore Project? any idea?...any help would be devastatingly appreciated
Not so good with scissors after all...
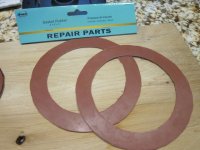
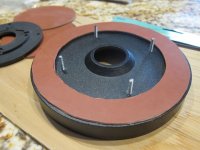
While layer after layer after layer of finish continues to be applied to the various pieces of the cabinet, I figured I would look for the second seal for the wave guide. This seal would be to isolate and seal the waveguide itself against the cabinet rather than the tweeter against the waveguide.
Hard to find anything remotely sized correctly. I was able to locate a rubber material in the plumbing department of Home Depot that can be cut to size as required. Just a big enough pair of pieces to work for this application. Probably not the best cutting job. I was never that good with free hand scissors. Should suffice nonetheless. I used the waveguide and the tweeter faceplate as templates.
In any case, while the size is close enough. I am not sure how much it will compress, I need it to compress at least slightly, otherwise the material is a bit too thick. almost perfect, but, not quite. I will know for sure once the cabinets are finished and drilled and I can see how much compression is obtainable.
Attachments
Joel - Any Wave guide orders for Sweden or Scandinavia?
Joe - Is the Danish fellow that contacted You the only responce from tihs are of the world?
Like to order material together to save money on shipping (both from You Joel and from Parts-express etc).
Shure, I have some ready to go out.
Solen is another parts supplier in Quebec that you could take a look at. They have the drivers and have their own inductors but no iron core types
Elsinore sounding great here for winter enjoyment.
Email at neverenoughmusic@hotmail.com
Waiting for more interest in Scandinavia
Shure, I have some ready to go out. /QUOTE]
Good to hear but I think I will wait untill some more interest show up here in Scandianavia as the shipping from US/CA are extremely high and good to share
Tank's anyway //Håkan
Shure, I have some ready to go out. /QUOTE]
Good to hear but I think I will wait untill some more interest show up here in Scandianavia as the shipping from US/CA are extremely high and good to share
Tank's anyway //Håkan
Sorry, I missed what you were asking me
If there's any other interest in Scandinavia I'll post it
Sorry, I missed what you were asking me
If there's any other interest in Scandinavia I'll post it
Great! I´ll be watching the other beauties untill then
I actually starting to look for some element set up that could be used for something as crazy as a "Multi media wall" with a thin wall (~15 cm thick) with full sound damped outside front and (parts of) the inside as the speaker volume - and ended up here
I might end up with 2,5 project´s instead of just one. I move this one to the basement as a Cinema set up together with the little Hamlets.....
I've read the entire thread and remember someone asking about a set of curved cabinets, but don't remember if their was an answer. I too would like to build a set with curved sides. I know the cabinet was designed for ease of build, but woodworking is my hobby, so I'm willing to tackle this. I would build it deeper to compensate for the loss of volume. I don't for see a need to adjust the crossover for this, but I could be wrong. Any ideas on this?
- Home
- Loudspeakers
- Multi-Way
- The "Elsinore Project" Thread