I've seen a waveguide application for this project, but I know the original design calls for thick felt around the tweeter. For those looking for something techier, and maybe as functional, check out aluminum foam!
Aluminum Foam
I think it would look really cool and work well in this application.
Aluminum Foam
I think it would look really cool and work well in this application.
Huh
Certainly a cool looking material with a number of interesting applications, but unless I'm misunderstanding your intent, it seems like it would make for an exceptionally lousy wave guide at tweeter wavelengths. Neat stuff though! Pocofoam is another very cool substance for entirely other reasons, as long as we're talking about techy materials with good conductivity and highly porous surfaces. Also probably not well suited for wave guides.
Certainly a cool looking material with a number of interesting applications, but unless I'm misunderstanding your intent, it seems like it would make for an exceptionally lousy wave guide at tweeter wavelengths. Neat stuff though! Pocofoam is another very cool substance for entirely other reasons, as long as we're talking about techy materials with good conductivity and highly porous surfaces. Also probably not well suited for wave guides.
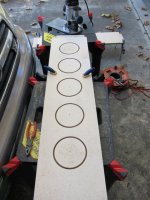
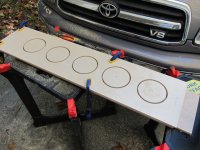
A perfect circle...
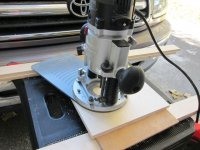
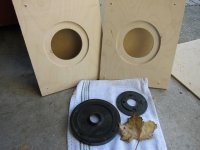
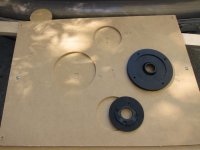
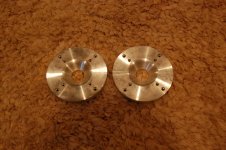
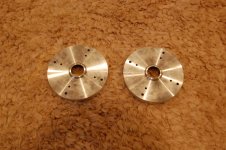
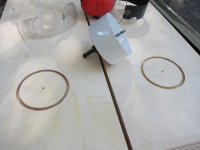
Broke out the Jasper jig today. Now I know why people love this jig, it makes short work of cutting perfect circles. A very, very handy device.
I went ahead and practiced cuts for the main sizes needed for the Elsinore. I also went ahead and created a "Joel Jig" for allowing proper alignment in order for the tweeter to be tapped and mounted onto the waveguide.
I used 151mm (5 and 15/16 on the Jasper) for Joel's waveguide and the fit was pretty much perfect. A very slight amount of give, but, not too much. I used 146mm (5 and 12/16 on the Jasper) for the 830875 drivers, which, was also fine.
For my first attempt at the "Joel Jig", I used 105mm (4 and 2/16 on the Jasper) for the tweeter front plate. This size, IMO has a bit too much leeway, so, I recut another one at 103mm (4 and 1/16 on the jasper). This cut, while slightly too tight, allowed me to sand down and hand-place a workable yet firm alignment with the waveguide (the front plate is held in place by the jig). This is the jig I will use for tapping the waveguide as the slight give on the waveguide appears to support a nice range of final alignment options.
BTW, I know now why Joel went with 6/32 threads. This thread size will give the most amount of alignment play for the final tweeter mounting. Going to 8/32 would probably be a better fit, but, you better be sure you are dead-nuts on as there will be little to no play for final alignment. I am going to use the 6/32 thread size.")
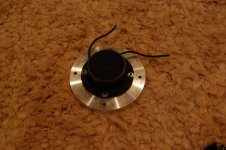
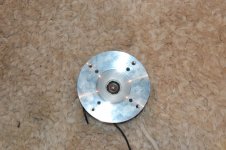
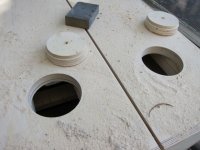
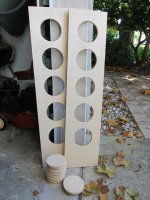
A couple of pics of the process. From here I will cut the front panels (after I get a new bit, this one is pretty much toast from my rookie abuse) and tap out the wave guides. Good stuff!
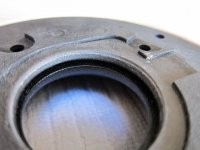
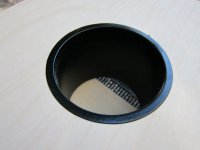
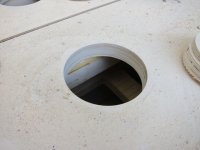
Oh, and here is a picture of the infamous gap. Not sure if I will do anything to fill this gap as it does not appear to be an issue with Joel's builds. Time (and creativity) will tell if I can come up with a clever solution for addressing the gap.
Broke out the Jasper jig today. Now I know why people love this jig, it makes short work of cutting perfect circles. A very, very handy device.
I went ahead and practiced cuts for the main sizes needed for the Elsinore. I also went ahead and created a "Joel Jig" for allowing proper alignment in order for the tweeter to be tapped and mounted onto the waveguide.
I used 151mm (5 and 15/16 on the Jasper) for Joel's waveguide and the fit was pretty much perfect. A very slight amount of give, but, not too much. I used 146mm (5 and 12/16 on the Jasper) for the 830875 drivers, which, was also fine.
For my first attempt at the "Joel Jig", I used 105mm (4 and 2/16 on the Jasper) for the tweeter front plate. This size, IMO has a bit too much leeway, so, I recut another one at 103mm (4 and 1/16 on the jasper). This cut, while slightly too tight, allowed me to sand down and hand-place a workable yet firm alignment with the waveguide (the front plate is held in place by the jig). This is the jig I will use for tapping the waveguide as the slight give on the waveguide appears to support a nice range of final alignment options.
BTW, I know now why Joel went with 6/32 threads. This thread size will give the most amount of alignment play for the final tweeter mounting. Going to 8/32 would probably be a better fit, but, you better be sure you are dead-nuts on as there will be little to no play for final alignment. I am going to use the 6/32 thread size.
A couple of pics of the process. From here I will cut the front panels (after I get a new bit, this one is pretty much toast from my rookie abuse) and tap out the wave guides. Good stuff!
Oh, and here is a picture of the infamous gap. Not sure if I will do anything to fill this gap as it does not appear to be an issue with Joel's builds. Time (and creativity) will tell if I can come up with a clever solution for addressing the gap.
Attachments
Broke out the Jasper jig today. Now I know why people love this jig, it makes short work of cutting perfect circles. A very, very handy device.
I went ahead and practiced cuts for the main sizes needed for the Elsinore. I also went ahead and created a "Joel Jig" for allowing proper alignment in order for the tweeter to be tapped and mounted onto the waveguide.
I used 151mm (5 and 15/16 on the Jasper) for Joel's waveguide and the fit was pretty much perfect. A very slight amount of give, but, not too much. I used 146mm (5 and 12/16 on the Jasper) for the 830875 drivers, which, was also fine.
For my first attempt at the "Joel Jig", I used 105mm (4 and 2/16 on the Jasper) for the tweeter front plate. This size, IMO has a bit too much leeway, so, I recut another one at 103mm (4 and 1/16 on the jasper). This cut, while slightly too tight, allowed me to sand down and hand-place a workable yet firm alignment with the waveguide (the front plate is held in place by the jig). This is the jig I will use for tapping the waveguide as the slight give on the waveguide appears to support a nice range of final alignment options.
BTW, I know now why Joel went with 6/32 threads. This thread size will give the most amount of alignment play for the final tweeter mounting. Going to 8/32 would probably be a better fit, but, you better be sure you are dead-nuts on as there will be little to no play for final alignment. I am going to use the 6/32 thread size.
A couple of pics of the process. From here I will cut the front panels (after I get a new bit, this one is pretty much toast from my rookie abuse) and tap out the wave guides. Good stuff!
Oh, and here is a picture of the infamous gap. Not sure if I will do anything to fill this gap as it does not appear to be an issue with Joel's builds. Time (and creativity) will tell if I can come up with a clever solution for addressing the gap.
Progress looks real good! The weather looks nice Too
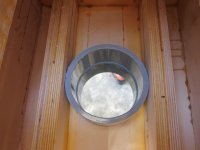
Regarding the gap, I'm listening to mine with a 1.5mm unfilled gap as per post 967. I think Terry is on to something
The sound is uncongested and very involving. window into the recording space with great focus
Joel,
Just for clarification, are you increasing the gap even larger than the one shown above? If so, by what means (washers, spacers, air gap, etc... )?
Yes, the weather in FL lately has been wonderful as of late. This is the time of year (oct to may) that makes living in FL a delight.
Just for clarification, are you increasing the gap even larger than the one shown above? If so, by what means (washers, spacers, air gap, etc... )?
Yes, the weather in FL lately has been wonderful as of late. This is the time of year (oct to may) that makes living in FL a delight.
From the point projection is touching I'm around 1.5mm spaced. I'm hanging the waveguide on mounting screws to play with gap but I'll use fender washers for the bolt size used to mount the tweeter to waveguide..
I't seems that playing with the gap up to a point has a subjective effect- in conjuction with speaker placement-. Right now vocals that might normally be a little forward are more laid back and image precision is consistant..
Is the gap correct?????? Can I listen all night without feeling there's somethings wrong? Yep
The only time things sound really odd to me is when the waveguide isn't centered or it's leaning or left and right are mounted different from each other..
Joel
Interesting observations and suggestions. Thanks Joel and tpate.
I'll have to be sure to leave the mounting threads a bit longer to support changing out the distance from the guide to the tweeter facing. I will probably build it with minimal gap at first to establish a reference and then go from there.
I'll have to be sure to leave the mounting threads a bit longer to support changing out the distance from the guide to the tweeter facing. I will probably build it with minimal gap at first to establish a reference and then go from there.
 a couple of posts were removed due to a racist term being present
 jdkJake, One caution on your rear port size. The 4" hole will be just a little bit wider than the internal back braces are, (4 X 25.4) if your braces are on the narrow side of 100mm the port tube will not fit between the braces especially if you are a little off center with your pilot hole. I'm sure you have thought of this but mine just barely fit.
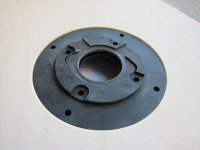
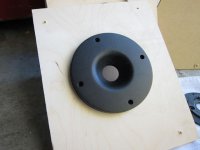
Have new waveguides with rear pocket removed for easy and clean mounting.. 5 spoken for and 7 remaining $160can/pair. Off to paint soon
Decided to mount the tweeters a new pair tight and fill gap.. I like what I hear. gap or no gap? Can add spacers to experiment..
Either way I definately like the tweeter mounted to the waveguide..
Decided to mount the tweeters a new pair tight and fill gap.. I like what I hear. gap or no gap? Can add spacers to experiment..
Either way I definately like the tweeter mounted to the waveguide..
Attachments

jdkJake, One caution on your rear port size. The 4" hole will be just a little bit wider than the internal back braces are, (4 X 25.4) if your braces are on the narrow side of 100mm the port tube will not fit between the braces especially if you are a little off center with your pilot hole. I'm sure you have thought of this but mine just barely fit.
Thanks for the heads up. I noticed it almost immediately after assembling the rear panel. Just after it was too far past the point of compensation.
I have a plan...
Decided to mount the tweeters a new pair tight and fill gap...
Tell us Joel, what did you use to fill the gap? Is that modeling clay?
what did you use to fill the gap? Is that modeling clay?
I used plumbers putty. Had some in the house. The excess carves out nicely
I used plumbers putty. Had some in the house. The excess carves out nicely
Ah, that makes sense. A good choice as it should "never" dry out nor crack over time.
I look forward to your impressions of a gap vice gapless after an extended listening period.
Even the blind squirrel finds a nut once in a while...
You've heard the adage "Better to be lucky than good", well, today I was lucky. VERY lucky.
Routed the holes for the ports. Used a router to start the hole and get a clean surface transition. Finished the job with a 4 inch hole saw.
So, how close to the back stiffeners did I get?
Whew!
You've heard the adage "Better to be lucky than good", well, today I was lucky. VERY lucky.
Routed the holes for the ports. Used a router to start the hole and get a clean surface transition. Finished the job with a 4 inch hole saw.
So, how close to the back stiffeners did I get?
Whew!
Attachments
- Home
- Loudspeakers
- Multi-Way
- The "Elsinore Project" Thread