Hello everyone!
Well it's been 10 weeks in the making with a lot of learning along the way, but here I present to you the:
We were given these speakers and narrowly saved them from being taken to the tip. They appeared to have water damage, many dents and scratches, the grilles were torn and ragged and the mids/tweeters were damaged. Liking the look of these older speakers and being drawn in by the 12" woofer, I wanted to do something to save them.
I would like to say a massive thank you to system7 and Galu for all their help and advice along the way, as well as raymondj, planet10 and everyone else who contributed or offered help and suggestions. It would not have been possible without you!
The Goodmans Magnum-K2 is a large (29cmx38cmx61cm) chipboard cabinet 3-way finished in teak veneer and is understandably very heavy. It retailed for £46.20 in 1971 and it's specs are:
Impedance: 4 - 8 ohm
Max. RMS power: 50W
Frequency Range: 30 - 22,000Hz
Sensitivity: 2W produces 96dB in the average domestic listening room
(Thanks Galu for finding the above)
Here is a brochure page for the range of Goodmans speakers at that time (thanks raymondj):

Here is the original thread: https://www.diyaudio.com/forums/multi-way/374378-restoring-modifying-goodmans-magnum-k2s-advice.html
Modifications
The above is a summary of the main changes, but I am sure there are other little things I have forgotten.
Replacement Drivers
The mids seemed to have extensive PVA glue on them from some sort of repair, and definitely sounded below par to me. It's possible they sounded as originally intended, but if that was truly the case then I wouldn't rate them very highly. The tweeters may have been ok, but they looked fairly poor cosmetically. We decided to replace them both.
The drivers used are the Faital 5FE120:

and the HifiDIY X1II:

Using this tweeter, the frequency range will improve slightly to 20 - 22,000Hz
The original crossover looked like this:

It was located on the small piece of removable ply board that the posts are attached to.
Diagram of original crossover:

Please excuse my rubbish scribbling!
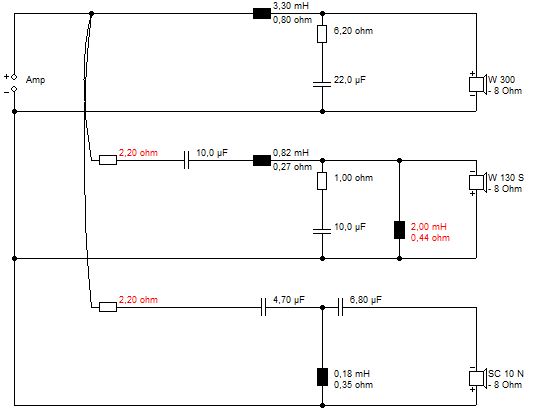
With the help of system7 (and Troels by proxy?") ), we ended up with this:
), we ended up with this:

Cost
By all rights, this probably should have cost more. But Freecycle/Neighbours/The Shed yields wonders from yesteryear, a failed project, some spares left over etc. I begged, stole and borrowed quite a large percentage of the materials needed for this, and the total cost ended up being just over £200, I am sure if I had purchased everything it could have easily been double that. By FAR the most expensive components were the Clarity Cap ESAs at half the total. The Faitals were a quarter of it at £51. I am sure this could be done even cheaper still if NPEs were used, the Tweeters weren't replaced and some things were ignored/skipped.
So without any more delay, lets have a look at some:
Build/Process Pictures
Original cabinets and condition they were received in:

They've seen better days!
Pretty ugly chocolate mousse brown rear panel:

Both drivers looking damaged or worse for wear:


Stripping the cabinets
Most of the stripping has to be done via the bass cutout. Removing the tweeters was easy. The mids were a little adhered by their very old gasket foam tape but did come out with a little persuasion. From there, you can place your hand in and push the large bass driver from the back. The crossover, wiring and 2 large foam pieces (per cabinet) have to come out via the bass cutout. We did briefly consider altering the cabinet so the back was removable, but in the end it seemed like it would be too much hassle and needlessly weaken what is a very strong cabinet. You can see that the teak veneer has a very red colour to it, and that the baffles were a very faded black. There were a large amount of staples that needed removing (from the velcro strips) this was not fun!

Because they were obviously allowed to get damp at some point, the LARGE amount of foam in the cabinets had a VERY strong musty smell. They were in the house when we first got them, and coming downstairs in the morning was a little unpleasant. We quickly moved them to the garage. We treated the foam with vast amounts of bicarb and a good airing on sunny days.

Here we had sanded the veneer (something which we later found out you SHOULD NOT DO!) and the baffles in prep for painting them black:

We also sanded the awful chocolate mousse brown backs which were just painted chipboard and filled a lot of bumps and dimples in the chipboard round the edge:
[url=https://ibb.co/D4kZnrq]
We also noticed when removing the bass drivers, that there was some corrosion to the metal at the rear of the drivers:

We didn't want this to continue so we used some hammerite on it:

Painting/Dying
One of the things that we wanted to do was get rid of the red wood. Neither myself or the wife are particularly fond of red wood, so a darker brown was chosen. We started off using an acrylic based paint to paint the veneer. This ended up looking absolutely awful:

It wasn't a problem to remove, though! It peeled straight off!

We changed course, and went for a dye this time. To start with, we stripped back the cabinets as much as we could and bleached them:
[/url]

We started applying Littlefair's wood dye (a fantastic product) and this was all going very well....

UNTIL... we waxed it:

Total lack of experience on our part, but the wax ruined what had looked rather nice. It wrecked the finish and made it look patchy and awful and to our surprise (despite the bleaching) showed a lot of the original red!
At this point we honestly thought it was game over! I contacted the company who made the dye for advice and they said that not only should be not have sanded the veneer (scrape off the excess wax and clean) but they would finish it with a dye mixed with polyurethane and acrylic. They said all the wax would have to come off first and gave some advice on how to do this.
Copious amounts of white spirit to dissolve the wax, then (if it will take it) washing up liquid and water plus LOTS of kitchen roll. We used the white spirit and were pleased, then moved onto the washing up liquid. This was causing some issues and we decided that it was getting too wet (something we had been warned about). Thinking that things couldn't possibly get any worse, we used citrus Swarfega with grit in it as it's more like a paste, strips oil based products and contains citrus which is a good cleaner... and..... this did the trick:

We lightly scrubbed it with an old nail brush and you can see how much is coming off on the kitchen roll:

And after applying the new dye with polyurethane and acrylic in:


Dyed, varnished and protected in one! We applied this one sparingly with a cloth in several layers. Phew!
We used this dye and varnish combo on the backs to get rid of the horrible brown:

Finally, we used black acrylic spray paint for the back of the grilles and the baffles:


The baffles and were given several coats of clear polyurethane varnish as well as the yellow paper the posts are sat on.
Mid enclosure / Driver Replacements / Crossover
The Faital 5FE120 required about a 5L enclosure.
View from bass cutout:

We started by using a cardboard box to see what size MDF we would need to get from the shed:

Then cut several peices BUT we had to assemble them inside the cabinet, which was lots of fun

Done!

We fixed in place and sealed with a LOT of hot glue and liquid nails:

This presented a problem... the way to secure the bass driver was to put your hand in through the mid cutout and use a stubby screw driver to hold the inverse facing screws/bolts whilst tightening them from the front with a spanner or socket. So remove this issue, we used liquid nails to fix small chunks of MDF behind each screw hole so that we could secure the driver from the front:


The cutouts were too small for the replacement drivers. Not by much, but the original Goodmans mid was 4" and the new Faital is 5".


The tweeter (which I got cheap from a friend who ordered the wrong size) would technically fit, but when I got it I found the spade connectors stuck out a little. The tweeter cutout would need a couple of notches to allow the connections to sit without being mangled. We had to make these notches top and bottom as opposed to left and right because the mid enclosure would be in the way:

Mid cutout increased:

Of course, the cutouts in the grilles would have to be increased and the black paint touched up:

And here's some of the grilles being refoamed:
 https://ibb.co/2gX9D4R
I got given some 5mm grey foam (for upholstery?) and we just used PVA to adhere it to the board once they were sanded off:
 [/url]
Cutting foam is not easy without tearing it!!
The grille fabric we ended up using I also got given:

We love the retro look of it, and think it matches the darker dyed veneer. I’ll save pics of this on the grilles for the end
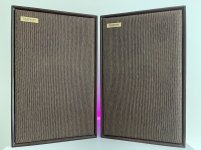
Well it's been 10 weeks in the making with a lot of learning along the way, but here I present to you the:
Goodmans Magnum-K2+

We were given these speakers and narrowly saved them from being taken to the tip. They appeared to have water damage, many dents and scratches, the grilles were torn and ragged and the mids/tweeters were damaged. Liking the look of these older speakers and being drawn in by the 12" woofer, I wanted to do something to save them.
I would like to say a massive thank you to system7 and Galu for all their help and advice along the way, as well as raymondj, planet10 and everyone else who contributed or offered help and suggestions. It would not have been possible without you!
The Goodmans Magnum-K2 is a large (29cmx38cmx61cm) chipboard cabinet 3-way finished in teak veneer and is understandably very heavy. It retailed for £46.20 in 1971 and it's specs are:
Impedance: 4 - 8 ohm
Max. RMS power: 50W
Frequency Range: 30 - 22,000Hz
Sensitivity: 2W produces 96dB in the average domestic listening room
(Thanks Galu for finding the above)
Here is a brochure page for the range of Goodmans speakers at that time (thanks raymondj):
Here is the original thread: https://www.diyaudio.com/forums/multi-way/374378-restoring-modifying-goodmans-magnum-k2s-advice.html
Modifications
- Crossover redesign (thanks Steve!)
- Relocate crossover to bottom of cabinets
- Upgrade internal wiring (2mm)
- Construct mid enclosure
- Replace mids
- Replace tweeters
- Strip veneer and refinish
- Restore/add black paint on baffle and grilles
- Replace velcro on baffle and grilles
- Replace posts
- Alter the way the bass driver is secured
- Filled various imperfections, especially on the rear of the cabinets
- New gaskets
- Add additional dampening material to the internal walls
- Recover grilles with new foam retro fabric
- Custom grille badge
The above is a summary of the main changes, but I am sure there are other little things I have forgotten.
Replacement Drivers
The mids seemed to have extensive PVA glue on them from some sort of repair, and definitely sounded below par to me. It's possible they sounded as originally intended, but if that was truly the case then I wouldn't rate them very highly. The tweeters may have been ok, but they looked fairly poor cosmetically. We decided to replace them both.
The drivers used are the Faital 5FE120:
and the HifiDIY X1II:
Using this tweeter, the frequency range will improve slightly to 20 - 22,000Hz
The original crossover looked like this:
It was located on the small piece of removable ply board that the posts are attached to.
Diagram of original crossover:
Please excuse my rubbish scribbling!
With the help of system7 (and Troels by proxy?
), we ended up with this:
Cost
By all rights, this probably should have cost more. But Freecycle/Neighbours/The Shed yields wonders from yesteryear, a failed project, some spares left over etc. I begged, stole and borrowed quite a large percentage of the materials needed for this, and the total cost ended up being just over £200, I am sure if I had purchased everything it could have easily been double that. By FAR the most expensive components were the Clarity Cap ESAs at half the total. The Faitals were a quarter of it at £51. I am sure this could be done even cheaper still if NPEs were used, the Tweeters weren't replaced and some things were ignored/skipped.
So without any more delay, lets have a look at some:
Build/Process Pictures
Original cabinets and condition they were received in:
They've seen better days!
Pretty ugly chocolate mousse brown rear panel:
Both drivers looking damaged or worse for wear:
Stripping the cabinets
Most of the stripping has to be done via the bass cutout. Removing the tweeters was easy. The mids were a little adhered by their very old gasket foam tape but did come out with a little persuasion. From there, you can place your hand in and push the large bass driver from the back. The crossover, wiring and 2 large foam pieces (per cabinet) have to come out via the bass cutout. We did briefly consider altering the cabinet so the back was removable, but in the end it seemed like it would be too much hassle and needlessly weaken what is a very strong cabinet. You can see that the teak veneer has a very red colour to it, and that the baffles were a very faded black. There were a large amount of staples that needed removing (from the velcro strips) this was not fun!
Because they were obviously allowed to get damp at some point, the LARGE amount of foam in the cabinets had a VERY strong musty smell. They were in the house when we first got them, and coming downstairs in the morning was a little unpleasant. We quickly moved them to the garage. We treated the foam with vast amounts of bicarb and a good airing on sunny days.
Here we had sanded the veneer (something which we later found out you SHOULD NOT DO!) and the baffles in prep for painting them black:
We also sanded the awful chocolate mousse brown backs which were just painted chipboard and filled a lot of bumps and dimples in the chipboard round the edge:
[url=https://ibb.co/D4kZnrq]
We also noticed when removing the bass drivers, that there was some corrosion to the metal at the rear of the drivers:
We didn't want this to continue so we used some hammerite on it:
Painting/Dying
One of the things that we wanted to do was get rid of the red wood. Neither myself or the wife are particularly fond of red wood, so a darker brown was chosen. We started off using an acrylic based paint to paint the veneer. This ended up looking absolutely awful:
It wasn't a problem to remove, though! It peeled straight off!
We changed course, and went for a dye this time. To start with, we stripped back the cabinets as much as we could and bleached them:
[/url]
We started applying Littlefair's wood dye (a fantastic product) and this was all going very well....
UNTIL... we waxed it:
Total lack of experience on our part, but the wax ruined what had looked rather nice. It wrecked the finish and made it look patchy and awful and to our surprise (despite the bleaching) showed a lot of the original red!
At this point we honestly thought it was game over! I contacted the company who made the dye for advice and they said that not only should be not have sanded the veneer (scrape off the excess wax and clean) but they would finish it with a dye mixed with polyurethane and acrylic. They said all the wax would have to come off first and gave some advice on how to do this.
Copious amounts of white spirit to dissolve the wax, then (if it will take it) washing up liquid and water plus LOTS of kitchen roll. We used the white spirit and were pleased, then moved onto the washing up liquid. This was causing some issues and we decided that it was getting too wet (something we had been warned about). Thinking that things couldn't possibly get any worse, we used citrus Swarfega with grit in it as it's more like a paste, strips oil based products and contains citrus which is a good cleaner... and..... this did the trick:
We lightly scrubbed it with an old nail brush and you can see how much is coming off on the kitchen roll:
And after applying the new dye with polyurethane and acrylic in:
Dyed, varnished and protected in one! We applied this one sparingly with a cloth in several layers. Phew!
We used this dye and varnish combo on the backs to get rid of the horrible brown:
Finally, we used black acrylic spray paint for the back of the grilles and the baffles:
The baffles and were given several coats of clear polyurethane varnish as well as the yellow paper the posts are sat on.
Mid enclosure / Driver Replacements / Crossover
The Faital 5FE120 required about a 5L enclosure.
View from bass cutout:
We started by using a cardboard box to see what size MDF we would need to get from the shed:
Then cut several peices BUT we had to assemble them inside the cabinet, which was lots of fun
Done!
We fixed in place and sealed with a LOT of hot glue and liquid nails:
This presented a problem... the way to secure the bass driver was to put your hand in through the mid cutout and use a stubby screw driver to hold the inverse facing screws/bolts whilst tightening them from the front with a spanner or socket. So remove this issue, we used liquid nails to fix small chunks of MDF behind each screw hole so that we could secure the driver from the front:
The cutouts were too small for the replacement drivers. Not by much, but the original Goodmans mid was 4" and the new Faital is 5".
The tweeter (which I got cheap from a friend who ordered the wrong size) would technically fit, but when I got it I found the spade connectors stuck out a little. The tweeter cutout would need a couple of notches to allow the connections to sit without being mangled. We had to make these notches top and bottom as opposed to left and right because the mid enclosure would be in the way:
Mid cutout increased:
Of course, the cutouts in the grilles would have to be increased and the black paint touched up:
And here's some of the grilles being refoamed:
https://ibb.co/2gX9D4RI got given some 5mm grey foam (for upholstery?) and we just used PVA to adhere it to the board once they were sanded off:
Cutting foam is not easy without tearing it!!
The grille fabric we ended up using I also got given:
We love the retro look of it, and think it matches the darker dyed veneer. I’ll save pics of this on the grilles for the end
Attachments
Crossover
We decided that in order to be as cost effective as possible (whatever that is!) that we would wind out own inductors. This was an interesting yet rewarding experience. We used ferrite rods from eBay made by Mullard (I expect old stock) and a mixture of bottle caps, cable ties and hot glue. We used 1mm wire for the ferrites and 1.2mm wire for the air coils. The resistors were all ceramic (and majorly overkill) and we decided on the Clarity Cap ESAs for the caps. We purchased an LCR meter specifically for this, which I don't include in the total outlay because it's a tool that'll go in the shed for another time. We used the GM328A, which was £12 from AliExpress.
Here is a pic of the massive 22uF bass circuit cap in the bottom of the cabinet:

And the completed crossover:

Just due to the sheer size of each circuit, we separated them onto 3 boards.
Here is one of the aircoils:

We did use bobbins for those because they were cheap and as a result are probably the tidiest. We kind of fashioned our own bobbins for the ferrites (most of them!) and some are wound on the rod. At some point we may redo those so they are a bit tidier. In any case, everything is secured with hot glue and the inductance and resistance values are stable and on point. We hit below the resistance value for each coil to avoid any heating in the circuits.
We fixed 2 pieces of wood to the bottom of each cabinet to mount:

We also wanted to replace the rather oxidised and small posts with something that would accept banana plugs:
Before:

After:

Grille Badges
We couldn't find the Goodmans badges for any less than about £12. Being that we had changed 2 of the drivers, and refinished the veneer, we felt that these should now be called the Goodmans Magnum-K2+
I contacted a seller on AliExpress who laser etches name badges. He would knock up 2 name badges in bronze colour for £6 delivered. I sent him the text "Magnum-K2+" and he sent me this proof back:

Obviously, it doesn't look very good. Not because of the seller, but because of the font. He sent a few more through that were much closer, but none looked quite right. He had asked me if I knew what the Goodmans and Magnum fonts were called, but I had no idea. Then I came across a website that will identify a font if you upload an image (What the font). I took photos of the Magnum label on the back of the cabinet and used the image of the Goodmans badges:


And Lo and Behold!


This website was selling them for quite a sum, but I searched a couple of websites that have free to use fonts, and they were listed there! I sent them to the seller with this:

And he promised that he could replicate that exactly. So I placed the order.. and waited... then this dropped on the mat:

We couldn't be happier with it!
Assembly
On to the exciting bit!
New gasket on bass driver cutout. We used some cheap self adhesive foam tape:

Crossover in:

Trimmed gasket and inserting foam:

We had to cut some of the foam up to get it to fit back in due to the mid enclosure and theres still some left over. We found by trial and error that the bass drivers actually sound better with more foam around them (thanks Galu for pointing out this may have not been the case, which prompted the trial and error)
Wiring the mid:

We drilled a hole in the mid enclosure then sealed it with a lot of hot glue afterwards. We also had some soft fluffy material from some sort of art project which we lined the enclosure with. We also added some of this to the walls of the cabinet. It's quite like thick felt.
Filling the mid enclosure with BAF from a sacrificed old pillow:

The Finished Article


Still to do and final thoughts...
Well, we love them and they sound great. We've already had a lot of comments on them, and our kids have already got their eye on them This has been an AMAZING project to do and we have learnt a LOT, like don't sand veneer! We nearly fell on that hurdle but luckily we managed to save it and in the end they look pretty decent.
Still on the todo list would be to either replace the screws or properly black them out, they do tent to stick out a bit as they are Obviously you can't see them with the grilles on, but everyone wants to see underneath when they first come across them! Another todo item is some stands! This is work in progress and I am trying to source free hardwood to make some very heavy stands out of. We will dye and varnish the wood to match the cabinets and then the Mrs can have her occasional tables back!
We hope you have enjoyed reading this, and please do let us know what you think!
Edit: ALBUM LINK
We decided that in order to be as cost effective as possible (whatever that is!) that we would wind out own inductors. This was an interesting yet rewarding experience. We used ferrite rods from eBay made by Mullard (I expect old stock) and a mixture of bottle caps, cable ties and hot glue. We used 1mm wire for the ferrites and 1.2mm wire for the air coils. The resistors were all ceramic (and majorly overkill) and we decided on the Clarity Cap ESAs for the caps. We purchased an LCR meter specifically for this, which I don't include in the total outlay because it's a tool that'll go in the shed for another time. We used the GM328A, which was £12 from AliExpress.
Here is a pic of the massive 22uF bass circuit cap in the bottom of the cabinet:
And the completed crossover:
Just due to the sheer size of each circuit, we separated them onto 3 boards.
Here is one of the aircoils:
We did use bobbins for those because they were cheap and as a result are probably the tidiest. We kind of fashioned our own bobbins for the ferrites (most of them!) and some are wound on the rod. At some point we may redo those so they are a bit tidier. In any case, everything is secured with hot glue and the inductance and resistance values are stable and on point. We hit below the resistance value for each coil to avoid any heating in the circuits.
We fixed 2 pieces of wood to the bottom of each cabinet to mount:
We also wanted to replace the rather oxidised and small posts with something that would accept banana plugs:
Before:
After:
Grille Badges
We couldn't find the Goodmans badges for any less than about £12. Being that we had changed 2 of the drivers, and refinished the veneer, we felt that these should now be called the Goodmans Magnum-K2+
I contacted a seller on AliExpress who laser etches name badges. He would knock up 2 name badges in bronze colour for £6 delivered. I sent him the text "Magnum-K2+" and he sent me this proof back:
Obviously, it doesn't look very good. Not because of the seller, but because of the font. He sent a few more through that were much closer, but none looked quite right. He had asked me if I knew what the Goodmans and Magnum fonts were called, but I had no idea. Then I came across a website that will identify a font if you upload an image (What the font). I took photos of the Magnum label on the back of the cabinet and used the image of the Goodmans badges:
And Lo and Behold!
This website was selling them for quite a sum, but I searched a couple of websites that have free to use fonts, and they were listed there! I sent them to the seller with this:
And he promised that he could replicate that exactly. So I placed the order.. and waited... then this dropped on the mat:
We couldn't be happier with it!
Assembly
On to the exciting bit!
New gasket on bass driver cutout. We used some cheap self adhesive foam tape:
Crossover in:
Trimmed gasket and inserting foam:
We had to cut some of the foam up to get it to fit back in due to the mid enclosure and theres still some left over. We found by trial and error that the bass drivers actually sound better with more foam around them (thanks Galu for pointing out this may have not been the case, which prompted the trial and error)
Wiring the mid:
We drilled a hole in the mid enclosure then sealed it with a lot of hot glue afterwards. We also had some soft fluffy material from some sort of art project which we lined the enclosure with. We also added some of this to the walls of the cabinet. It's quite like thick felt.
Filling the mid enclosure with BAF from a sacrificed old pillow:
The Finished Article
Still to do and final thoughts...
Well, we love them and they sound great. We've already had a lot of comments on them, and our kids have already got their eye on them
This has been an AMAZING project to do and we have learnt a LOT, like don't sand veneer! We nearly fell on that hurdle but luckily we managed to save it and in the end they look pretty decent.Still on the todo list would be to either replace the screws or properly black them out, they do tent to stick out a bit as they are
Obviously you can't see them with the grilles on, but everyone wants to see underneath when they first come across them! Another todo item is some stands! This is work in progress and I am trying to source free hardwood to make some very heavy stands out of. We will dye and varnish the wood to match the cabinets and then the Mrs can have her occasional tables back!We hope you have enjoyed reading this, and please do let us know what you think!
Edit: ALBUM LINK
Last edited by a moderator:
Thanks! I couldn’t have done it without you guys
What next? Well it just so happens that I can answer that question!
Meet my latest freecycle pickup:

I’m thinking Bluetooth connectivity, lead acid motorbike battery, additional drivers for a more immersive experience, OLED screen…. Man this thing already sounds amazing and I haven’t even started. I’ve got it hooked up to my phone via the aux in at the back.
Ima look way more hip to the kids with this Brixton briefcase on my shoulder than with any of their new fangled JBL play things, who needs water proof when you can’t physically knock it over into the pool?. 
On a not so cool note, I’ve just noticed all my images are showing as thumbnails I can’t edit the posts anymore either. If a mod could change that, I’ll sort it tomorrow. Gonna take an age to change the links on over 50 images!
What next? Well it just so happens that I can answer that question!
Meet my latest freecycle pickup:
I’m thinking Bluetooth connectivity, lead acid motorbike battery, additional drivers for a more immersive experience, OLED screen…. Man this thing already sounds amazing and I haven’t even started. I’ve got it hooked up to my phone via the aux in at the back.
Ima look way more hip to the kids with this Brixton briefcase on my shoulder than with any of their new fangled JBL play things, who needs water proof when you can’t physically knock it over into the pool?.
On a not so cool note, I’ve just noticed all my images are showing as thumbnails
I can’t edit the posts anymore either. If a mod could change that, I’ll sort it tomorrow. Gonna take an age to change the links on over 50 images!I noticed the image problem, cropped and not expandable.
Try reporting the problem via the little exclamation triangle at bottom left of your post.
Have fun with your boombox - 3D bass - what other way would bass waves propagate?
What is the model number for interest's sake?
Try reporting the problem via the little exclamation triangle at bottom left of your post.
Have fun with your boombox - 3D bass - what other way would bass waves propagate?
What is the model number for interest's sake?
That first post was greatest saga since "Gone with the Wind"...
Just glad my reputation for complete guesswork isn't in tatters. TBH, I just nicked it from Troels Gravesen, the Crossover Prince of Denmark...
Just proves a three-way beats a two way, IMO. Marvellous piece of work. Those efficient Faital Pro drivers look alright.
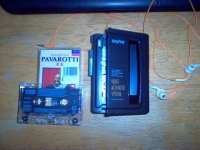
I have invested 25p on a "Pavarotti Hits vol. 2" cassette tape. I was given a Sanyo cassette walkman and must try it out.
Just glad my reputation for complete guesswork isn't in tatters. TBH, I just nicked it from Troels Gravesen, the Crossover Prince of Denmark...
Just proves a three-way beats a two way, IMO. Marvellous piece of work. Those efficient Faital Pro drivers look alright.
I have invested 25p on a "Pavarotti Hits vol. 2" cassette tape. I was given a Sanyo cassette walkman and must try it out.
Done. Thanks, I didn’t even see it lol.
3D bass: I know right? How deliciously over marketed.
The model number is TRK-3D8E. Not sure how much to preserve. Might have to start another thread at some point and brainstorm it!
Edit: and I’ve done it again, typing without refreshing!
Thanks Steve, well nicked or not, they sound great I’ll make sure I do another good novel for my next project…. “gone with the hitachi boom box”
That’s funny, I was given an old Technics RS-B40 with this Hitachi and I have no tapes either!
3D bass: I know right? How deliciously over marketed.
The model number is TRK-3D8E. Not sure how much to preserve. Might have to start another thread at some point and brainstorm it!
Edit: and I’ve done it again, typing without refreshing!
Thanks Steve, well nicked or not, they sound great
I’ll make sure I do another good novel for my next project…. “gone with the hitachi boom box”That’s funny, I was given an old Technics RS-B40 with this Hitachi and I have no tapes either!
Last edited:
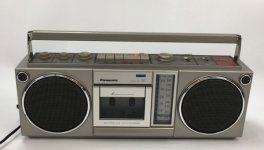
I've still got the Panasonic portable cassette receiver I bought new many moons ago - very similar to the model pictured.
I fitted external speaker jacks to it at the time (to compensate for the lack of a subwoofer!) and have recently replaced the drive belt.
It's used infrequently to play any old cassette tapes I come across.
My hi-fi dual cassette deck is unused and packed away in its box awaiting possible sale when the current compact cassette revival reaches its full peak!
Attachments
Done. Thanks, I didn’t even see it lol.
David, you will have to repost how you want that content to appear (as a new reply here with an explanation why so those following the thread can follow it).
Then report the thread and we can delete post #2
@Galu
Nice thanks!
I should make a new thread for this, any idea what section this should go under?
Edit: @Mooly thanks will do.
Edit 2: Actually Mooly, this might be easier.. can you put this album link at the bottom of post 2? Goodmans Magnum-K2 — ImgBB
Nice thanks!
I should make a new thread for this, any idea what section this should go under?
Edit: @Mooly thanks will do.
Edit 2: Actually Mooly, this might be easier.. can you put this album link at the bottom of post 2? Goodmans Magnum-K2 — ImgBB
Last edited:
I think the closest match would be 'Analog Source'.@Galu I should make a new thread for this, any idea what section this should go under?
Modifying a Hitachi TRK-3D8E.. Ideas?
No plans to do anything with your Panasonic? Gotta love the look of these old units. I bet you'll get a tidy sum for it. I looked up the Hitachi I just picked up and a PWO example is listed for over £200!
No plans to do anything with your Panasonic?
Gotta love the look of these old units. I bet you'll get a tidy sum for it. I looked up the Hitachi I just picked up and a PWO example is listed for over £200!My Cassette recorder seems to have problems (er, "Issues" or "Challenges" in modern speak... ).
It doesn't like 1.2V AA rechargeables. Seems designed for 1.5V types. Pavarotti seems to have dropped an octave and sounds distinctly horrible. Like the battery is going flat...
The inbuilt speaker is mediocre. The headphone socket only plays left channel. Doubtless a broken solder joint on this high stress connection. But I might fix that.
It's voice-activated on recording, so makes ideal spyware to find out what colleagues say about me when I leave the room!
It also is sufficiently low tech to avoid the British government and Russian internet spies knowing what I am listening to. In fact if the Internet gets hacked by the Chinese, and the lights go out, I will still be playing happy songs. No digital rights management by Bill Gates either. I can make endless copies for my fellow music lovers without Mr. Plod knocking on my door. Just like the good ol' days.
Paranoid? Me?
).It doesn't like 1.2V AA rechargeables. Seems designed for 1.5V types. Pavarotti seems to have dropped an octave and sounds distinctly horrible. Like the battery is going flat...
The inbuilt speaker is mediocre. The headphone socket only plays left channel. Doubtless a broken solder joint on this high stress connection. But I might fix that.
It's voice-activated on recording, so makes ideal spyware to find out what colleagues say about me when I leave the room!
It also is sufficiently low tech to avoid the British government and Russian internet spies knowing what I am listening to. In fact if the Internet gets hacked by the Chinese, and the lights go out, I will still be playing happy songs. No digital rights management by Bill Gates either. I can make endless copies for my fellow music lovers without Mr. Plod knocking on my door. Just like the good ol' days.
Paranoid? Me?
Attachments
That is done.album link at the bottom of post 2? Goodmans Magnum-K2 — ImgBB
I am pretty sure this Sanyo M1118 player is MONO! It's more a Dictaphone it seems.

Only two wires on the shielded lead from the head, and it looks a mono head too. Apparently, stereo headphone jacks aren't compatible with mono sockets. You just get the left channel.
I found all sorts of strange goings on with different NiMH batteries. Some are 1.27V, some are 1.38V. I had some oldish alkalines in uncertain condition to try. Those are 1.51V. Regardless, in situ and under load, the NiMH were 2.73V. The Alkalines were 2.89V.
Quite likely the drive belts are stretched, as you say. But the player is quite enjoyable over the speaker. You get used to it. Pavarotti does Ave Maria and Nessun Dorma to his usual high standard.
I see new ferrite C-90 Type 1 cassettes are £1. Chrome Dioxide Type 2 about £10!
Old cassette players are a bit of a gamble, IIRC. Drive wheels with flats. Stretched belts. Worn heads. Oh well.
Those are strange reading for your AA cells.
Rechargeable AA cells will have a lower EMF than 1.5V, around 1.2V.
However, they will maintain their terminal voltage under load, where non-rechargeables flag.
P.S. I recently made a small fortune at auction by selling unopened multipacks of CrO2 cassette tapes that I'd bought around the millenium. Currys were getting rid of their stock cos the bottom had fallen out of the compact cassette market.
The packs were dispatched to locations in Europe.
That is done.
Thanks!
@system7 Galu seems to know more about cells than I do but I always found that nothing beat a good old Duracell Alkaline 1.5V for stuff like that. We had one of those Alkaline rechargers for all the AAA, AA, C and D’s many of my childhood toys used. The thing actually worked, or so I remember!
@Galu, I’ve got some CrO2s somewhere, my Dad had a load until very recently and was very fond of those in his Nakamichi deck!
- Home
- Loudspeakers
- Multi-Way
- Goodmans Magnum K2+ -or- Massive Magnum-K2 rework/refurb