
Well, I’ve searched and searched and I cannot find anything that specifically says it’s transformer varnish, electrical resin or similar that I can have here this weekend.  these kind of varnishes seem to be electrically insulating as well as heat resistant. In the case of my coils, they are already insulated with polyester so I really only need it to be heat resistant and not catch fire (and hold well, of course).
Based on the Electrolube product from CPC above, I highly suspect that the link on eBay is just polyurethane… the seller has put a pic of a small bottle which is either a stock image or if it is the genuine bottle you get, shows that they’re decanting a larger vessel into small 100ml containers.
I’m going to take a risk on this one and order a polyurethane acrylic solution. I have found several posts across various forums including this one: Winding your own inductors — MAC/DIY where the user “Wolf” tells someone to dip the coil in polyurethane.
What kind of temps are coils expected to reach? 70C? Acrylic begins to break down at about 75C and Polyurethane at about 93C. If it gets hotter than that, I’m not sure if it should be in a wooden box with a load of foam and pillow stuffing… I mean, there’s going to be a giant piece of foam covering the whole crossover…. Or am I being stupid?
Edit: looks like acrylic doesn’t actually melt until about 160C.
So unless these coils are going to reach the 90s…..
these kind of varnishes seem to be electrically insulating as well as heat resistant. In the case of my coils, they are already insulated with polyester so I really only need it to be heat resistant and not catch fire (and hold well, of course). Based on the Electrolube product from CPC above, I highly suspect that the link on eBay is just polyurethane… the seller has put a pic of a small bottle which is either a stock image or if it is the genuine bottle you get, shows that they’re decanting a larger vessel into small 100ml containers.
I’m going to take a risk on this one and order a polyurethane acrylic solution. I have found several posts across various forums including this one: Winding your own inductors — MAC/DIY where the user “Wolf” tells someone to dip the coil in polyurethane.
What kind of temps are coils expected to reach? 70C? Acrylic begins to break down at about 75C and Polyurethane at about 93C. If it gets hotter than that, I’m not sure if it should be in a wooden box with a load of foam and pillow stuffing… I mean, there’s going to be a giant piece of foam covering the whole crossover…. Or am I being stupid?
Edit: looks like acrylic doesn’t actually melt until about 160C.
So unless these coils are going to reach the 90s…..
Last edited:
No, I didn’t miss it but that varnish is:
1. For high voltage applications
2. Won’t get here for almost a week
3. Seems very expensive when it’s main USP won’t actually be of use
I have searched for another source for that same varnish that I can get sooner but I cannot find any. It seems like being insulating up to 70KV is a bit overkill for a wire that is already insulated and won’t have that kind of voltage. Unless I’m missing the point, all I need is a varnish that can withstand the temperatures a coil will reach. A varnish that can withstand 70,000 volts when I don’t need it to and waiting a week for it seems unnecessary when it looks like polyurethane and/or acrylic will do the same job and I can get half a litre for the same price and use it on the cabinets afterwards as well. Since neither of us have used a product like this on coils before, it would be helpful if someone who has could clarify what types of varnish are actually suitable.
Sorry, I quickly realised that and edited out my query.No, I didn’t miss it...
I think we are getting a bit carried away here. Steve pointed out that using insulating tape was a bad idea, so we just want an alternative way of securing your scatter wound coil to the cylindrical ferrite bar.
Maybe just use plastic ties at either end of the bar and stop worrying.
@Galu Well, I’ve never been one to shy away from doing something again if the first attempt wasn’t good enough. I chalk such things down to experience and enjoy the learning. Maybe they should be a bit tidier than they are… tbh, I don’t like the look of those coils in the tannoys. I know they’re professionally developed and assembled, but I don’t like the idea of just dumping hot glue on something.
I’ve got a varnish arriving today that is a polyurethane and acrylic mix. My plan is to semi-varnish (the ends) as I go to avoid them cascading and the upper layers collapsing. I’ll have the heat gun on standby and two of us should be able to wind, apply and quickly set a row at a time. At the end I can apply a nice thick coat to keep the whole thing in place. I don’t see how this would be any different than dipping the entire thing in varnish at the end.
I won’t be able to do anything until about 8pm this evening as we’re out all day. @system7 I can’t find any information on the kinds of temperatures coils like these are expected to reach. From what I have read, polyurethane doesn’t want to go over about 93C so if it’s lower than that I think we’re good to go.
Edit: I’ll also hopefully get time to do one of the grilles this evening and will attach a photo of the custom made badges in place
Last edited:
Bass inductors in professional PA speakers are likely to get hot due to the very high powers involved.
I doubt if such overheating is a concern with home speakers such as yours, given that normal domestic listening levels are attained with an average of no more than a couple of watts of power.
I doubt if such overheating is a concern with home speakers such as yours, given that normal domestic listening levels are attained with an average of no more than a couple of watts of power.
True. But why limit them to average listening levels? And what if someone did turn it up a bit? If a speaker is capable of, for example, 16 to 32 watts then surely the best thing to do would be to design the crossover to be capable of that? If we ever find ourselves in a situation where we want them cranked up (garden party? Hall hire?) it would seem sensible to make sure they are able to run like that. Totally agree that for average use they’re not going to be that loud, but I couldn’t trust that they’re going to not accidentally be turned up over 1-2 Watts. Whilst I might be able to remember that, I’d put money on the wife and kids not remembering. If the Mrs cranks it up and the house burns down, I think I’d be getting a divorce pretty quickly.
Last edited:
It's not a problem with domestic speakers cos the manufacturers don't wrap their bass coils in insulating tape.
So, basically, the problem is solved if you don't use tape!
The inductors they use are designed with the maximum power rating of the speaker in mind.
Low resistance coils won't get as hot as high resistance ones. What is the resistance of your bass coil I wonder?
So, basically, the problem is solved if you don't use tape!
The inductors they use are designed with the maximum power rating of the speaker in mind.
Low resistance coils won't get as hot as high resistance ones. What is the resistance of your bass coil I wonder?
Oh sorry, I see what you mean.
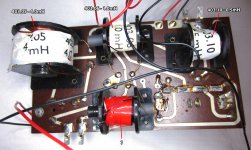
The resistance is lower than the spec Steve provided. I went for thicker wire than I probably needed. I probably could have used 0.8mm, but I used 1.0mm.
The 3.3mH on the Bass circuit is 0.4R, it can be up to 0.8R.
For the air coils I am using 1.25mm to get a lower resistance there too.
The resistance is lower than the spec Steve provided. I went for thicker wire than I probably needed. I probably could have used 0.8mm, but I used 1.0mm.
The 3.3mH on the Bass circuit is 0.4R, it can be up to 0.8R.
For the air coils I am using 1.25mm to get a lower resistance there too.
Last edited:
The lacquer is here.
While we wait for some input about the suitability of the lacquer for the coils, I was thinking about the sticker on the back:

I’ve kept it there because it’s part of the charm, but I should probably label it correctly now it’s been modified.
What would be a sensible thing to label it with now? 8ohms? How many watts? Not really sure how the relationship between the drivers works and how to determine the new maximum wattage and ohm value?
While we wait for some input about the suitability of the lacquer for the coils, I was thinking about the sticker on the back:
I’ve kept it there because it’s part of the charm, but I should probably label it correctly now it’s been modified.
What would be a sensible thing to label it with now? 8ohms? How many watts? Not really sure how the relationship between the drivers works and how to determine the new maximum wattage and ohm value?
You measured the DC resistance of the bass driver as 6.5 ohm. Adding on one third of that figure, as is the rule of thumb, suggests a nominal impedance of around 8 ohm.
The power handling of the bass driver will not have changed.
Even your mid's DCR of 5.4 ohm indicates it has a highish nominal impedance of around 7 ohm.
And then, at certain frequencies. the impedance can drop below the nominal value.
Consequently, I would leave the label exactly as it is 4 - 8 ohm/40W.
When you rebuild your ferrite rod coils, why not cut a couple of squares of plywood, or what have you, drill holes in the middle of them to match the diameter of the ferrite rod, then glue them onto the rod to provide supporting end 'cheeks' which will retain your coil windings?
A sort of homemade bobbin I mean, and no need for varnish. Simply drill a small hole in each wooden cheek through which to pass and help secure each end of the insulated copper wire.
A sort of homemade bobbin I mean, and no need for varnish. Simply drill a small hole in each wooden cheek through which to pass and help secure each end of the insulated copper wire.
Good idea. I think I’ll do that.
I noticed that even on the air coils, which do have a bobbin, it was still quite difficult to get the wire to sit butted up against the previous turn, continue wrapping and maintain an even tension. This meant that it was entirely possible to not ‘properly fill’ the length of the bobbin and on subsequent rows the pressure of the turns could ‘force’ its way down in between the turns of the row underneath. I’ve only done one air coil so far, but it was much easier to keep it neat. I think the next job will be to knock up some ends as you suggest.
I took the masking tape (at least that’s what it looks like) off one of the Goodmans air coils that came with these, and it’s quite chaotic. It’s loose and all over the place. Not uniform and neat at all. Makes you wonder how the thing maintained a static value and didn’t cause noise. Maybe the values weren’t high enough.
I didn’t get very far with the grilles this evening. The fabric (having a distinct weave) was really tricky to get the rows/columns aligned. Without a lot of pulling, holding and checking before stapling, it was extremely easy to get a wonky result which looked crap and was immediately noticeable! I’ve just about got one covered now, but the edges aren’t trimmed and the badge isn’t fitted so that’ll be a job for another day (probably next week now).
What with work / summer hols and various other commitments, I don’t have anywhere near as much time as I’d like to spend on these. I’m sure they’ll be worth it in the end!
Left to do:
Finish grilles
Add Velcro to cabinets (old stuff was shot)
Build air coils
Redo ferrites
Build crossovers
Several layers of clear varnish on cabinets
Add spikes
Assemble
- Home
- Loudspeakers
- Multi-Way
- Restoring / Modifying Goodmans Magnum K2s Advice Needed