If you like the look of the ports, you can of course use them. But the thin plastic ports are not particularly stable and you have to get them completely sealed. I'd rather not do that - but it's your speakers.
When it comes to screwing, tubeglow is right. Additional material in the area of the screws is not wrong. It is best to use such nuts:
Einschlagmuttern M5 M6 M8 M10 galv. verzinkt DIN6930 Gewinde Einschlagmutter | eBay
Then the material thickness of the thread is sufficient.
When it comes to screwing, tubeglow is right. Additional material in the area of the screws is not wrong. It is best to use such nuts:
Einschlagmuttern M5 M6 M8 M10 galv. verzinkt DIN6930 Gewinde Einschlagmutter | eBay
Then the material thickness of the thread is sufficient.
Thanx for all the tips guys here !
As heading... thanx guy's")
I actually have the baffle 15" strenghtning under control, I either glue in a ring as Tubeglow wrote's or maybe just "stripes" of wood where the screws go into. If using ring's its not possible to use a complete one duo that the holes is near the side walls, so i will at least cut it into two pieces and just glue them in even when i allready glued the frontbaffle today...
I have some sheet'e of 4mm. bitumen pads allready on hand, will glue them into the horn champer, with vinyl and floor tack, excatly as Troel's does.
Regarding my routerskill's... Well i just use a lot of time thinking, and use a fresh bit for the cut's... glad you think it's nice through. - I have the green series Bosch router and a wooden guide i bough on ebay recently for the holes. The square cut's is just placing some straight wood, where router can glide on, scraping the corners with a very sharp "iron".
My plan is to verneer them, as the JBL's, the corners are 30deg.
Jesper.
As heading... thanx guy's
I actually have the baffle 15" strenghtning under control, I either glue in a ring as Tubeglow wrote's or maybe just "stripes" of wood where the screws go into. If using ring's its not possible to use a complete one duo that the holes is near the side walls, so i will at least cut it into two pieces and just glue them in even when i allready glued the frontbaffle today...
I have some sheet'e of 4mm. bitumen pads allready on hand, will glue them into the horn champer, with vinyl and floor tack, excatly as Troel's does.
Regarding my routerskill's
... Well i just use a lot of time thinking, and use a fresh bit for the cut's... glad you think it's nice through. - I have the green series Bosch router and a wooden guide i bough on ebay recently for the holes. The square cut's is just placing some straight wood, where router can glide on, scraping the corners with a very sharp "iron".My plan is to verneer them, as the JBL's, the corners are 30deg.
Jesper.
Attachments
Strips are OK, Ring is good, but best thing in your case would be mounting a 1/4 rectange cut out hole (the size that it touches the sides) and then fixing it to the inner sides and front with F clampsand a lot of glue. You should still be able to get in the 1/4 holed rectangle into the hole. This way you get most of the benefits of a thicker baffle, especially dissipating some vibrations into the side panels and stronger front baffle.
Some peopel like the threaded inserts some hate them. They are a bit easier to use in MDF than HDF and in my opinion a predrilled hole with wood screws works best/easiest. Also Troels is not a fan Tips and ideas Copyright 2012-14
Test the threaded inserts or even the drilling first on some piece of mdf to get a feel for them before doing this on your mounted speakers. Better safe than sorry. You are far along. Actually that practice piece of MDF (No flush mounting) can be cut into 4 parts and then used as the woofer brace afterwards.
Keep up the good work
Regarding the routing. Still good work and no ripping. Its HDF which is easier but still good job looks like you took your time and its professional.
Hi...
I'am in for doing it your'e way so to say Tubeglow...
But i'am having a hard time understanding what you exactly mean, especially the part here
Is it possible you can mockup a quick drawing ?
Thank's; Jesper.
I'am in for doing it your'e way so to say Tubeglow...
But i'am having a hard time understanding what you exactly mean, especially the part here
but best thing in your case would be mounting a 1/4 rectange cut out hole (the size that it touches the sides) and then fixing it to the inner sides and front with F clampsand a lot of glue. You should still be able to get in the 1/4 holed rectangle into the hole.
Is it possible you can mockup a quick drawing ?
Thank's; Jesper.
A staple clamp or a small screw can help prevent the T-nuts from twisting.
When it comes to wood screws, the quality of the MDF is always important. With HDF this is usually not a problem, but here in Germany MDF is often so bad at hardware stores that you can carve the inner layer with your fingernail. You have to be very careful not to overturn the wood screws.
In the end, the method is not important - the main thing is that the drivers are securely mounted.
You can glue a small piece of good plywood/hardwood to the hole's inner side. Not big, 3x3 cm is enough, 19mm thick.
Then you can use any kind of woodscrews you like, that piece/block will work as a nut and never falls. Better if you drill a pilot hole.
I like Spax woodscrews very much, inox and galvanized.
Then you can use any kind of woodscrews you like, that piece/block will work as a nut and never falls. Better if you drill a pilot hole.
I like Spax woodscrews very much, inox and galvanized.
Mooney wood pieces
...
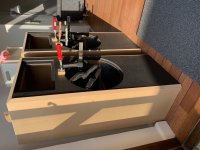
I ended up with my "first" plan, howto strengthen the 15" driver hole's...
I now have near 30mm. of material including the recess, and i feel good about it
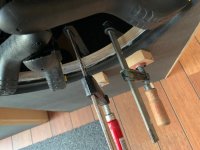
I will use thoose "special" speaker screw's and ofcause predrill the holes.
It will be some day's of break now i think, but i don't have so much more to do before i can put in the driver's and the horns... Actually i think i'am done with the wood's' now, just missing to glue in the bitumen pad's.
Thank's everyone for helping me into the right direction here.
Jesper.
...I ended up with my "first" plan, howto strengthen the 15" driver hole's...
I now have near 30mm. of material including the recess, and i feel good about it
I will use thoose "special" speaker screw's and ofcause predrill the holes.
It will be some day's of break now i think, but i don't have so much more to do before i can put in the driver's and the horns... Actually i think i'am done with the wood's' now, just missing to glue in the bitumen pad's.
Thank's everyone for helping me into the right direction here.
Jesper.
Attachments

I usually pre drill for the wood screws, and put wood glue in the hole before entering the screw to strengthen the MDF. Do not overtighten the screw, wait for the glue to dry. After the screws can be tightened again. Wood glue does not stick to the metal screw, so it is not stuck from glueing. It only creates a 'thread' in the hole, be sure to enter the screw incorrectly in the 'thread' if you take it out.
Super glue (cyano) in the hole can work too, but it has to dry before the screw is inserted, or the screw can be stuck in the hole.
Super glue (cyano) in the hole can work too, but it has to dry before the screw is inserted, or the screw can be stuck in the hole.
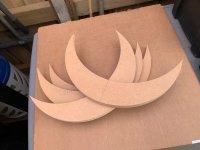
Hi Jesper sorry to have not been more concise and late in responding. The idea was having a rectangular sheet the size that it would connect the two sides of the speaker together placed behind the front baffle. In this rectangle you would have routed the hole for the woofer. Because such a board would not fit into the preglued speakers hole you need to cut the rectangle with the routed hole into four pieces, actuall two as you did would likely work if there is enough space inside the cabinet. The idea is to extend the baffle behind by thickening the section around the hole until it extends to the sides or in your case connects to the lip your baffle is glued to. Thus it forms a thicker baffle around the woofer hole and stronger support for the baffle.
You pretty much did that anyway Just with a moon. I assume there was no space between the hole and the lip so this works fine. Again looks like you know how to use a router And you seem to be a man of action, keep up the good work.
Second what Rallyfinnen says about pregluing. This way you can take off the driver many times without worry, creates a non metal threaded damping nut, not made of metal but of glue Don't overtighten! And seeing the thickness of the baffle countersunk baffle that was a good idea to give it extra material. Now you can party hardy if you choose or do low level listening with less cabinet noise however you want with no regrets.
Cheers
. The idea was having a rectangular sheet the size that it would connect the two sides of the speaker together placed behind the front baffle. In this rectangle you would have routed the hole for the woofer. Because such a board would not fit into the preglued speakers hole you need to cut the rectangle with the routed hole into four pieces, actuall two as you did would likely work if there is enough space inside the cabinet. The idea is to extend the baffle behind by thickening the section around the hole until it extends to the sides or in your case connects to the lip your baffle is glued to. Thus it forms a thicker baffle around the woofer hole and stronger support for the baffle.You pretty much did that anyway
Just with a moon. I assume there was no space between the hole and the lip so this works fine. Again looks like you know how to use a router And you seem to be a man of action, keep up the good work.Second what Rallyfinnen says about pregluing. This way you can take off the driver many times without worry, creates a non metal threaded damping nut, not made of metal but of glue
Don't overtighten! And seeing the thickness of the baffle countersunk baffle that was a good idea to give it extra material. Now you can party hardy if you choose or do low level listening with less cabinet noise however you want with no regrets.Cheers
Last edited:
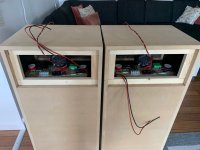
For tube amps I have now made an impedance linearization, marked in red in the picture.
Unfortunately, two RCLs are necessary for this, but except for the 82µF cap, all components are very small and inexpensive. For the Cs, electrolytic caps can be used without any problems. The resistors should be 20 watt types.
Would these components be acceptable? The resistance values for the coils were the only ones I could find that were close to the schematic.
001-6071: 82uF 100Vdc Jantzen Bi-polar Electrolytic Capacitor
001-6038: 12uF 100Vdc Jantzen Bi-polar Electrolytic Capacitor
000-1002 0.1mH Jantzen Air Core Wire coil AWG20, 0.8mm diameter wire, .190R
000-1350 0.27mH Jantzen Air Core Wire Coil AWG21, 0.7mm diameter wire, .405R
002-0949: Jantzen 20W Ceramic resistor, 12R
002-0940: Jantzen 20W Ceramic resistor, 6.8R
Hi here...
Tubeglow i figured out what you ment, regarding the enforcement of the baffle, and it's perfect...
The screw's are belive me real tight and the driver's are very very good attached.
I actually coulden't resist doing some more work, so i glued in the bitumen pads.
Jesper.
Tubeglow i figured out what you ment, regarding the enforcement of the baffle, and it's perfect...
The screw's are belive me real tight and the driver's are very very good attached.
I actually coulden't resist doing some more work, so i glued in the bitumen pads.
Jesper.
Attachments

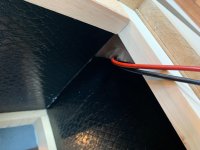
The layers do not have to be in contact over the entire surface. I simply attach them with a few staples. An electric staple gun is very helpful.
I have never directly compared different damping materials. To do this, you would have to build several identical speakers and fill them differently. I used to have access to very thick felt because of my previous job. This was perfect, but unfortunately you can't buy it. The pond fleece also works very well. The denim material is certainly comparable.
It is important that the inside of the walls is covered with at least 2-3cm (1inch) of relatively dense damping material in order to absorb mid-tone reflections. With which material this happens does not matter.
@Jesper:
Looks like the construction of your Asathor is close to the goal. I'm really excited to see how you like them.
Cheers ...
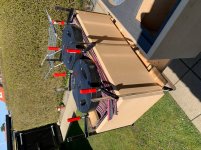
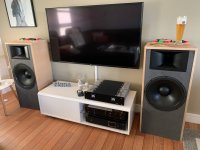
Evening all
So !
!
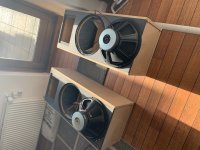
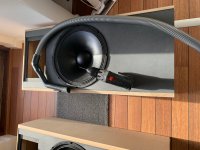
I took a listning to them today Rese66, to test if crossover's would get hot or not.
The back is not attached behind the tweeter champer cause of this btw.
- So no critical listning yet!
(I got parts for the impedance part, but didn't build it yet)
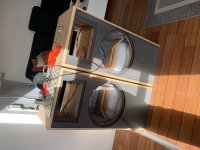
I had day off work today, and when my wife got home, she told me that the speaker's was really nice looking for her eye's, i'am a very lucky guy... and my wife is actually by profession educated to sell music (LP's / CD's etc... ) back in late 80's
I fired my AlephJ Mimi (~12-15w) up, and whooow them AsaThor's can play loud Rese... really loud. I newer really had the chance of listening to "horn" like speaker's with BIG woofer's and party stuff, but whoow they make a huge soundstage, and musicians are suddently at the middle of my livingroom, also even when i work away from the "sweet spot". - But again i will not make any critical listning as of now... But Rese, i really like that even when playing at low volume the soundstage and kind of hard to say soundpressure is very impressive... I think i will be very happy with them... but i must finish them first.
Jesper.
Evening all
So
!I took a listning to them today Rese66, to test if crossover's would get hot or not.
The back is not attached behind the tweeter champer cause of this btw.
- So no critical listning yet!
(I got parts for the impedance part, but didn't build it yet)
I had day off work today, and when my wife got home, she told me that the speaker's was really nice looking for her eye's, i'am a very lucky guy... and my wife is actually by profession educated to sell music (LP's / CD's etc... ) back in late 80's
I fired my AlephJ Mimi (~12-15w) up, and whooow them AsaThor's can play loud Rese... really loud. I newer really had the chance of listening to "horn" like speaker's with BIG woofer's and party stuff, but whoow they make a huge soundstage, and musicians are suddently at the middle of my livingroom, also even when i work away from the "sweet spot". - But again i will not make any critical listning as of now... But Rese, i really like that even when playing at low volume the soundstage and kind of hard to say soundpressure is very impressive... I think i will be very happy with them... but i must finish them first.
Jesper.
Attachments

- Home
- Loudspeakers
- Multi-Way
- Asathor - a JBL 4367 Clone