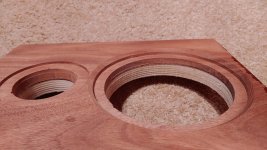
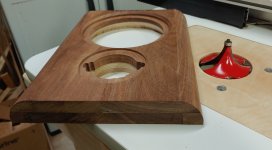
First pic shows the driver cut outs with the flange recesses. The tweeter terminal dog-ears have not yet been cut, and the chamfer on the backside of the mid has not yet been cut. This baffle was a composite layup of 3/4 inch solid wood and 3/4 plywood. I unfortunately cut the flange recess for the mid driver too deep, so I had to add a small chamfer on the front side... It could have been a real F**K-up, but I managed to salvage it and in the end, it looks good.
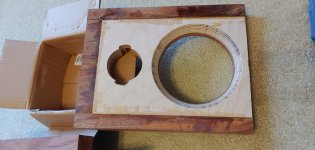
Second pic shows the backside 60 degree chamfer. Tweeter terminal dog-ears have been cut.
I am not sure how I would machine this hole on a assembled cabinet.
Second pic shows the backside 60 degree chamfer. Tweeter terminal dog-ears have been cut.
I am not sure how I would machine this hole on a assembled cabinet.
Attachments
I've seen this several times and still wonder why people rebate a driver prior to veneering.
This is the way Chris built all our loudspeakers. Veneer before the rebates.
And to address Cal’s query, Chris used an actual exact-knife.
dave
FWIW, not all my many builds over the years followed exactly the same procedure/sequence or used the same tools, and of course there’s more than one way to skin a cat, but in no particular order of merit, and to correct a couple of Dave’s assertions:
- I almost exclusively used flexible paper baked veneers in full 4x 8’ (sometimes larger) sheets, and post veneered after assembly completed. I found them much cheaper per square foot, and a full sheet could easily finish several small pairs of boxes and allow for alignment and mirror image / book matching of grain patterns - which on some species can be very dramatic.
- Yes a laminate trim router with a down spiral can do a perfectly fine job of trimming even across the grain, but I generally did at least all the latter by hand, with a cheap thick bodied Stanley 2” chisel, in a series of arcing downstrokes.
- Most of my builds with with smaller diameter “full range” single drivers with chamfers on rear side of through hole, and many of those with rebates shallower than the bearing and nut clearance on flush trim bits - even on something as small as the Amanda 3/16” . That, and the fact that I had access to a CNC routing machine that allowed for matching of all the cut outs and rebates even on multi-ways in a single operation determined my build and assembly sequence.
Driver, terminal and vent cut-outs were done by highlighting /lightly scorching the edges with nose of the iron and trimming with a utility “box cutter” knife (generally an Olfa L-5, to be precise), then sanding at a slight angle with 150/220g paper before sanding the rest of the enclosure.
Attachments

Last edited:
This baffle was a composite layup of 3/4 inch solid wood and 3/4 plywood.
That looks great but I would be a bit concerned at having real wood that thick glued to plywood. The solid wood is going to want to move with seasonal changes in humidity and the plywood is going to remain at the same dimensions. You may end up with joints failing or the panel delaminating. Recommendations I've seen are never to go more than about 3/8" thick for a veneer.
Well, what is done is done, and no splitting so far ") Actually I don't expect any trouble. In modern epoxy-fused wood boat building, it is a common practice to laminate solid wood to plywood in this same way, or to encapsulate plywood within solid wood. The joints between bulkheads and stringers, and between hull and bulkhead, often resemble the kind of construction seen in my baffle. You can also see this kind of construction in fully-glued-up butcher block table tops.
Actually I don't expect any trouble. In modern epoxy-fused wood boat building, it is a common practice to laminate solid wood to plywood in this same way, or to encapsulate plywood within solid wood. The joints between bulkheads and stringers, and between hull and bulkhead, often resemble the kind of construction seen in my baffle. You can also see this kind of construction in fully-glued-up butcher block table tops.
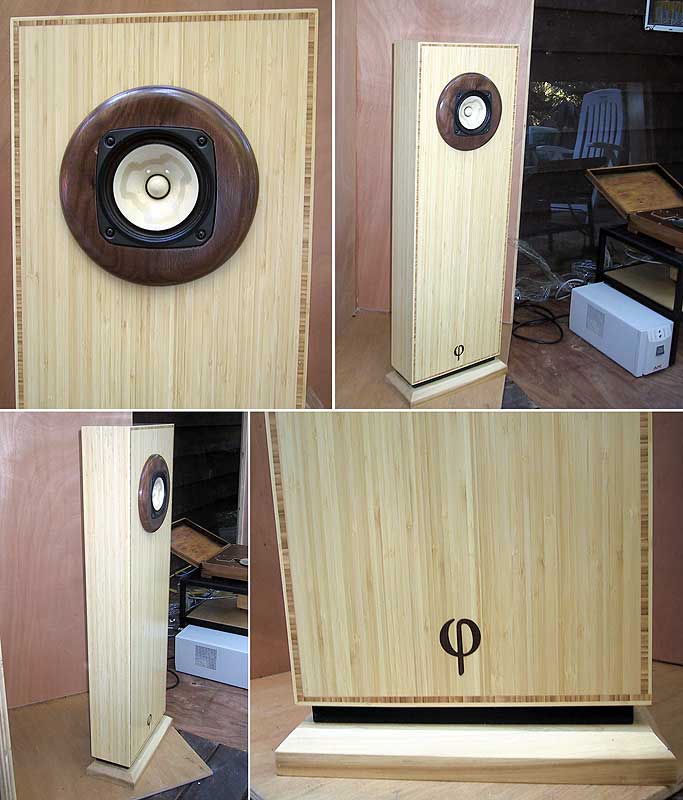
The reason I needed such a thick layer of solid wood is that I wanted to deeply profile my baffle, and I lack the veneer skills to do it with veneer. So I needed a solid wood edge of 1.5 inches thick
Actually I don't expect any trouble. In modern epoxy-fused wood boat building, it is a common practice to laminate solid wood to plywood in this same way, or to encapsulate plywood within solid wood. The joints between bulkheads and stringers, and between hull and bulkhead, often resemble the kind of construction seen in my baffle. You can also see this kind of construction in fully-glued-up butcher block table tops.The reason I needed such a thick layer of solid wood is that I wanted to deeply profile my baffle, and I lack the veneer skills to do it with veneer. So I needed a solid wood edge of 1.5 inches thick
Attachments
Lovely, hifijim!
Using solid wood has been discouraged by woodworkers but so far haven't had a problem. I have a walnut front panel 2way that's about 5 years old and haven't noticed any changes. This 3way has a poplar front panel and bottom section is joined to side ply panel with a tongue and a groove. But the Bin primer works so well at sealing that I'm now thinking about layering BB and profiling it and the bin primer will perfectly seal the exposed end grain-will see!
Using solid wood has been discouraged by woodworkers but so far haven't had a problem. I have a walnut front panel 2way that's about 5 years old and haven't noticed any changes. This 3way has a poplar front panel and bottom section is joined to side ply panel with a tongue and a groove. But the Bin primer works so well at sealing that I'm now thinking about layering BB and profiling it and the bin primer will perfectly seal the exposed end grain-will see!
Attachments
First off jifijim and Joel, that's some incredible work you have there and I absolutely understand the desire for thicker solid wood for that sort of profiling.
As I've been posting in my very first speaker build thread, I added a solid wood 'picture frame' border around the baffle so that I could add some profiling to the front. It won't allow me to do anything as significant as your designs but I will have something interesting I hope.
I had a look at a wood shrinkage calculator and put in the following assumptions:
Wood: yellow poplar
Width: 10 inches
Initial moisture content: 5%
Final moisture content: 10%
Shrinkage: 5/32 inch
This is a big assumption as I don't know the variation in moisture content where you are. The thick paint will also definitely help and a little more than 1/8" movement might not even be noticeable.
Doing the same for cherry ( I think that's what hifijim's gorgeous baffle has )
Wood: cherry
Width: 10 inches
Initial moisture content: 5%
Final moisture content: 10%
Shrinkage: 1/8 inch
Again it might well be fine, especially as in both cases we are talking about movement of the front of a panel rather than at or against a joint. I can tell you though that I have a couple of cherry picture frames on my wall where the mitres are not as tight as they were when I made them. I also have a cutting board that uses a mixture of cherry, walnut and maple, it was perfectly smooth when I made it, now I can feel ridges at the joints because the species have moved different amounts.
Of course the great thing about woodworking and I guess the same applies to diy audio, is something does break or deteriorate in some way, then you should always be able to fix it. Having seen your two excellent examples of baffle contouring, I may well use solid wood for my next baffle!
Thanks, Solarfish. I have never looked at a shrinkage calculator.
I had some poplar logs milled 3 weeks ago and the boards are stacked and drying. I had one thin 1/2 inch off cut that is drying inside the warm house. The piece is down to 12% moisture. I planed it a few times during the drying process. Its very stable with no splitting or checking and nice and flat. FWIW, poplar appears to be a good choice for Front Panels.
I had some poplar logs milled 3 weeks ago and the boards are stacked and drying. I had one thin 1/2 inch off cut that is drying inside the warm house. The piece is down to 12% moisture. I planed it a few times during the drying process. Its very stable with no splitting or checking and nice and flat. FWIW, poplar appears to be a good choice for Front Panels.
In woodworking the rule of thumb is that a layer of wood 1/8" (3.2mm) or thicker is a board and will behave like wood, less thick can be treated as a veneer. When laminating wood to wood or wood to plywood the seasonal movement across the grain needs to be considered to achieve a stable result. The most significant issue for stability is to balance the layup of wood and veneers to avoid warping and, in the most extreme case cracking of layers. Balance is achieved by starting with a single core layer, and then adding pairs of similar thickness layers at right angles to the layer beneath. That is why you will generally always find plywood with an odd number of layers and see that each pair of layers from the core out is matched in thickness and the thickness is consistent or decreases from the core out with the most expensive face veneers being the thinnest.
With your 3/4" solid wood on one side and 3/4" plywood on the other you have an unbalanced layup and the thickest ply is on the outside on one side only. The plywood component is itself balanced and will move little with humidity changes whereas the 3/4" solid wood will want to move crossgrain as humidity changes. Since it's bonded to the plywood it is constrained in expansion at the glue-line but not so on the free air side. The result will be that the composite panel will want to warp bowing out toward the solid wood when humidity rises and in toward the solid wood when humidity decreases.
The reason veneers are consistent or decrease in thickness moving away from the core in plywood is that the further from the center of the layup a layer is the more leverage it has in having it's movement warp the sandwich. So you have an unbalanced layup and the thickest layer is on the outside on one side. If the environment in which this item lives sees large seasonal variation in humidity it will certainly warp and possibly develop longitudinal cracks in the solid 3/4" layer. If humidity is very tightly controlled you might be OK, but in typical household conditions likely not.
Is there a case for lining the inside as well as the outside with veneer to balance out the stress? This reminds me of when I stained the outside of a removable front baffle, when it came to bolting on some square steel stiffening bars it became apparent that they had warped ( at first I thought that the steel was bent ). I solved it be staining the inside face until they straightened.
Last edited:
Is there a case for lining the inside as well as the outside with veneer to balance out the stress? This reminds me of when I stained the outside of a removable front baffle, when it came to bolting on some square steel stiffening bars it became apparent that they had warped ( at first I thought that the steel was bent ). I solved it be staining the inside face until they straightened.
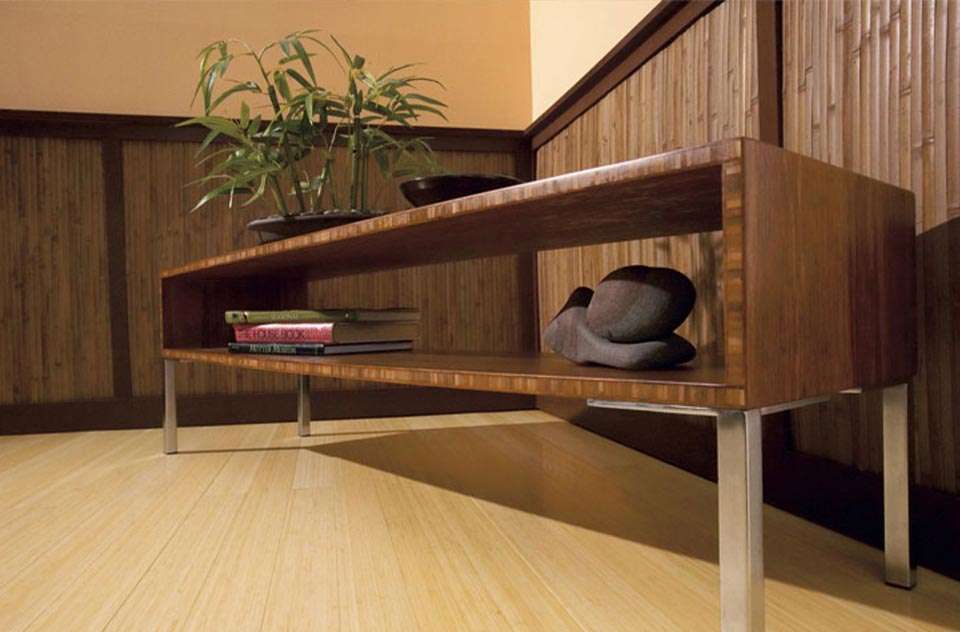
Before "plywood" and "particle board" were widely used in the furniture industry, panels were made with solid wood cores. These "cores" were built up with small pieces of pine or poplar glued together to form wide and long panels. These small pieces of lesser grade lumber were used to reduce or eliminate cupping or warping. They would also serve to save precious hardwoods for the veneer.
The panels had the finished veneer on one side with a lesser veneer on the other side of the panel to reduce or prevent unbalanced movement.
I don't think this is necessary for Plywood, Particle Board or MDF, although I have seen PB speaker boxes from the 1960's that had veneer on the inside, maybe this was just a hold-over way of doing things.
The primary reason for applying complimentary layers to panel faces is balance. Humidity, or lack thereof is the enemy. The layers not only equalize panel pull but also seal the surfaces from big swings in airborne moisture content. Sealing the backs of veneered panels used in an enclosure is good practice. Alternatively, a guy could use a paper "backer" sheet of laminate on the reverse side. This is very effective for counter tops and other applications that can't be held down (free span desk tops, etc). For a braced box though, I'd think that a bit of overkill.
@bedrock ... lumber core was the best.
@bedrock ... lumber core was the best.
Last edited:
Before "plywood" and "particle board" were widely used in the furniture industry, panels were made with solid wood cores. These "cores" were built up with small pieces of pine or poplar glued together to form wide and long panels. These small pieces of lesser grade lumber were used to reduce or eliminate cupping or warping. They would also serve to save precious hardwoods for the veneer.
I have disassembled many consoles with this construction. Bamboo plywood is of similar construction.
dave
I have disassembled many consoles with this construction. Bamboo plywood is of similar construction.
dave
Yes, those were the days. I love that type of construction, you can get thicker panels that are stronger and lighter than MDF or PB. I worked with a cabinet maker who learned the trade after WW2, he called it "Nova-Ply".
I've never worked with bamboo but it would be nice to build something with it.
@bedrock ... lumber core was the best.
Agreed.
Door manufacturers call it "Stave Core"
- Status
- This old topic is closed. If you want to reopen this topic, contact a moderator using the "Report Post" button.
- Home
- Loudspeakers
- Multi-Way
- Help expert woodworkers