So for a while I had a set of ‘78 Klipsch lascalas that I truly enjoyed the sound of. The mid bass hump, while not flat, was nice to listen to and I very much dig the love or hate “horn sound”.
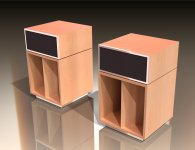
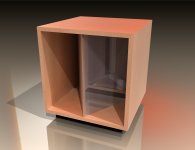
Only issue was I wasn’t in love with the 12 cubic foot black boxes in my listening room and wanted something a little nicer to look at and also that was in two pieces like the modern LaScala to make them a bit more manageable. I’d heard people have had great results with the K510 horn from the Jubilee so decided to go with that. (The 402 is just too huge to consider for me).
So CAD was thrown together based on LaScala plans and measuring the set I had, parts were ordered and things have started to arrive so I figured I would document the process here. Here’s a quick list of what the project consists of.
I’m open to suggestions for setting up the active crossover, I don’t have a ton of experience besides some basic room correction. I do have the umik-1 and minidsp 2x4. Oh and for amplification it will be a Bryston 4B for the low end and a 2B for the highs.
First post doesn’t have a ton of progress yet, I’m currently waiting on the horns, compression drivers and plywood. That said, I have the woofers and the motorboard and wings are being made from MDF as they’re not seen so that was started yesterday.
Only issue was I wasn’t in love with the 12 cubic foot black boxes in my listening room and wanted something a little nicer to look at and also that was in two pieces like the modern LaScala to make them a bit more manageable. I’d heard people have had great results with the K510 horn from the Jubilee so decided to go with that. (The 402 is just too huge to consider for me).
So CAD was thrown together based on LaScala plans and measuring the set I had, parts were ordered and things have started to arrive so I figured I would document the process here. Here’s a quick list of what the project consists of.
- 1” Russian birch for the outer panels to calm the resonances I noticed in the originals using 3/4.
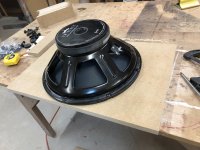
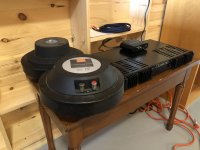
- Eminence Kappa 15C woofers for the bass bins.
- Klipsch K510 horn clone (thanks eBay)
- JBL 2446h compression drivers (was going to go b&c but found a good deal on these second hand so giving them a shot first)
- Minidsp for the EQ for the CD horn and crossover
- Two piece construction so if I for some reason hate it I can just build a top half with my Altec 511b’s and some CT120’s, use my ALK passive crossover and abandon active/two way (unlikely, but peace of mind is nice)
I’m open to suggestions for setting up the active crossover, I don’t have a ton of experience besides some basic room correction. I do have the umik-1 and minidsp 2x4. Oh and for amplification it will be a Bryston 4B for the low end and a 2B for the highs.
First post doesn’t have a ton of progress yet, I’m currently waiting on the horns, compression drivers and plywood. That said, I have the woofers and the motorboard and wings are being made from MDF as they’re not seen so that was started yesterday.
Attachments
-
 CF77D6D0-5561-4503-92ED-7ABC45192A03.jpeg364.4 KB · Views: 1,437
 -
 E0269491-55F7-4AF5-9AC6-B75AACC94DD6.jpeg489.6 KB · Views: 1,384
 -
 BD1CD37E-AD55-4664-AB2E-B03112DB7449.jpg881.7 KB · Views: 1,396
 -
 BCD9A69B-4B55-4066-A9C6-13D155A7C35D.jpg823 KB · Views: 1,414
 -
 97CED38B-651F-4132-A695-41D4F5EF11A1.jpg879.4 KB · Views: 1,320
 -
 082487AB-0FB5-460E-89D8-5791BB1F56FA.jpg1,015.5 KB · Views: 409
That's great. Let's hope that your build, including mods you may make in the future give you even more of the first, and less of the second.and I very much dig the love or hate “horn sound”.
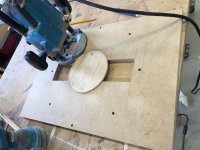
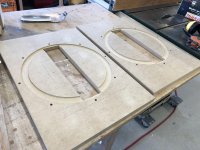
So one thing that needed doing was a little bit of extra wiggle room for the extension of the cone against the motorboard. This is something that will literally only ever matter at ridiculous volumes and isn’t built into the original design. That said, if I’m making it, I’d rather never worry about it. Built a quick jig and used a 1” plunge bit.
Attachments
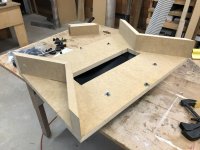
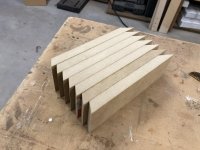
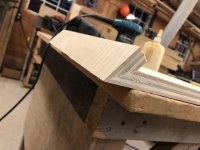
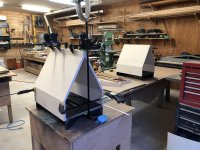
Today was a pretty chill day just creating a jig for the 60 degree bevels on the front edge of the doghouse for the LaScala clone bass bins. Still waiting on the nice plywood but did some test cuts and fits and I feel like this will be a solid method to get it done.
Attachments
Since it’s essentially identical to the LaScala cabs I had earlier I’m expecting 50hz, although mine measured down to around 40 in the room I had them in. I figure if I go into it expecting the same performance I had with passive crossovers and no dsp I can only be pleasantly surprised by anything I get with some active crossover/bigger power for headroom.
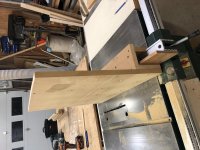
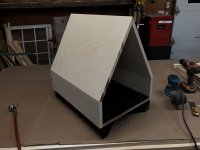
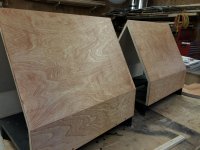
Plywood arrived today and the doghouse panels are cut. Fun fact, uncommon angles in woodworking are uncommon for a reason. Lord give me strength. So far so good but just a lot of cuts that are “good enough”.
Attachments
zeagan, To make your glue-up less fun, we used hot hide glue to adhere angled blocks to the cab surfaces. A strip of brown paper between the block and the plywood though. Then you can use a regular clamp like a wood hand screw or small jorgensen. Snap the block off and sand.
zeagan, To make your glue-up less fun, we used hot hide glue to adhere angled blocks to the cab surfaces. A strip of brown paper between the block and the plywood though. Then you can use a regular clamp like a wood hand screw or small jorgensen. Snap the block off and sand.
I should have checked the replies a little earlier. This will definitely come in handy on the next weird angle I have to clamp though. Thanks!
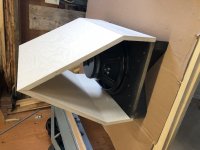
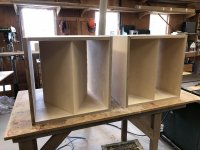
Little bit more progress, the first doghouse I was able to sand and touch up while also sealing all of the seams from the rear with silicone. The other one still has some time before the glue dries. They’re coming out even better than I was expecting so far and now I’m trying to figure out what I want to do for finish. It’s just too light for just oil I feel.
Attachments
Subscribed. I've always wanted to make some Lascala-type bins but sadly I do not have the room for them nor the distance to properly listen. Such an awesome speaker.
I'd love to build this -
Project | Homebuilt Hi-Fi - A user submitted image showcase of high quality home built hi-fi components.

I'd love to build this -
Project | Homebuilt Hi-Fi - A user submitted image showcase of high quality home built hi-fi components.
Thanks for the encouragement everyone, glad to see some people into gigantic speakers that can barely do bass haha.
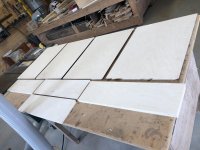
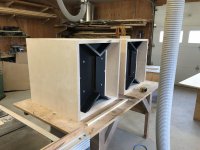
More updates: got the 1” ply cut for the box sides, the initial cuts were definitely a two man job but thankfully had help. Just mocked everything up to pick the best faces to have facing out and hiding the few patches in the ply where they won’t be seen. These will be butt joints like the originals mostly because I don’t hate myself enough to attempt mitres.
More updates: got the 1” ply cut for the box sides, the initial cuts were definitely a two man job but thankfully had help. Just mocked everything up to pick the best faces to have facing out and hiding the few patches in the ply where they won’t be seen. These will be butt joints like the originals mostly because I don’t hate myself enough to attempt mitres.
Attachments
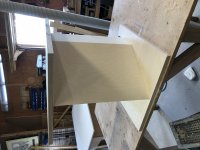
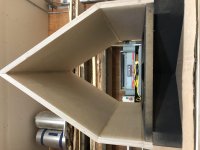
Finish has been applied, while I was a little panicked at first about the colour it is looking nice to my eye after the second coat and I took a sample inside and under non-shop lighting it’s quite nice. It’s a “golden pecan” oil based stain and a satin clear will be going over top of it.
Attachments
More updates: got the 1” ply cut for the box sides, the initial cuts were definitely a two man job but thankfully had help.
Must not have a "dead man"? Shop's not complete without one
")
- Home
- Loudspeakers
- Multi-Way
- Not exactly small two way project - horn loaded, active crossover, Jubescala clones.