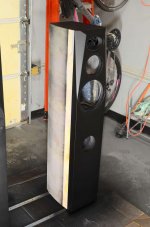
Spent the week laying down primer, sanding, touching up some missed pinholes, and sanding some more. Finally laid down 3 coats of flat black today and I'm pretty darn happy! Absolutely no telegraphing of joint lines. The lower front looks a bit blotchy because it's still drying.
I'm going to let them dry until Sunday morning and then lay some veneer down on the sides") Until then I'll be giving the garage a much needed cleaning from bondo dust and overspray
Until then I'll be giving the garage a much needed cleaning from bondo dust and overspray


I'm going to let them dry until Sunday morning and then lay some veneer down on the sides
Until then I'll be giving the garage a much needed cleaning from bondo dust and overspray Attachments
Last edited:
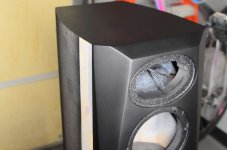
Thanks, I'm happy with how they came out. I still have a couple more coats of tung oil to apply to the veneer. I also need to add the cabinet spikes after I finish tuning them (they're sitting on stick-on chair slides right now)
I spent a hour or two auditioning them with everything from Fleetwood Mac to Tool to Lil Jon, and my initial impression is that they're smooth. Nothing stands out as sounding harsh or severely out of balance, although my reference standards are pretty low!
Next steps are to tweak the port length and take some FR measurements on and off-axis, although it'll be a few weeks since I'm long overdue on fall yard work
So after a couple weeks of sitting back and listening to the speakers, I finally had some time to take some measurements. My general impression prior to measurements was:
Measurement setup (I inserted the mic into PVC pipe and then onto a broom handle per recommendations:


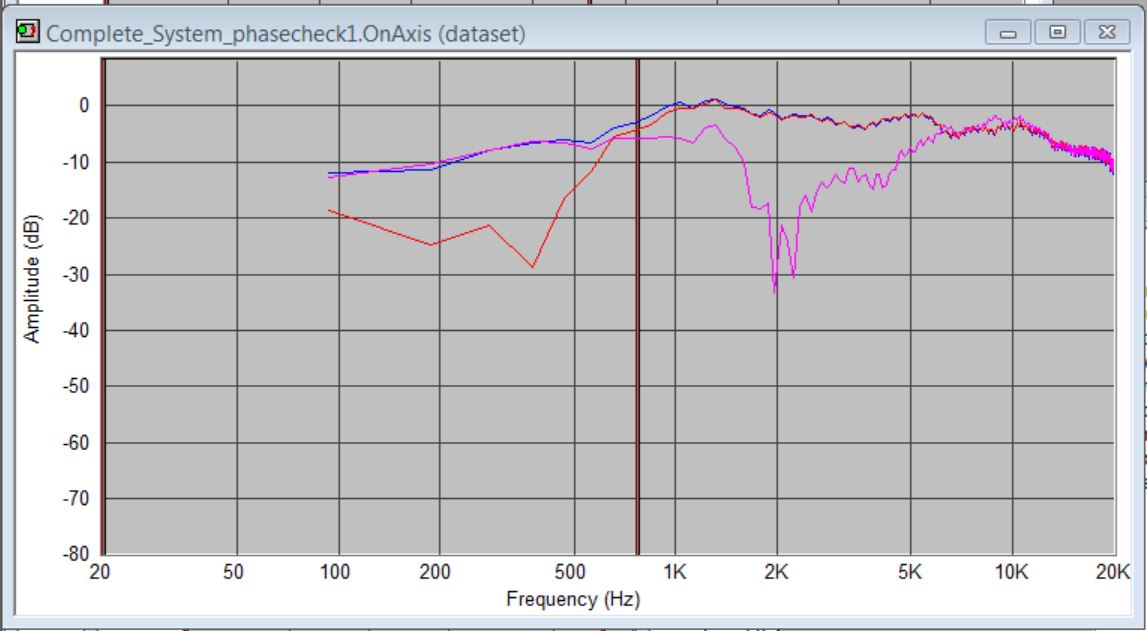
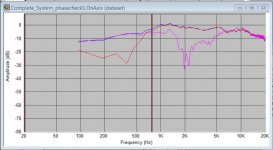
First I checked driver phasing. I previously did a quick RTA sweep and found that the woofer looked to need its polarity reversed.
Blue - Mid & tweeter normal, Woofer reverse polarity
Red - All normal polarity (null created at the mid/woofer crossover point)
Pink - Mid electrically normal, woofer and tweeter reversed polarity
Looks like my initial wiring was optimum:
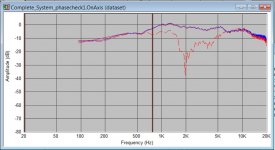
I moved swapped over the second cabinet with the intention of just doing a comparison check, but I quickly realized that I had the tweeter wired reversed as compared to the first cabinet. The huge null around the 2khz crossover point sure would explain why higher frequency imaging was bad (if not non-existant)!
Blue - "Baseline" Cabinet #1
Red Dashed - "Baseline" cabinet #2
Red Solid - "Fixed" cabinet #2
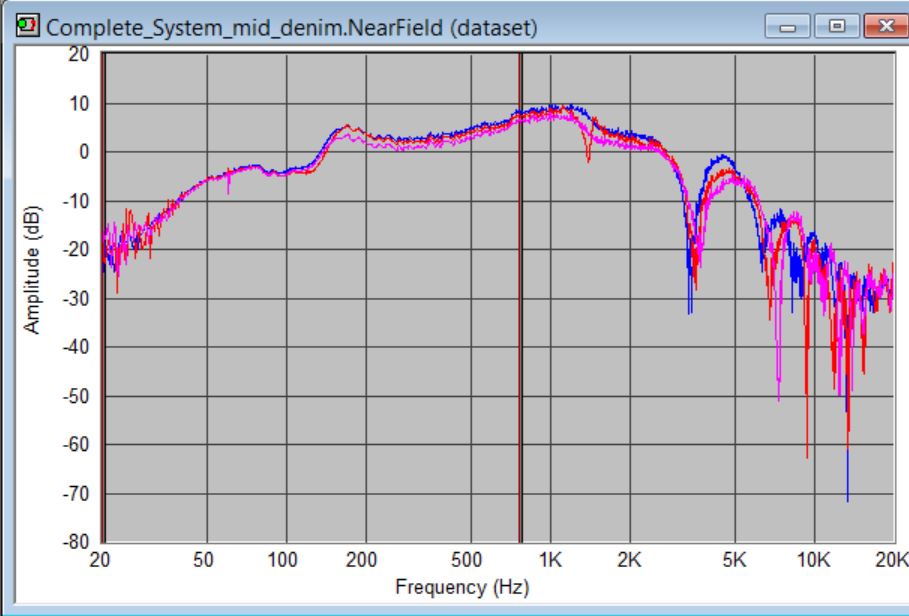
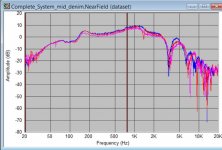
With phasing confirmed, I took nearfield measurements of the mid with a couple different stuffing configurations in the midrange enclosure. It's amazing how effective denim insulation is.
Red - empty chamber
Blue - Lined w/ denim insulation
Pink - denim insulation lining with polyfill on top.
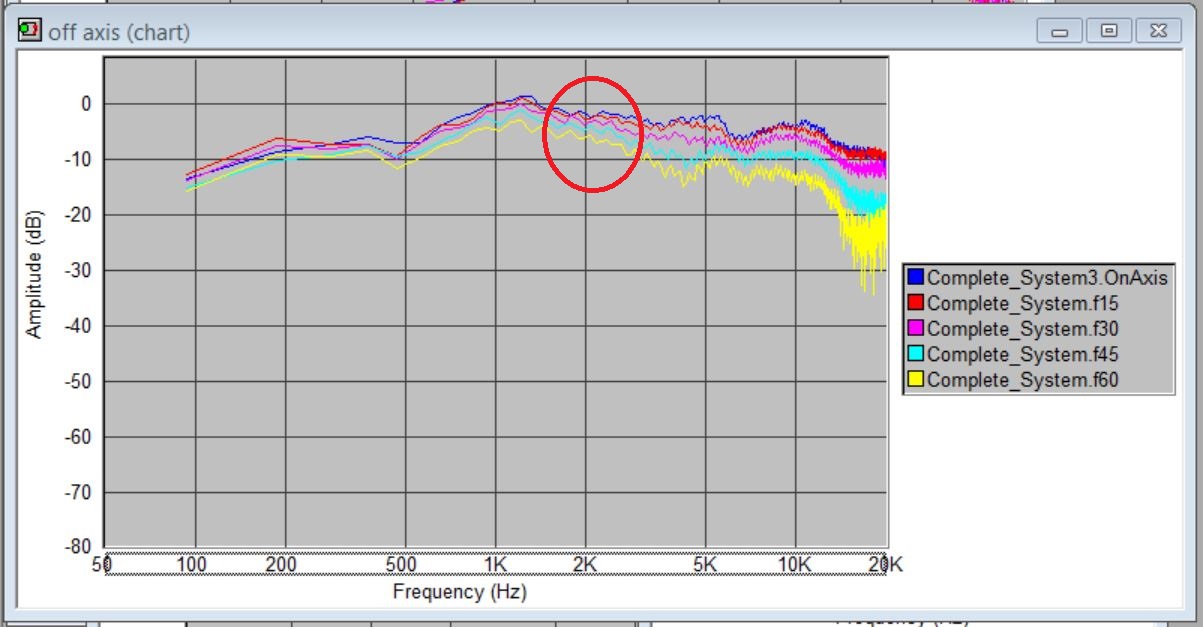
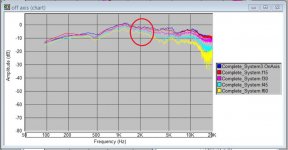
Moving on, I swept through FR measurement from on-axis through 60deg off-axis. The integration of the mid to the tweeter seems to have turned out very well, although I'm eager to hear thoughts from the more seasoned designers on here.
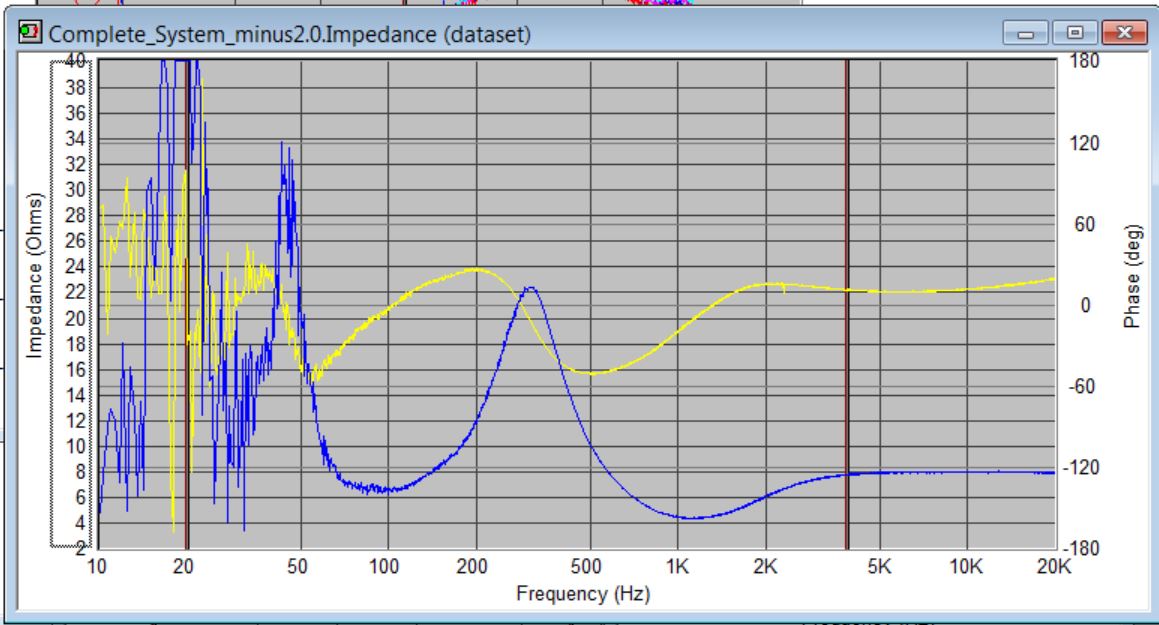
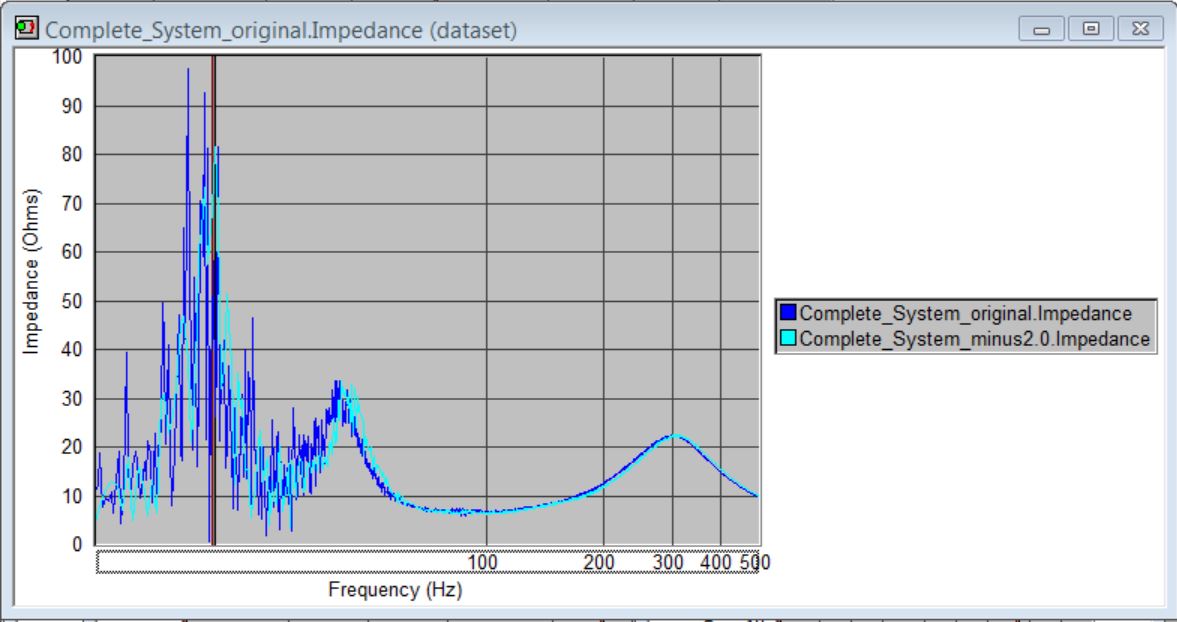
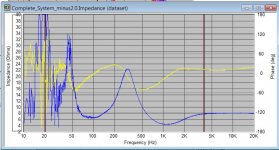
I need to do a bit of investigating on the hump in the ~800-1500hz range. I see a similar hump in the tweeter nearfield measurements posted earlier, so I'm thinking I might need a bit of tweaking on the HP side of the 2khz crossover. This hump also seems to match the dip in impedance shown below:
System impedance:
Finally I did a bit of trimming on the port. The enclosure came out somewhere between 1.75 and 2ft^3 (unsure of how much larger the stuffing/lining made it behave. I started with an 8.375" long port which should have given a tuning of around 25hz. After a couple trim/measure cycles, I ended up taking off 2" for a 6.375" long port (2.45"ID) which should yield a tuning of around 30hz.
Theoretical transfer function (Red = untrimmed, Trimmed lies somewhere between the Green and Blue traces)

..and the corresponding impedance measurements which corroborate an upward shift in tuning of a few Hz (Dark blue = untrimmed, cyan = trimmed)
I've only had maybe 30 minutes to flip through some tracks, but imaging is (as expected) MUCH better. Much better impact with drums and bass guitar, and an overall much more balanced bass sound without needing any EQ. I'm going to let myself get used to them again for a few weeks before taking some more measurements in an attempt to address the 1khz bump. I also want to get some better low-freq in-room FR measurements to see how the bass looks. My gut feeling is that I might want to shorten the port by maybe another 1/2", but I don't want "boomy" club-style bass or overbearing bass guitar.
As always, any constructive criticism and interpretation is appreciated!
- Vocals generally imaged well, epecially make and lower toned female vocals
- Instruments w/ higher frequency content (Cymbals, horns, electric guitars didn't image well and seemed pulled to the side. Without having a good reference set of speakers, I wasn't sure if it was the material or the system
- Low frequency extension was good (ie - movie effects) but kick drums lacked punch. A bit of EQ was needed to balance out the low end
--This wasn't unexpected since intentionally left the port a bit long to allow it to be shortened to tune it in - Material with a lot of electric guitar seemed a bit "in your face", and I was expecting to need to attenuate the tweeter a bit
Measurement setup (I inserted the mic into PVC pipe and then onto a broom handle per recommendations:
First I checked driver phasing. I previously did a quick RTA sweep and found that the woofer looked to need its polarity reversed.
Blue - Mid & tweeter normal, Woofer reverse polarity
Red - All normal polarity (null created at the mid/woofer crossover point)
Pink - Mid electrically normal, woofer and tweeter reversed polarity
Looks like my initial wiring was optimum:
I moved swapped over the second cabinet with the intention of just doing a comparison check, but I quickly realized that I had the tweeter wired reversed as compared to the first cabinet. The huge null around the 2khz crossover point sure would explain why higher frequency imaging was bad (if not non-existant)!
Blue - "Baseline" Cabinet #1
Red Dashed - "Baseline" cabinet #2
Red Solid - "Fixed" cabinet #2
With phasing confirmed, I took nearfield measurements of the mid with a couple different stuffing configurations in the midrange enclosure. It's amazing how effective denim insulation is.
Red - empty chamber
Blue - Lined w/ denim insulation
Pink - denim insulation lining with polyfill on top.
Moving on, I swept through FR measurement from on-axis through 60deg off-axis. The integration of the mid to the tweeter seems to have turned out very well, although I'm eager to hear thoughts from the more seasoned designers on here.
I need to do a bit of investigating on the hump in the ~800-1500hz range. I see a similar hump in the tweeter nearfield measurements posted earlier, so I'm thinking I might need a bit of tweaking on the HP side of the 2khz crossover. This hump also seems to match the dip in impedance shown below:
System impedance:
Finally I did a bit of trimming on the port. The enclosure came out somewhere between 1.75 and 2ft^3 (unsure of how much larger the stuffing/lining made it behave. I started with an 8.375" long port which should have given a tuning of around 25hz. After a couple trim/measure cycles, I ended up taking off 2" for a 6.375" long port (2.45"ID) which should yield a tuning of around 30hz.
Theoretical transfer function (Red = untrimmed, Trimmed lies somewhere between the Green and Blue traces)
..and the corresponding impedance measurements which corroborate an upward shift in tuning of a few Hz (Dark blue = untrimmed, cyan = trimmed)
I've only had maybe 30 minutes to flip through some tracks, but imaging is (as expected) MUCH better. Much better impact with drums and bass guitar, and an overall much more balanced bass sound without needing any EQ. I'm going to let myself get used to them again for a few weeks before taking some more measurements in an attempt to address the 1khz bump. I also want to get some better low-freq in-room FR measurements to see how the bass looks. My gut feeling is that I might want to shorten the port by maybe another 1/2", but I don't want "boomy" club-style bass or overbearing bass guitar.
As always, any constructive criticism and interpretation is appreciated!
Attachments
-
 20201115_080436.jpg404.9 KB · Views: 204
 -
 20201115_080453.jpg306.2 KB · Views: 208
 -
 phase check, speaker 1.jpg82.7 KB · Views: 179
 -
 phase check, speaker 1vs2.jpg91 KB · Views: 38
 -
 off-axis.jpg134.8 KB · Views: 1,012
 -
 system impedance.jpg125.1 KB · Views: 192
 -
 Enclosure stuffing.jpg82.4 KB · Views: 182
 -
 port tuning.jpg147.9 KB · Views: 181
 -
 Low HZ impedance.jpg90.5 KB · Views: 194
Last edited:
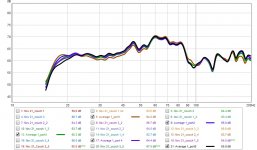
Spent some time this morning doing some additional trimming of the ports. I'll be adding a sub for HT duty, so I'm more than happy to trade of sub-20hz extension for a couple dB in the 30-40hz range!
Each trace is the average of 3 mic positions in the normal listening area. The maroon trace (Average 1_port1) is where I started, with the black trace where I ended up. Ended up trimming the port down from around 6 7/8" to 4 5/8". Tuning should be in the low 30s now, but I'll be confirming with impedance measurements eventually. I'll spend a couple weeks listening to them before considering further adjustments.
Time to toss a coat of polyurethane on them and go do some yardwork while it's drying
Attachments
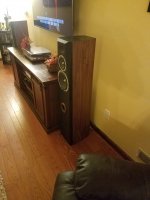
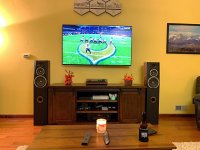
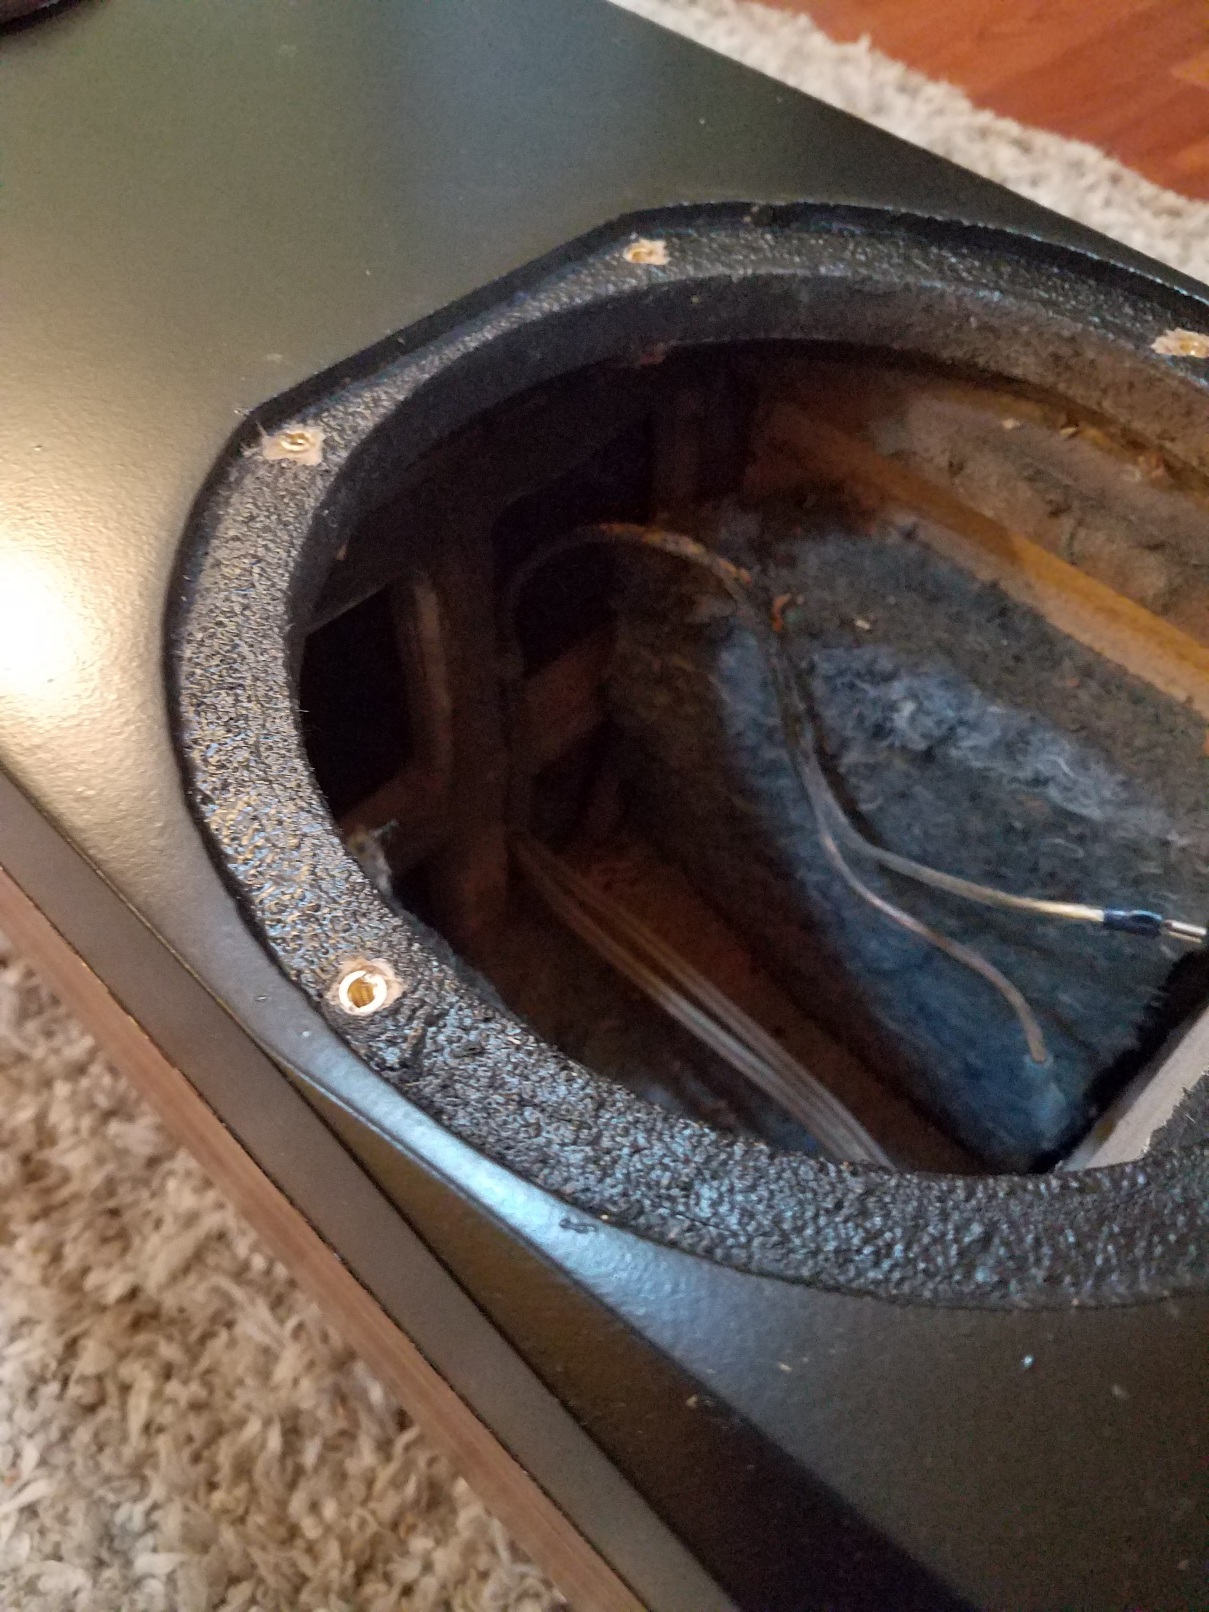
Pretty much finished up the cosmetics this week. Layed down 3 coats of Varathane Satin water-based polyurethane, which I'm very happy with. I also found that a few of the mounting screws were starting to strip out, so I installed EZ-Lok #8-32 threaded inserts. Speaker spikes are installed and the ports are epoxied in. Only thing left is to potentially swap the zinc plated machine screws with brass, since I'm luke-warm on how the silver screws look.
Attachments


- Status
- This old topic is closed. If you want to reopen this topic, contact a moderator using the "Report Post" button.
- Home
- Loudspeakers
- Multi-Way
- My long overdue 3-way tower build